Case Label Item Configuration and Printing
Item Case Configuration and Printing Case Labels. Purpose. Use Case Configurations to define the case sizes available for an item. Assign one or more case sizes per item — such as Each, Inner Case, o…
Item Case Configuration and Printing Case Labels
Purpose
Use Case Configurations to define the case sizes available for an item. Assign one or more case sizes per item — such as Each, Inner Case, or Master Case — so B2B buyers can select the appropriate purchase unit when placing wholesale orders.
Case Configurations are set at the item level. The Case Configurations section appears on all items, above Vendor Info.
Prerequisites
You must have permission to manage items in Flourish.
- Click Settings.
- Select User Roles.
- Select the facility you need.
- Click Configure next to the role.
- Locate the Admin card.
- On the Inventory line, ensure the View and Update toggles are on.
- Click Save.
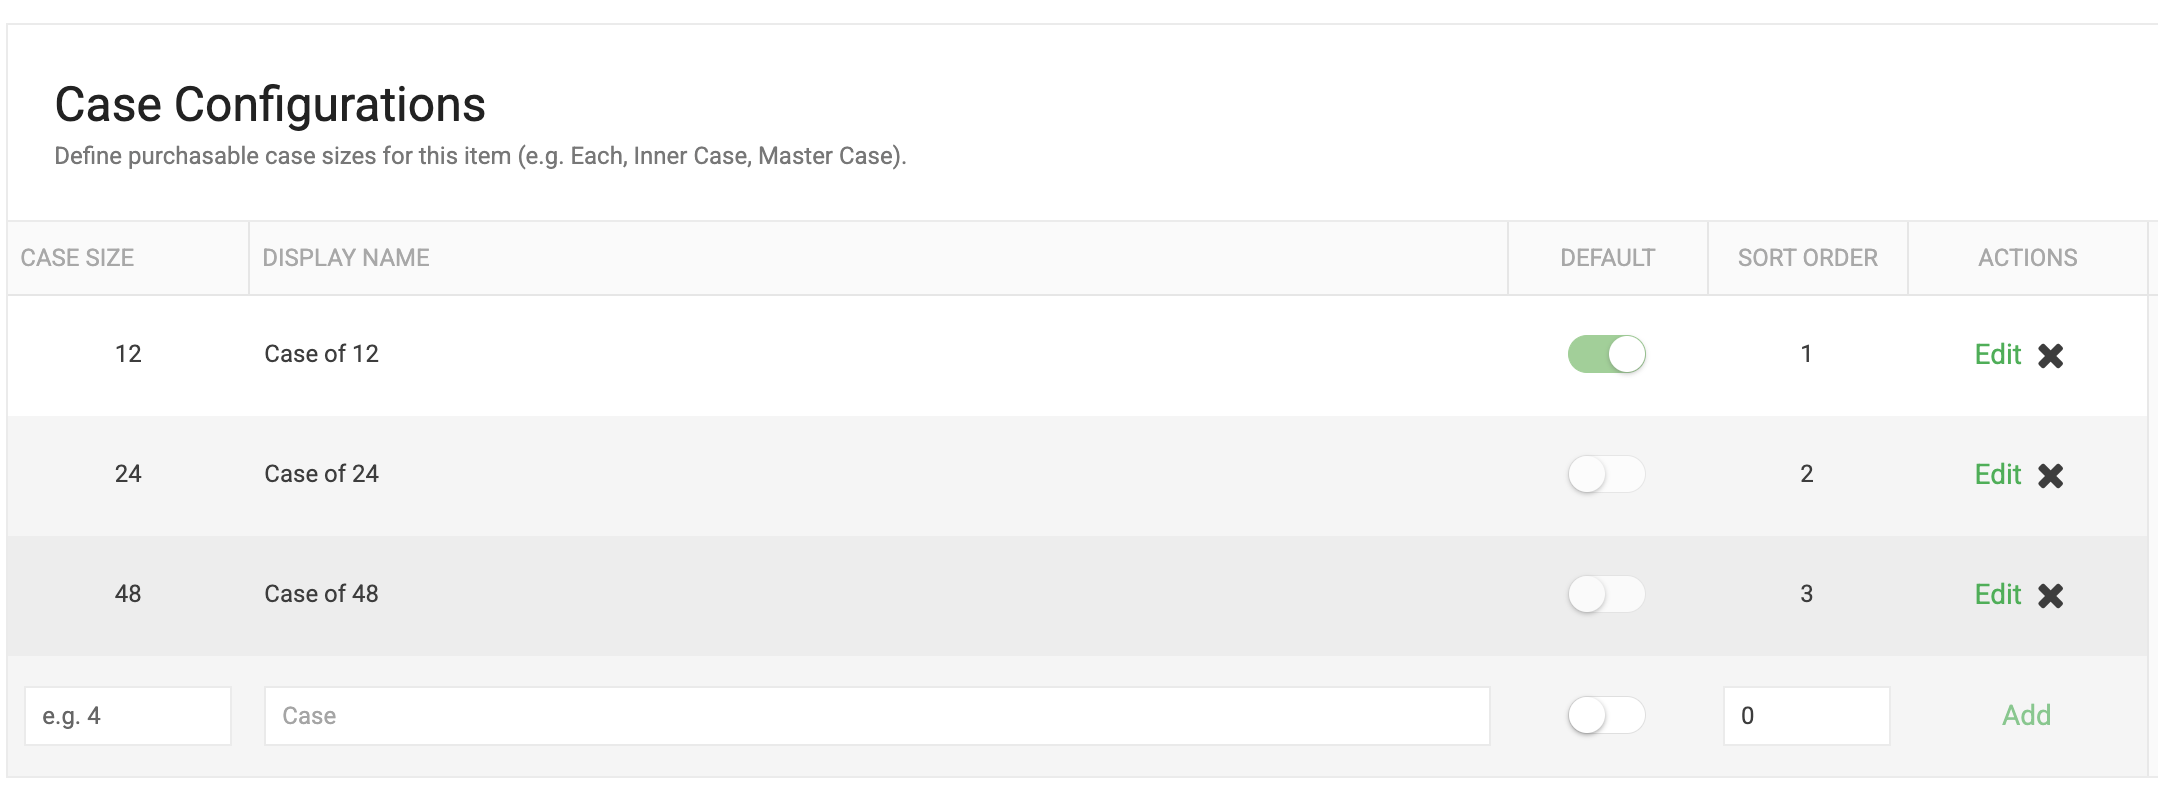
Add a Case Configuration
The Case Configurations section is only available after an item has been saved. It does not appear in create or clone mode.
- Navigate to Inventory and open an existing item.
- Scroll to the Case Configurations section, located above Vendor Info.
- In the blank Add row at the bottom of the grid, enter a value in Case Size. Enter the number of units per case. Enter 1 for eaches. Case size must be 1 or greater.
- Enter a label in Display Name. Common values include Each, Inner Case, Master Case, and Tray. If left blank, the display name defaults to Case.
- Toggle Default on if this should be the pre-selected case size for buyers. Only one case configuration per item can be set as the default.
- Enter a value in Sort Order to control display order in the unit-of-measure picker. Sort order auto-increments in steps of 10.
- Click Add.
Repeat these steps to add additional case sizes to the same item. Each case size must be unique per item.
Edit a Case Configuration
- Navigate to the item.
- Scroll to the Case Configurations section.
- Click Edit on the row you want to update.
- Update Case Size, Display Name, Default, or Sort Order as needed.
- Click Save.
To cancel without saving changes, click the X button. All values revert to their state before editing.
Change the Default Case Configuration
Only one case configuration can be marked as the default at a time. When you set a new default, the previous default is automatically cleared.
- Navigate to the item.
- Scroll to the Case Configurations section.
- Click Edit on the row you want to make the default.
- Toggle Default on.
- Click Save.
Deactivate a Case Configuration
Deactivating a case configuration removes it from the unit-of-measure picker without deleting it. You can reactivate it later.
You cannot deactivate the default configuration while other active configurations exist. Set a new default first.
- Navigate to the item.
- Scroll to the Case Configurations section.
- Click X on the row you want to deactivate.
- Verify the row is removed from the active grid.
Reactivate a Case Configuration
Deactivated configurations remain visible in the Inactive section of the grid.
- Navigate to the item.
- Scroll to the Case Configurations section.
- Locate the configuration in the Inactive section.
- Click Reactivate.
Example Case Configurations
Case Size | Display Name | Default |
1 | Each | Yes |
4 | Inner Case | No |
12 | Master Case | No |
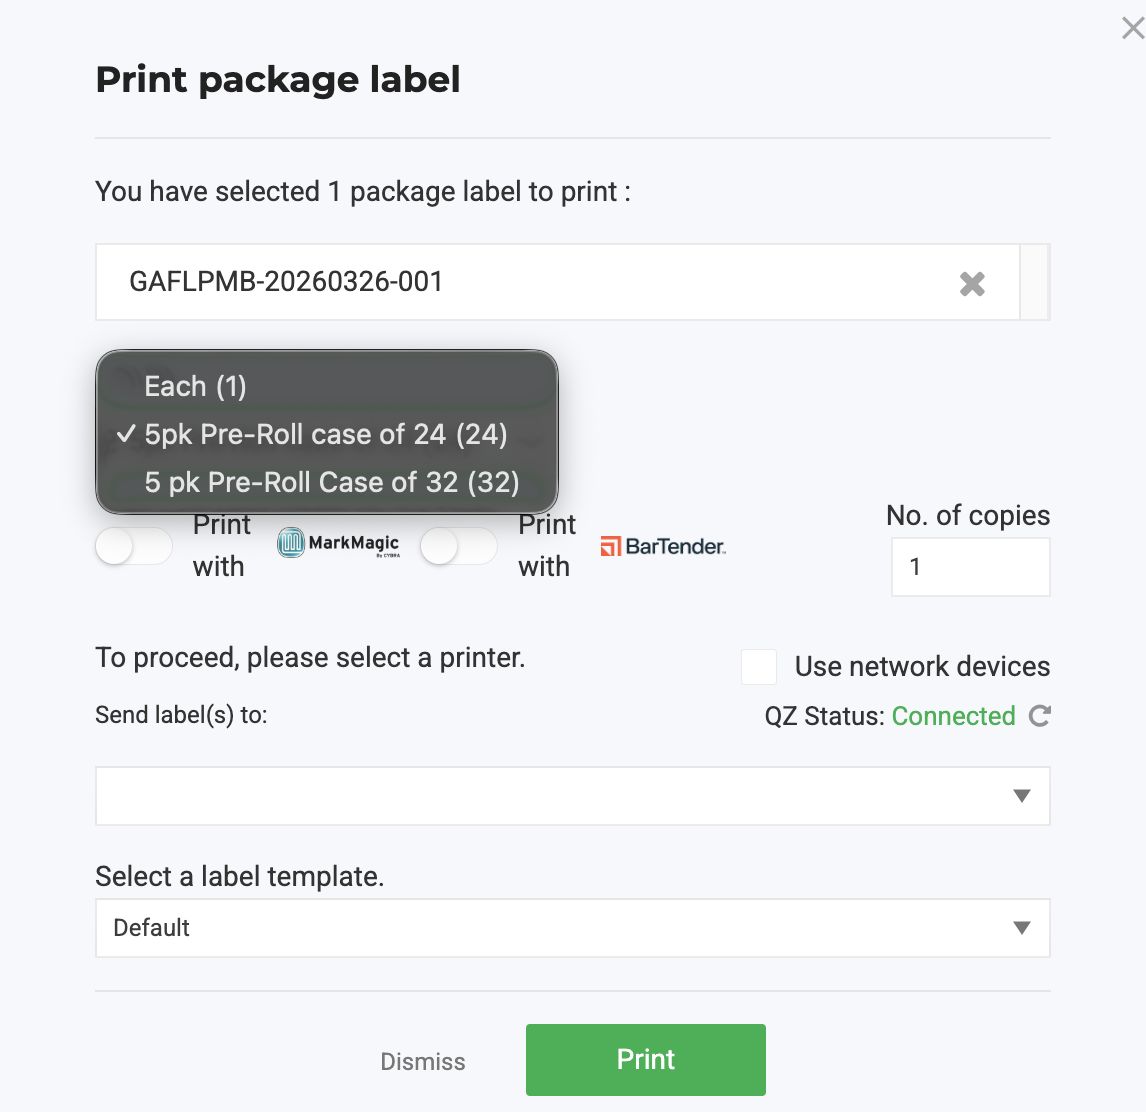
Print Case Labels for a Package
Purpose
When an item has case configurations set up, Flourish lets you print a label for each case within a package rather than a single label for the whole package. The print modal calculates the number of copies automatically based on the case size you select, and the scannable QR code on each label encodes the package ID with the case size suffix (for example, AZSHNMF-20260407-042|cs:12). This supports accurate case-level allocation and receiving workflows.
Prerequisites
The item must have at least one active case configuration. If no case configurations exist on the item, the Print as dropdown does not appear and the print modal behaves as normal.
For steps to set up case configurations on an item, see the Item Case Configurations article.
Print a Case Label
- Navigate to the package you want to print labels for.
- Click Print.
- In the print modal, locate the Print as dropdown.
- Select a case configuration (for example, Inner Case (12) or Master Case (24)).
- Flourish automatically sets No. of copies to the number of full cases (package quantity ÷ case size, rounded down). Adjust this number if needed.
- Confirm your printer settings.
- Click Print.
Each printed label includes a QR code containing the package ID with the case size suffix (for example, AZSHNMF-20260407-042|cs:12).
Print Individual (Each) Labels
If you need to print a standard package label instead of case labels:
- Navigate to the package.
- Click Print.
- In the Print as dropdown, select Each (1).
- No. of copies resets to 1. Adjust if needed.
- Click Print.
The QR code on each label contains the plain package ID with no case size suffix.
Notes on Mixed-Item Print Jobs
If you select multiple packages containing different items and open the print modal, the Print as dropdown is hidden. Print mixed-item jobs as individual packages to use case label printing.
BarTender Integration
Case label printing is supported in BarTender™. The Print as selection passes the case size to the BarTender template, and the QR code element maps to the case-encoded package ID field. No additional configuration is required if your BarTender template is already set up for package labels.
For BarTender setup, see the BarTender™ Integration article.
How did we do?
Bulk Item Create Instructions
Brand Management