Configure the Retail Purchase Receipt
Choose what prints on your retail sales receipt: license number, SKU, purchase date and time, footer text, item line layout, and more. Preview before you print.
Purpose
Control what prints on your facility's retail sales receipts without contacting Support. Receipt settings are saved per facility, so each retail location can have its own receipt. Changes apply to the next receipt you print or reprint.
Prerequisites
- A user role with access to facility Settings.
- A receipt printer set up for the facility. See Set Default Printers in POS.
Open the Purchase Receipt Settings
- Click Settings.
- Select Configuration.
- Select the retail facility you want to configure.
- Locate Retail, then Purchase Receipt.
- Change the settings you need. Changes save automatically.
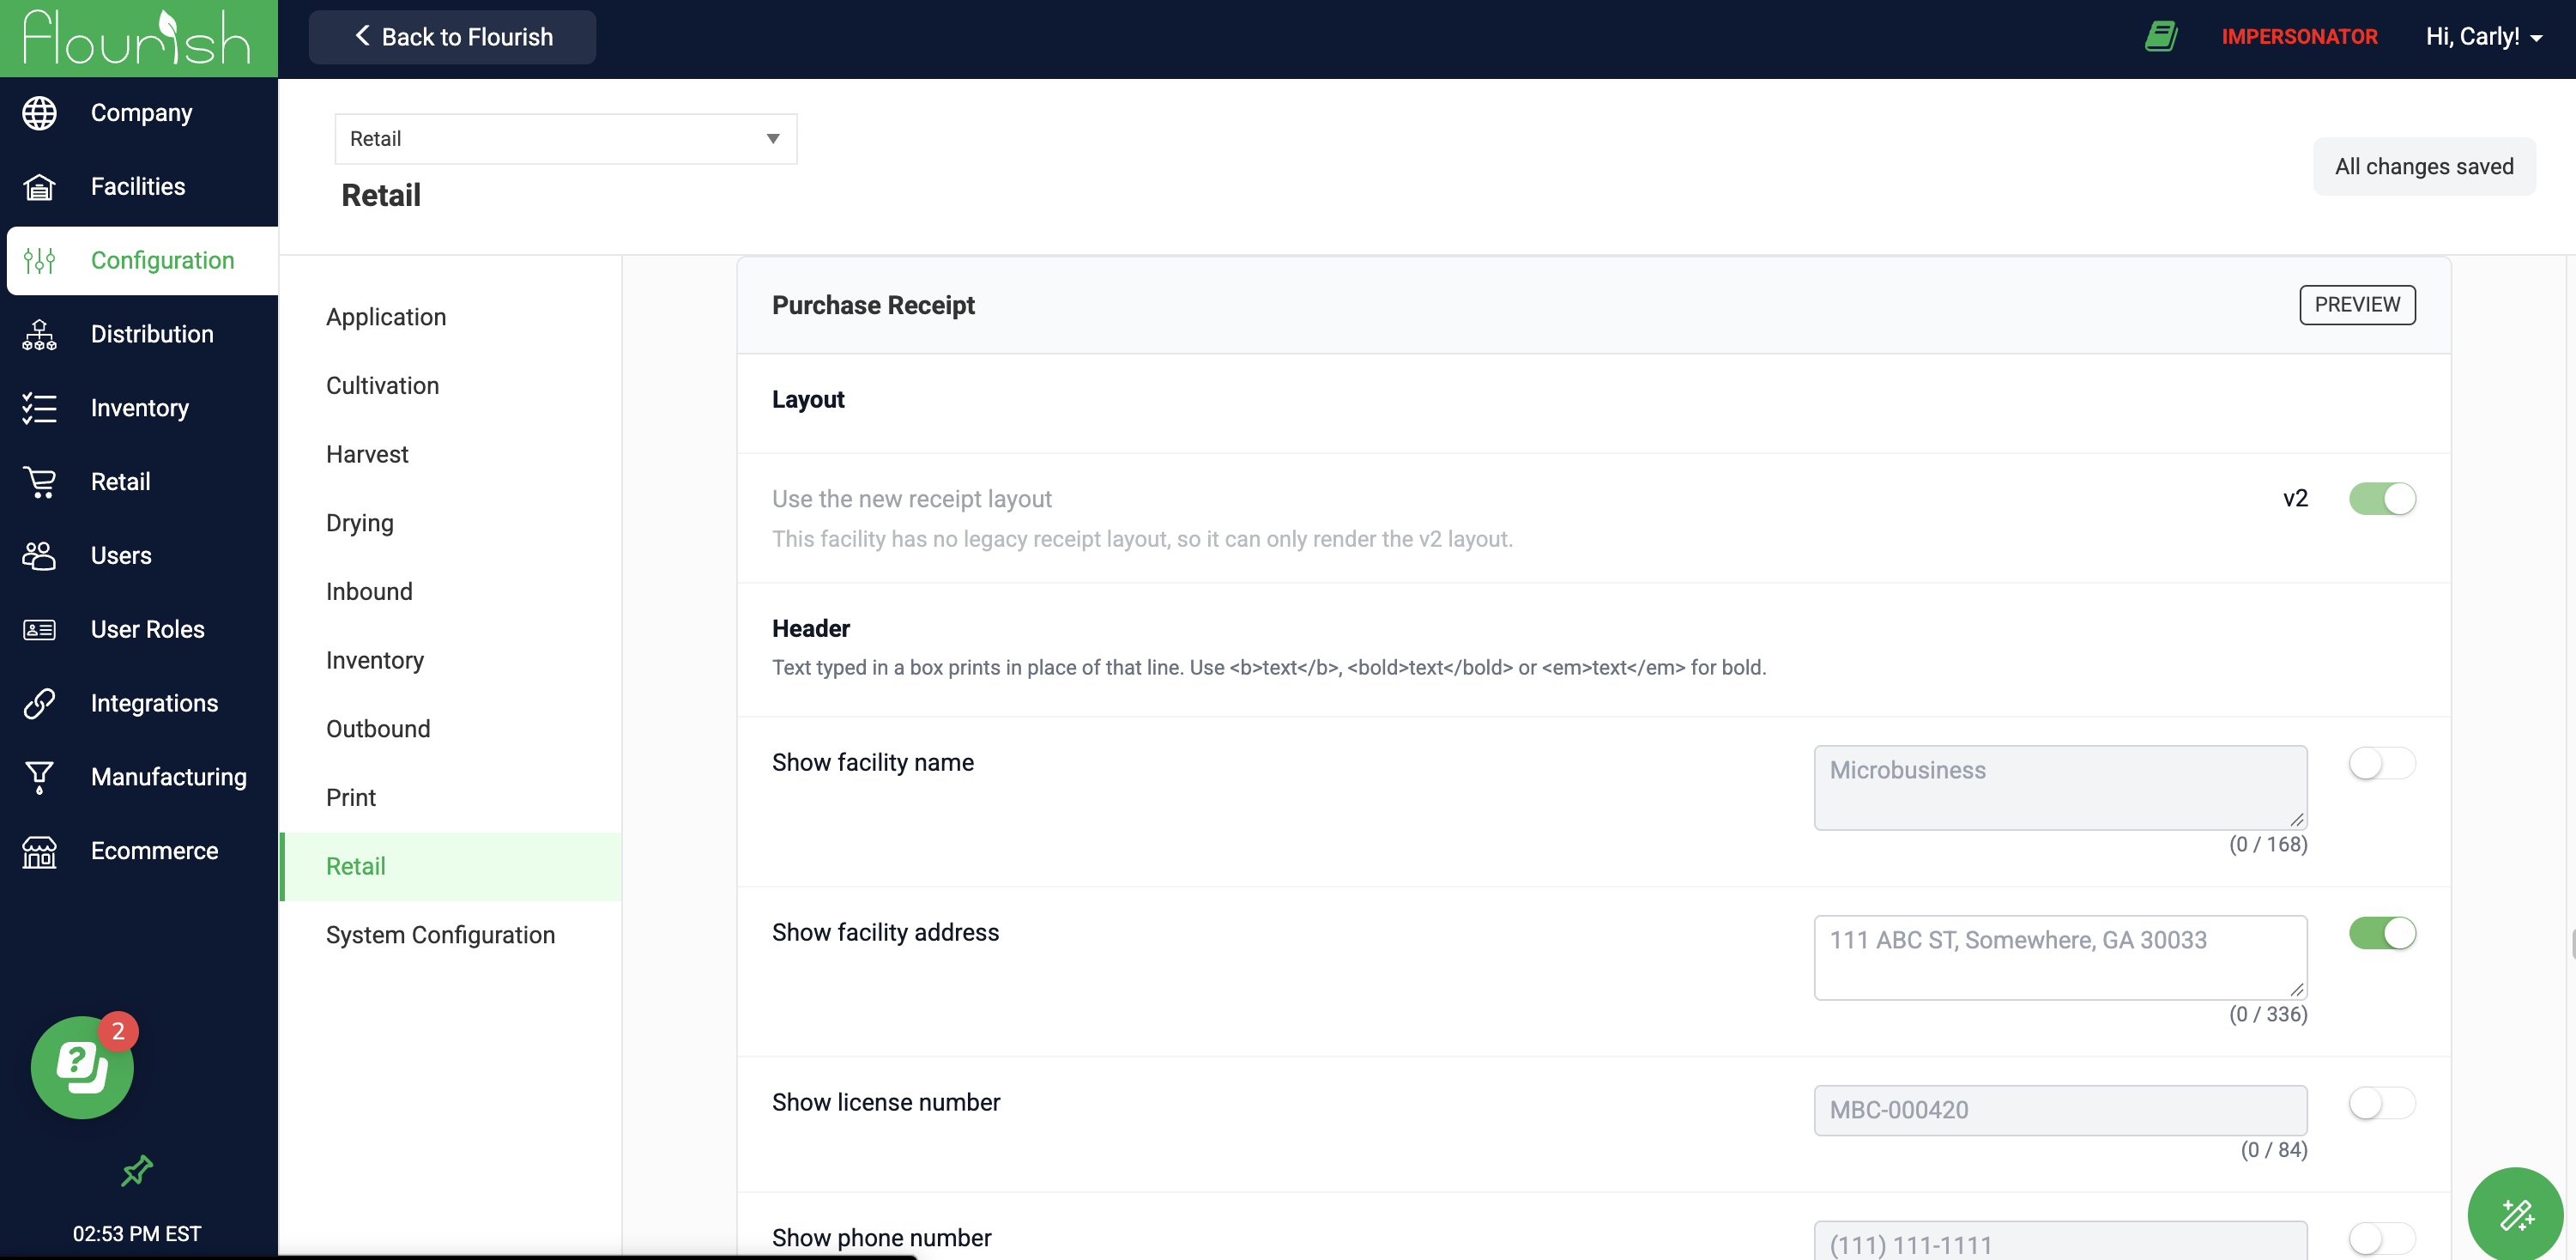
Choose the Receipt Layout
The Purchase Receipt section has two receipt layouts. [VERIFY: exact label of the layout selector and its two options, for example v1 and v2]
Layout | How it works |
v1 (original layout) | Your facility's existing receipt. Some lines depend on whether your state's receipts follow the medical or recreational format. Only the settings that apply to this layout are shown. |
v2 (configurable layout) | Every line on the receipt is controlled by the settings on this page. More settings appear when you select it. |
- Switching from v1 to v2 without changing anything else produces a receipt that looks nearly the same as before.
- If you switch back to v1, settings shared by both layouts, such as Show facility address, keep their latest values. Settings that only apply to v2 are hidden but kept, so they return if you switch to v2 again.
- A facility without an original receipt layout can only use v2. The layout selector is disabled and shows This facility has no legacy receipt layout, so it can only render the v2 layout.
Choose What Prints on the Receipt
Every toggle in this section reads as Show something. Toggle it on to print that element. Toggle it off to leave it off the receipt.
Setting | What it prints |
Show facility address | The facility's address in the receipt header. In v2, you can also edit the address text. |
License number | The facility's license number. |
Item SKU | The SKU on each item line. The item name always prints. |
Date of purchase and Time of purchase | The date and time of the sale. Each has its own toggle. |
Customer information: Date of birth, Delivery address, Full name, Mobile number, State, State registry ID/Med card no. | The selected customer details. |
Show tax breakdown by type | Each tax as its own line, in a consistent order on every print and reprint. You can use either the tax breakdown or a tax note, not both. See Show Tax Breakdown by Type on Retail Sales Receipt. |
Subtotal Before Rounding and Cash Rounding | The subtotal before cash rounding and the rounding amount, so the rounded total reconciles on the receipt. |
Round-up donation | The round-up-to-the-next-dollar donation amount, when the customer donates. |
Remaining purchase limit on medical orders (Rhode Island) | Prints Remaining gram limit on medical orders for a patient. It never prints a negative number; a customer over the limit shows 0. Available for Rhode Island facilities only. |
v2 has additional settings, including an item line layout, a lot label, a facility name override, and header lines.
Choose the Item Line Layout (v2)
In v2, select how each item line prints:
- Item-Price
- Item-Qty-Price
- Qty-Item-Price
Quantities print with only the decimals they need, for example 1 or 1.5. New facilities start with the layout their state used before.
You can also choose to print each unit as its own line instead of combining units of the same item. For example, an order of 3 of the same product prints as 3 lines with a quantity of 1.
Add Footer Text
- In Purchase Receipt, select the v2 layout.
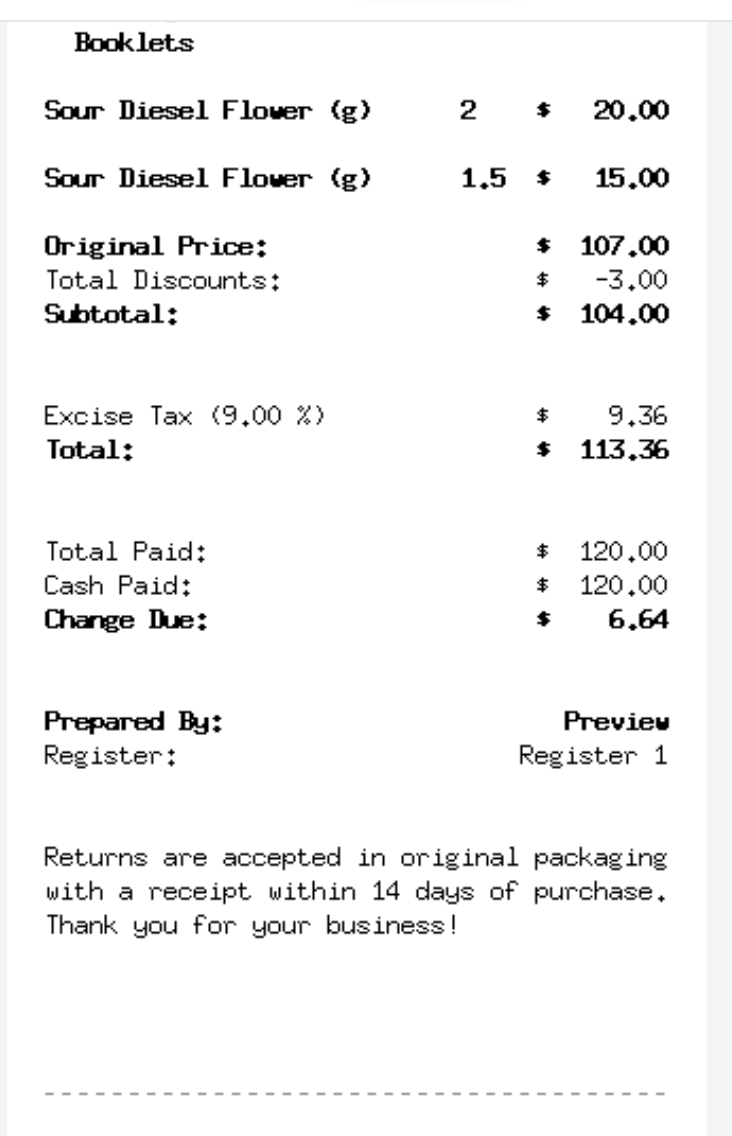
- Enter your text in the footer field, such as a return policy or a required state warning.
- The text word-wraps to fit the receipt and prints at the bottom.
- To emphasize a word or phrase, wrap it in <b> and </b>. <bold> and <em> also print as emphasis. Other formatting, such as centering or italics, is not supported.
- A character counter shows under the field. Formatting tags don't count toward it.
- Above 1,000 characters, the counter turns amber and shows Wow, that's long! with an estimate of the printed lines. You can still save.
- Above 2,000 characters, the counter turns red and shows Too long, and the text is not saved until you shorten it.
Other text fields, such as the tax note, facility name, address, and lot label, also show a counter and warn you when the text gets long.
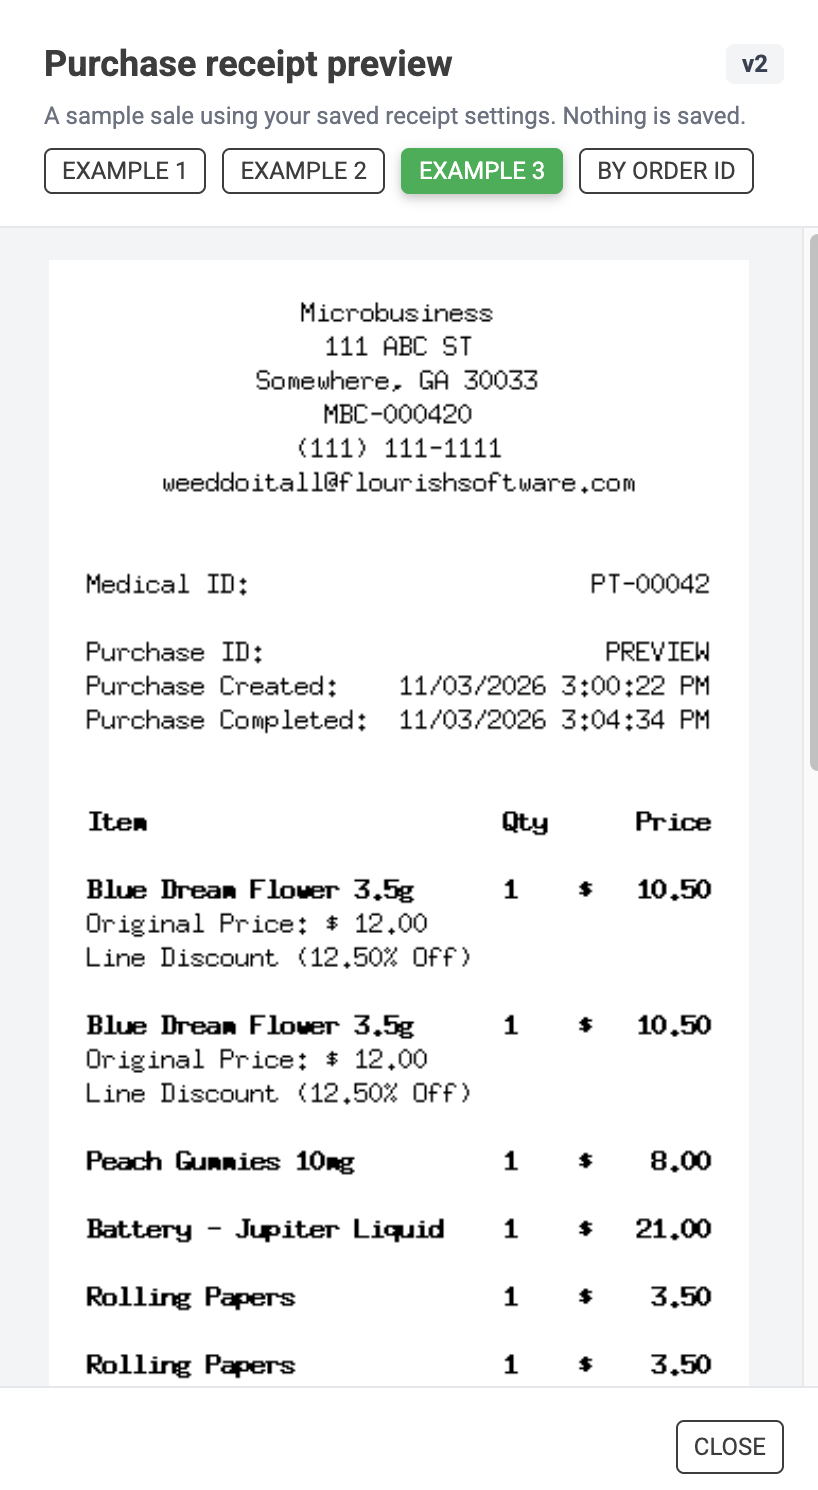
Preview the Receipt
Check your changes before you print a real receipt.
- On the settings page: open the receipt preview and choose one of the sample sales, or select By Order ID and enter an order ID to preview a real order with the current settings. Make sure you're looking at the right facility's settings.
- From an order in the web app: in the Print Receipt window, click Preview to see the receipt before printing.
Troubleshooting
If you see | Do this |
A setting you expected isn't on the page | Some settings only appear in the v2 layout. See Choose the Receipt Layout. |
You can't switch the layout back to v1 | The facility has no original receipt layout, so it can only use v2. |
The footer won't save and the counter is red | Shorten the footer to 2,000 characters or fewer. |
The footer field is greyed out | The facility is on v1. Switch to v2 to edit the footer. |
The printed receipt doesn't show a change | Confirm you changed the settings for the facility you're printing from, then reprint the receipt. |
How did we do?
How Retail Returns Sync to METRC
Set Default Printers in POS
