Table of Contents
Flourish Label Maker - Configure Labels
Understanding Label Configuration Settings. Flourish provides templates with standard static and reference fields for printing labels. Labels are managed at the Facility level. Flourish's Label Maker…
Understanding Label Configuration Settings
Flourish provides templates with standard static and reference fields for printing labels. Labels are managed at the Facility level.
Flourish's Label Maker can be found by navigating to:
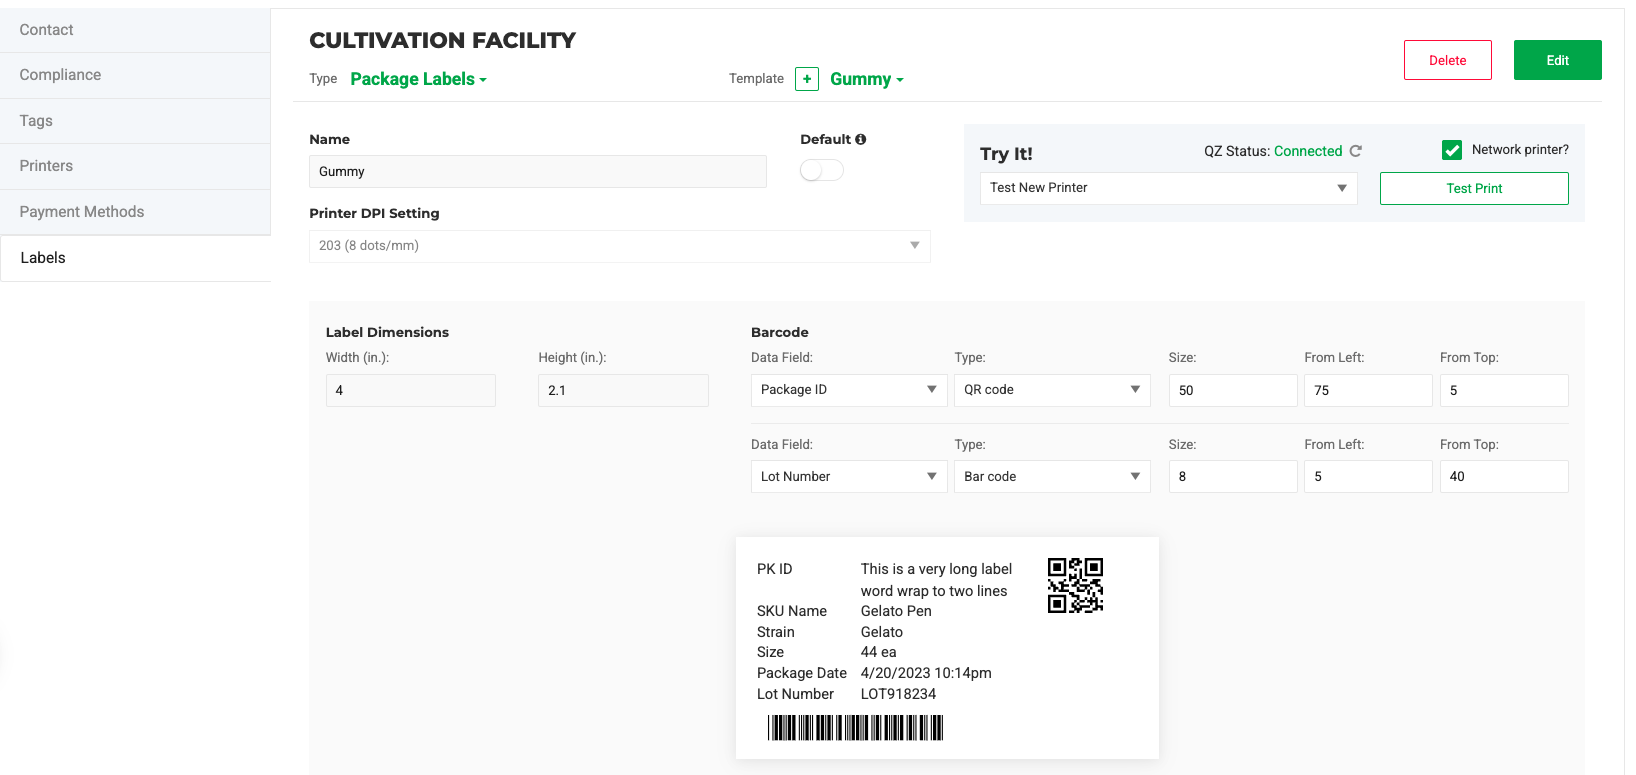
Manage Settings > Facilities > Click on your desired facility to configure labels > Click Labels > Click 'Type' Drop-down menu to choose the label type you want to configure.

# | Setting | Description |
Label Type | Select the appropriate label type
| |
Printer DPI Setting | Printers dots per inch (DPI) setting. Consult with your printer manufacturer for ideal settings for your machine | |
Test Printer | optional: Use a test printer as an emulator to test out new label designs | |
QZ Status / Network | Status of your QZ connection. You must have QZ Tray downloaded and configured to communicate with your label printer. Note: You might have to download a previous version: 2.0.12. | |
Label (width) (height) | Consult product information from your label manufacturer | |
Bar code/QR code | Select the appropriate barcode type. Note, click the + icon to add multiple scannable elements.
| |
Size | Font size | |
From Left / From Top | x/y axis for placement of the barcode data | |
Preview Label | Preview changes of label - this changes dynamically when your settings have been adjusted | |
Content Settings | Select what information you want to show on labels. Use the number values to place data on specific areas of the label. Use the Content column to customize data fields. |
Types of labels
- Customer Labels - Display details for the retail customer
- Harvest Package Labels - Cannabis compliance label on harvest packages
- Package Labels - Cannabis compliance label on any package
- Plant Labels - label individual plants
- Product Labels (Cannabis/Hemp) - label individual "Each" item within a package.
- Product Labels (Non-Cannabis/Hemp) - - label individual "Each" item.
- Serial Number Labels - Display a barcode and a serial number.
- Metrc Retail ID Label
Labels Data Elements
The Flourish label printer supports printing several types of data elements, including:
- Barcode / QR codes
- Dynamic Elements pulled from Flourish data fields
- Static Elements for headers and static text
- Calculated Elements from data within Flourish
Barcode / QR code
Display the following values:
- Package ID
- Lot Number
- SKU
- UPC Number
- NDC Number
- Part Number
- Lab Test URL
- COA Portal URL (if deployed)
Learn more about Multiple Barcodes/QR Codes on a Single Label
Dynamic Elements
Dynamic fields display live data from existing sources, such as packages, items, and test results.
Examples
- Package ID (The ID of the package).
- Lot Number (The Lot Number of the package).
- Brand (The Brand of the Item).
- Destination Name (If the package is allocated to an Outbound Order).
- Package Date.
- Expiration Date.
- Test Results (as calculated elements, depending on the UOM requirements).

Static Elements
Static Elements, unlike dynamic ones, are containers for constant information. They allow you to input text that will remain unchanged unless you modify it.
Examples
- "Warning: Keep Out Of Reach Of Children And Animals."
- License Number
Calculated Elements
Flourish Software calculates fields based on the data provided on the package or item. The data is calculated based on the relevant % lab results such as"THC%."
The Calculated Elements are:
"mg per g"
- Multiply the % of the field in the test results by 10.
Example: "CBG mg per g" element.
If your test result of the CBG% Element is 14%, the "CBG mg per g" element displays 140.
"mg per serving"
- Multiply the % of the field in the test results by 10 to get "milligrams per gram."
- Multiply milligrams per gram by the "Serving Size in Grams" field in the Item Level if that field is set in the Item level.
Example: "THC mg per serving" element.
- The test result of the THC% Element is 20%.
- The "Serving Size in Grams" is 5
"milligrams per gram" is 200, multiplied by 5, and the "THC mg per serving" field displays 1000.
Total Cannabinoid mg per unit
Example: "Lab Test Result Total THC mg Per Unit"
- Multiply the % of the THC % in the test results by 10 to get "milligrams per gram."
- Multiply milligrams per gram by the "Unit weight" field (Item Unit weight unless designed differently on the package)
- The test result of the THC% Element is 20%.
- The Unit weight is 3.5 grams.
The "milligrams per gram" value is 200, multiplied by 3.5, and the "Total THC mg per unit" field displays 700.
Similar elements (partial list):
- "Lab Test Result CBD mg per unit"
- "Lab Test Result TAC mg per unit"
- "Lab Test Result Delta-8 THC mg per unit"
- "Lab Test Result Delta-9 THC mg per unit"
<LOQ and ND Display on Labels (Arizona Only)
For facilities located in Arizona using non-custom label templates, Flourish will automatically display <LOQ or ND on a label in place of a numeric value when both of the following conditions are met:
- The lab test result level for that analyte is
0 - The lab's Note/Comment field for that analyte contains a value such as
<LOQorND
Flourish reads whatever text is stored in the note/comment field of the lab test result detail and prints it directly on the label for the corresponding analyte percentage field (e.g., THC %, CBD %).
Important limitations to be aware of:
- This behavior applies to analyte percentage fields only (e.g., THC %, CBD %). It does not apply to mg per unit, mg per serving, or mg per g label elements.
- This feature only runs for Arizona facilities. Facilities in other states will display numeric values or a dash, not the comment text.
- Custom label templates are not supported. If your facility uses a custom label template,
<LOQandNDwill not be automatically substituted.
<LOQ or ND text is not appearing on your labels, confirm that: (1) your facility state is set to Arizona, (2) you are using a non-custom label template, and (3) your lab test results have the note field populated with the appropriate text and the result value is set to 0.Working with Dose-Based Products
If you are configuring labels for capsules, edibles, tinctures, drinks, or other dose-based products, see the Labeling Guide for Dose-Based Items for guidance on how unit weight, serving size, and COA results interact with your label calculations.
Configure labels
Basic Settings
In the basic settings area, define:
- Type - The Type of the label
- Name of Template – Give your label a clear, descriptive name. This displays to the end user when prompted to print.
- Template - Select a name of an existing template to View/Edit or click
 to create a new template
 - Default – Enable this to make the template your default for printing.

- Printer DPI Setting – Match this to your printer’s resolution for accurate scaling.
- Label Dimensions – Set the exact height and width of your label.
- Barcode – Choose whether and how barcodes are displayed. See Multiple Barcodes/QR Codes on a Single Label.
- Try It! – Use this to print a test label and confirm alignment and content.
Multiple Barcodes/QR Codes on a Single Label
Display multiple barcodes or QR codes on a single label to include key data such as Package ID, Lot Number, or Lab Test/COA URLs — ensuring all required information is easy to scan and compliant with state regulations.

- Select an existing template or click the ‘+’ icon to create a new one.
- Choose the Barcode Data Field from the dropdown:
- Package ID
- SKU
- UPC
- NDC
- Part Number
- Lot Number
- Lab Test URL
- COA Portal URL (if deployed)
- Select the Type:
- Bar Code
- QR Code
- None (no display)
- Define Dimensions and Positioning for the code:
- Size
- From Left
- From Top
- Click the
 icon to add another code, then repeat steps 2–4.
 - Click the trash can
 icon to remove a code line.
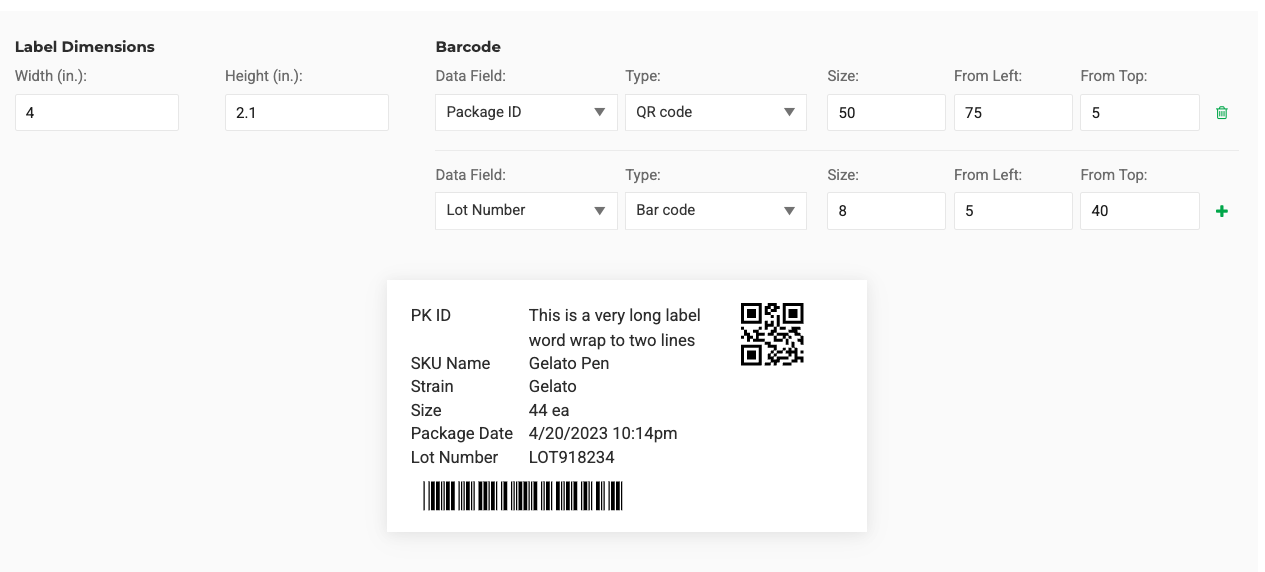
- Click Save to finalize the label codes.
Element Settings
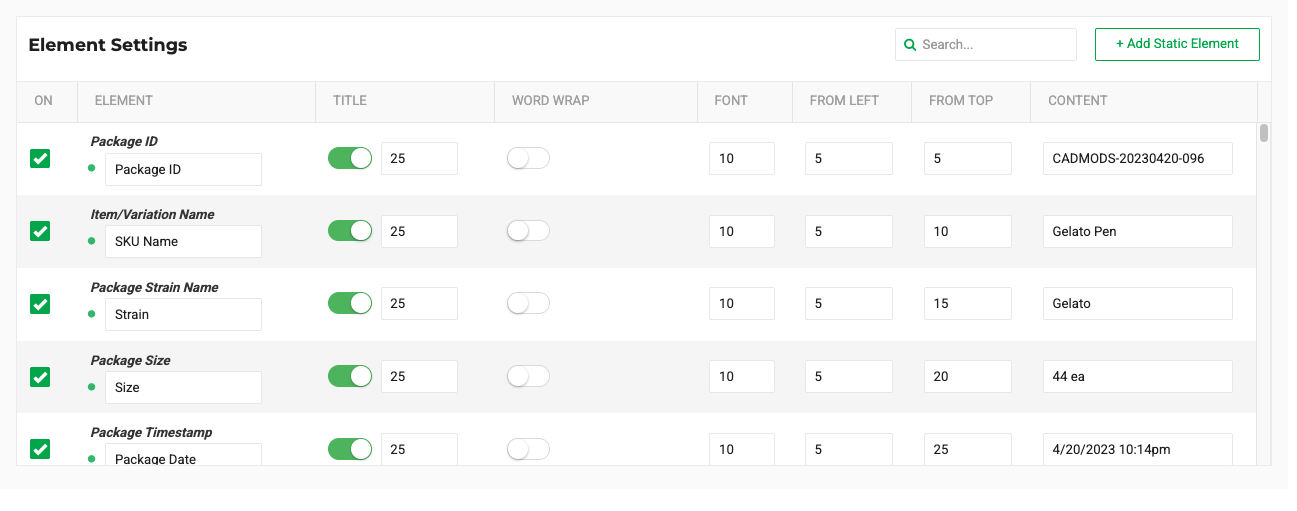
This section defines what data elements appear on your label and how they’re displayed.
- Search – Quickly find any data field you want to include.
- On – Toggle the element line on or off to show or hide it.
- Element – Select the data element you want to print (e.g., Package ID, Lot Number, COA Portal URL).
- Title –
4a. Turn the title display on or off.
4b. Define the title text that appears before the data (e.g., “COA Link:” or “Lab Test URL:”).
4c. Set the title width to control how much space it takes. - Word Wrap –
Use Word Wrap to control how text appears on your labels — set the number of lines and the width for longer text fields to improve readability and layout consistency.
5a. Set the number of lines the text should wrap to.
5b. Define the width of the wrapped text area—longer text will be truncated if it exceeds this width.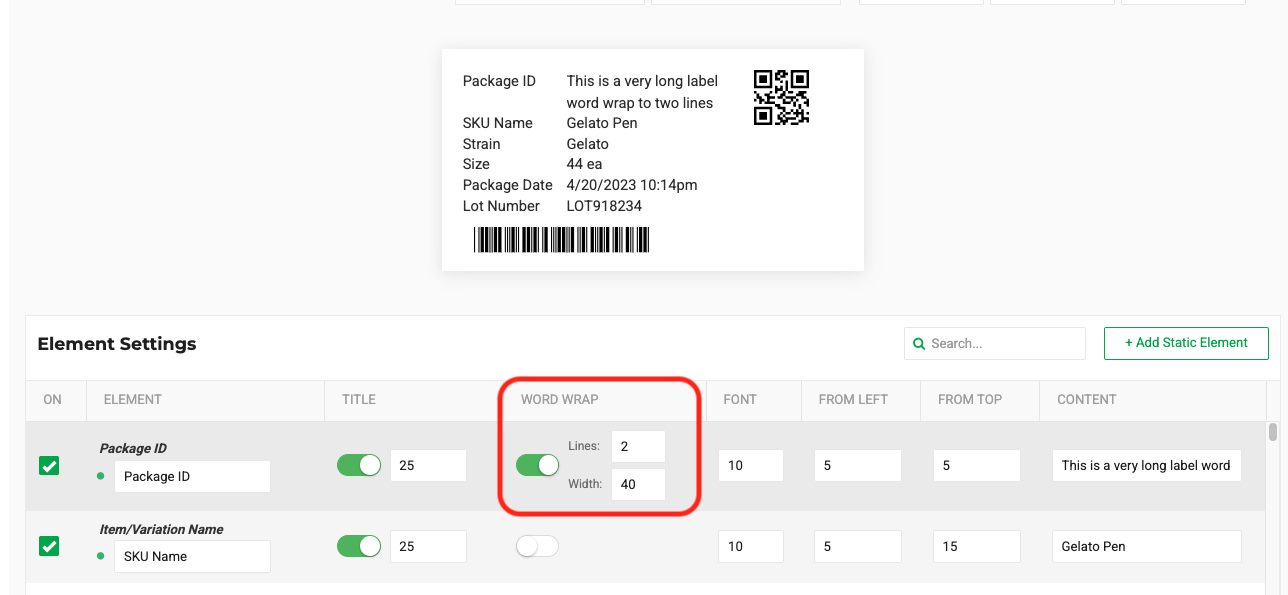
- Font – Adjust the font size and spacing for readability.
- Positioning on Label – Define exact placement using:
7a. From Left – Distance from the left edge.
7b. From Top – Distance from the top edge. - Content – Add any static content you want printed, such as fixed text or URLs.

Metrc Retail ID Label
Metrc released a new feature called "Retail ID" to generate an each-level identifier for each unit that goes to retail within the state cannabis market. This is similar to Flourish's serial number feature and COA portal features. Anyone can scan the retail ID, which will display a webpage with product information.
Configure the Metrc Retail ID Label
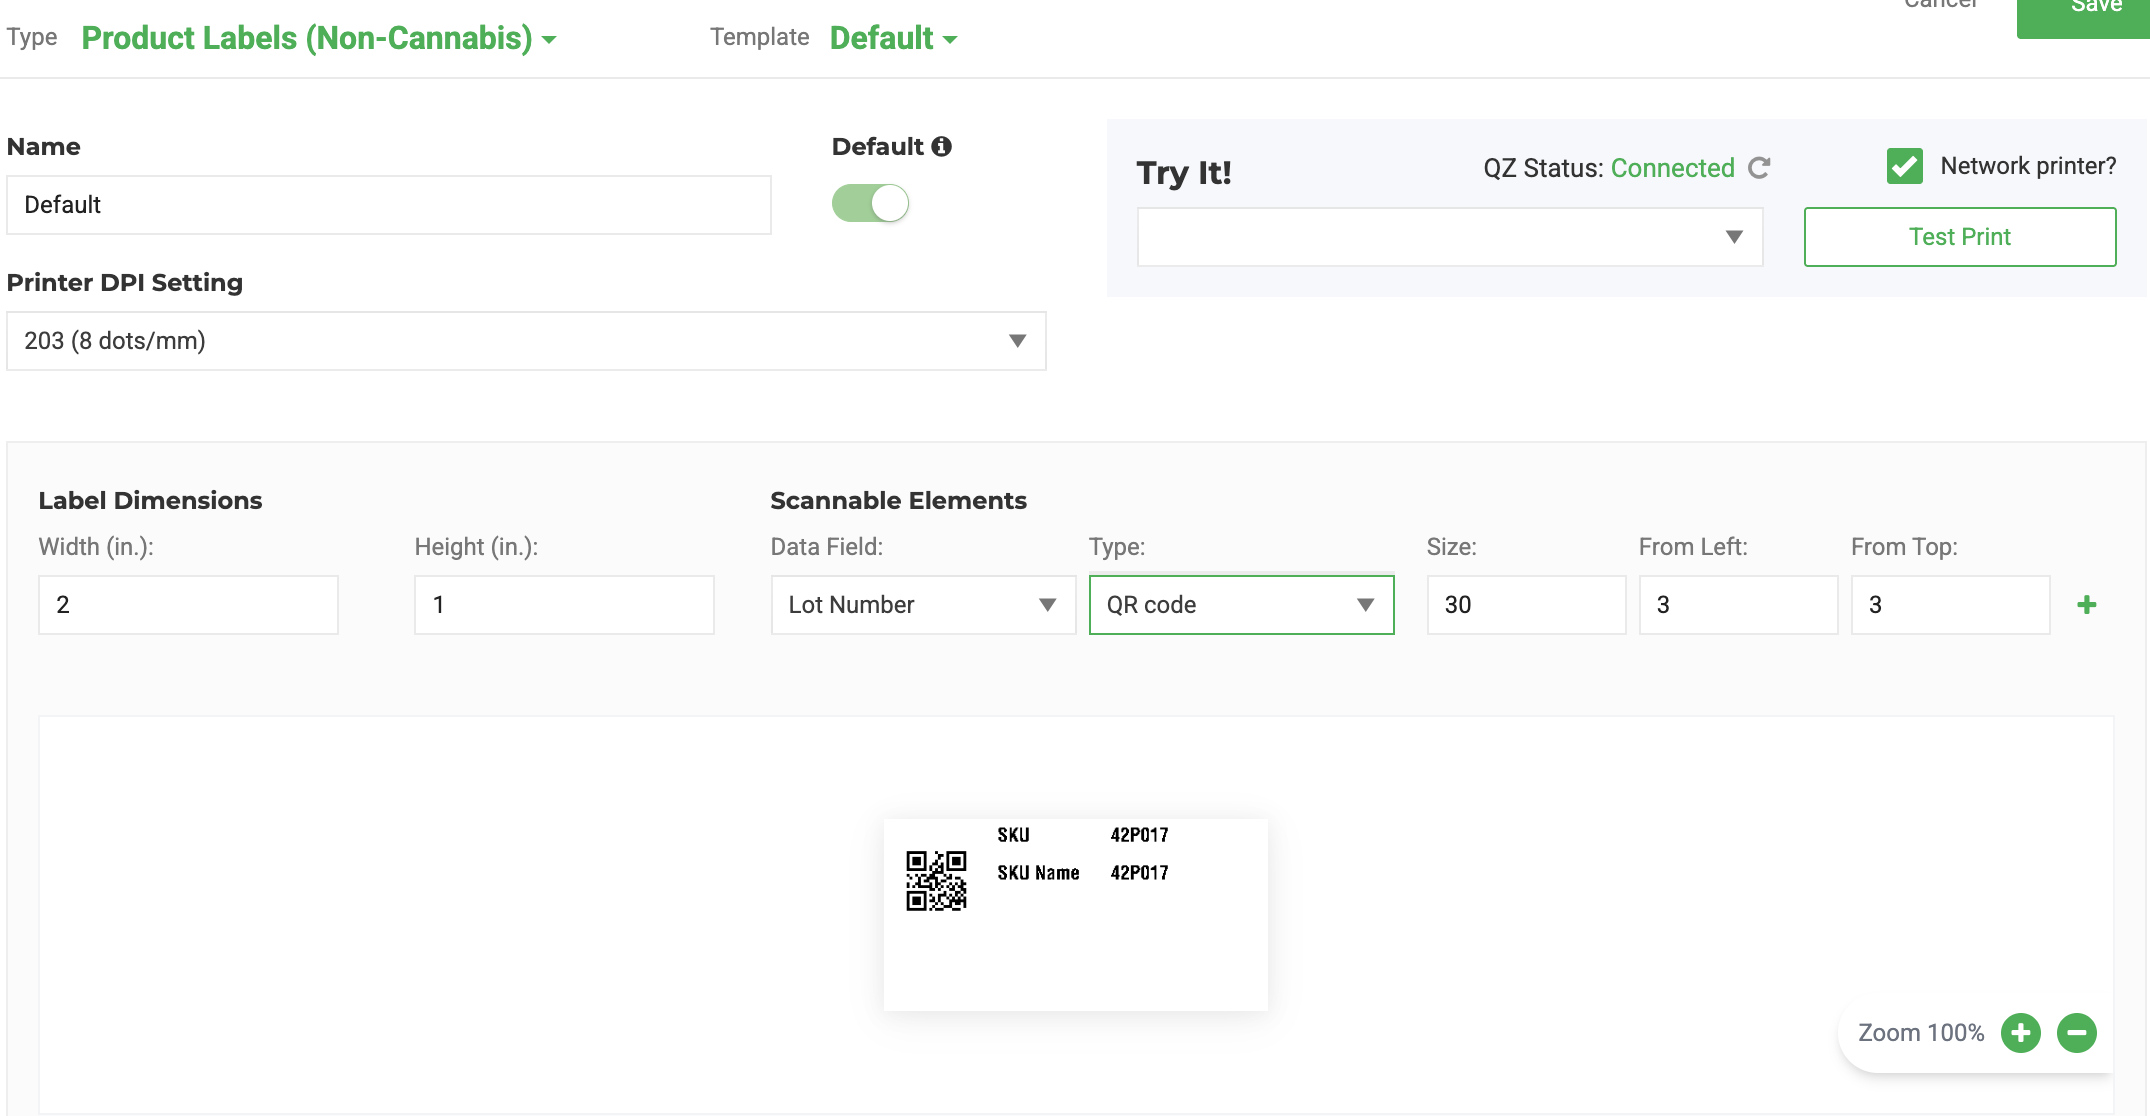
Non-Cannabis Product Labels and Scannable Elements
On the Non-Cannabis Product Label, selecting Lot Number here makes it scannable in the mobile app (for example, during inventory counts).
Select the Type:
- Bar Code
- QR Code
- None (no display)
- Click the small green plus icon
 which represents the interactive button used within the Flourish Label Maker to add additional barcode or QR code entries to a single label template.
 - Define Dimensions and Positioning for the code:
- Size
- From Left
- From Top
Case Size
On a package label
- You can now include a scannable element for Case Label configurations. Please use this guide as a referdence to setting up your items in case sizes. Item Case Configuration for Labeling.
- Configure the package label as you normally would by following the steps above. Printing the labels is referenced in the doc above.
How did we do?
CYBRA MarkMagic® Integration Setup