WordPress and WooCommerce Setup Guide for Cannabis Retail
Set up WordPress, WooCommerce, and Flourish plugins to launch your cannabis retail store with required checkout fields, payment gateways, and security configurations.
Welcome to the guide on setting up your WordPress website, installing WooCommerce, and configuring your online store with our recommended theme. By following these guidelines, you'll be able to create a professional-looking website, seamlessly integrate powerful e-commerce functionality, and customize your store to align with your brand identity.
Hosting
You'll need a server to host the site. The Flourish team can deploy and host a server with WordPress and WooCommerce installed on it. We'll set the site up with our standard Theme and recommended plugins. If you wish to do this yourself, please review this guide for general guidance.
Domain Setup
In general, we will configure the WooCommerce site as a subdomain to a domain that you already own. The exact steps depend on where you host the site. If Flourish is hosting the site for you, please coordinate with the Flourish team for specific instructions.
Setting Up Your WordPress Site:
- Install WordPress:
- Log in to your hosting account's control panel (cPanel).
- Look for the WordPress installer, often found under the "Website" or "WordPress" section.
- Follow the prompts to install WordPress on your domain.
- Create a username and password for your WordPress admin account during the installation process.
- Access Your WordPress Dashboard:
- Once WordPress is installed, access your website's dashboard by navigating to yourdomain.com/wp-admin.
- Log in using the username and password you created during the installation process.
Installing WooCommerce:
- Install WooCommerce Plugin:
- In your WordPress dashboard, navigate to "Plugins" > "Add New."
- Search for "WooCommerce" using the search bar.
- Click "Install Now" next to the WooCommerce plugin.
- After installation, click "Activate" to enable the plugin on your website.
- Complete WooCommerce Setup Wizard:
- Upon activating WooCommerce, you'll be prompted to run the setup wizard.
- Follow the wizard's steps to configure essential settings such as store location, currency, shipping options, payment gateways, and tax settings.
- Once completed, WooCommerce will automatically create necessary pages (shop, cart, checkout, etc.).
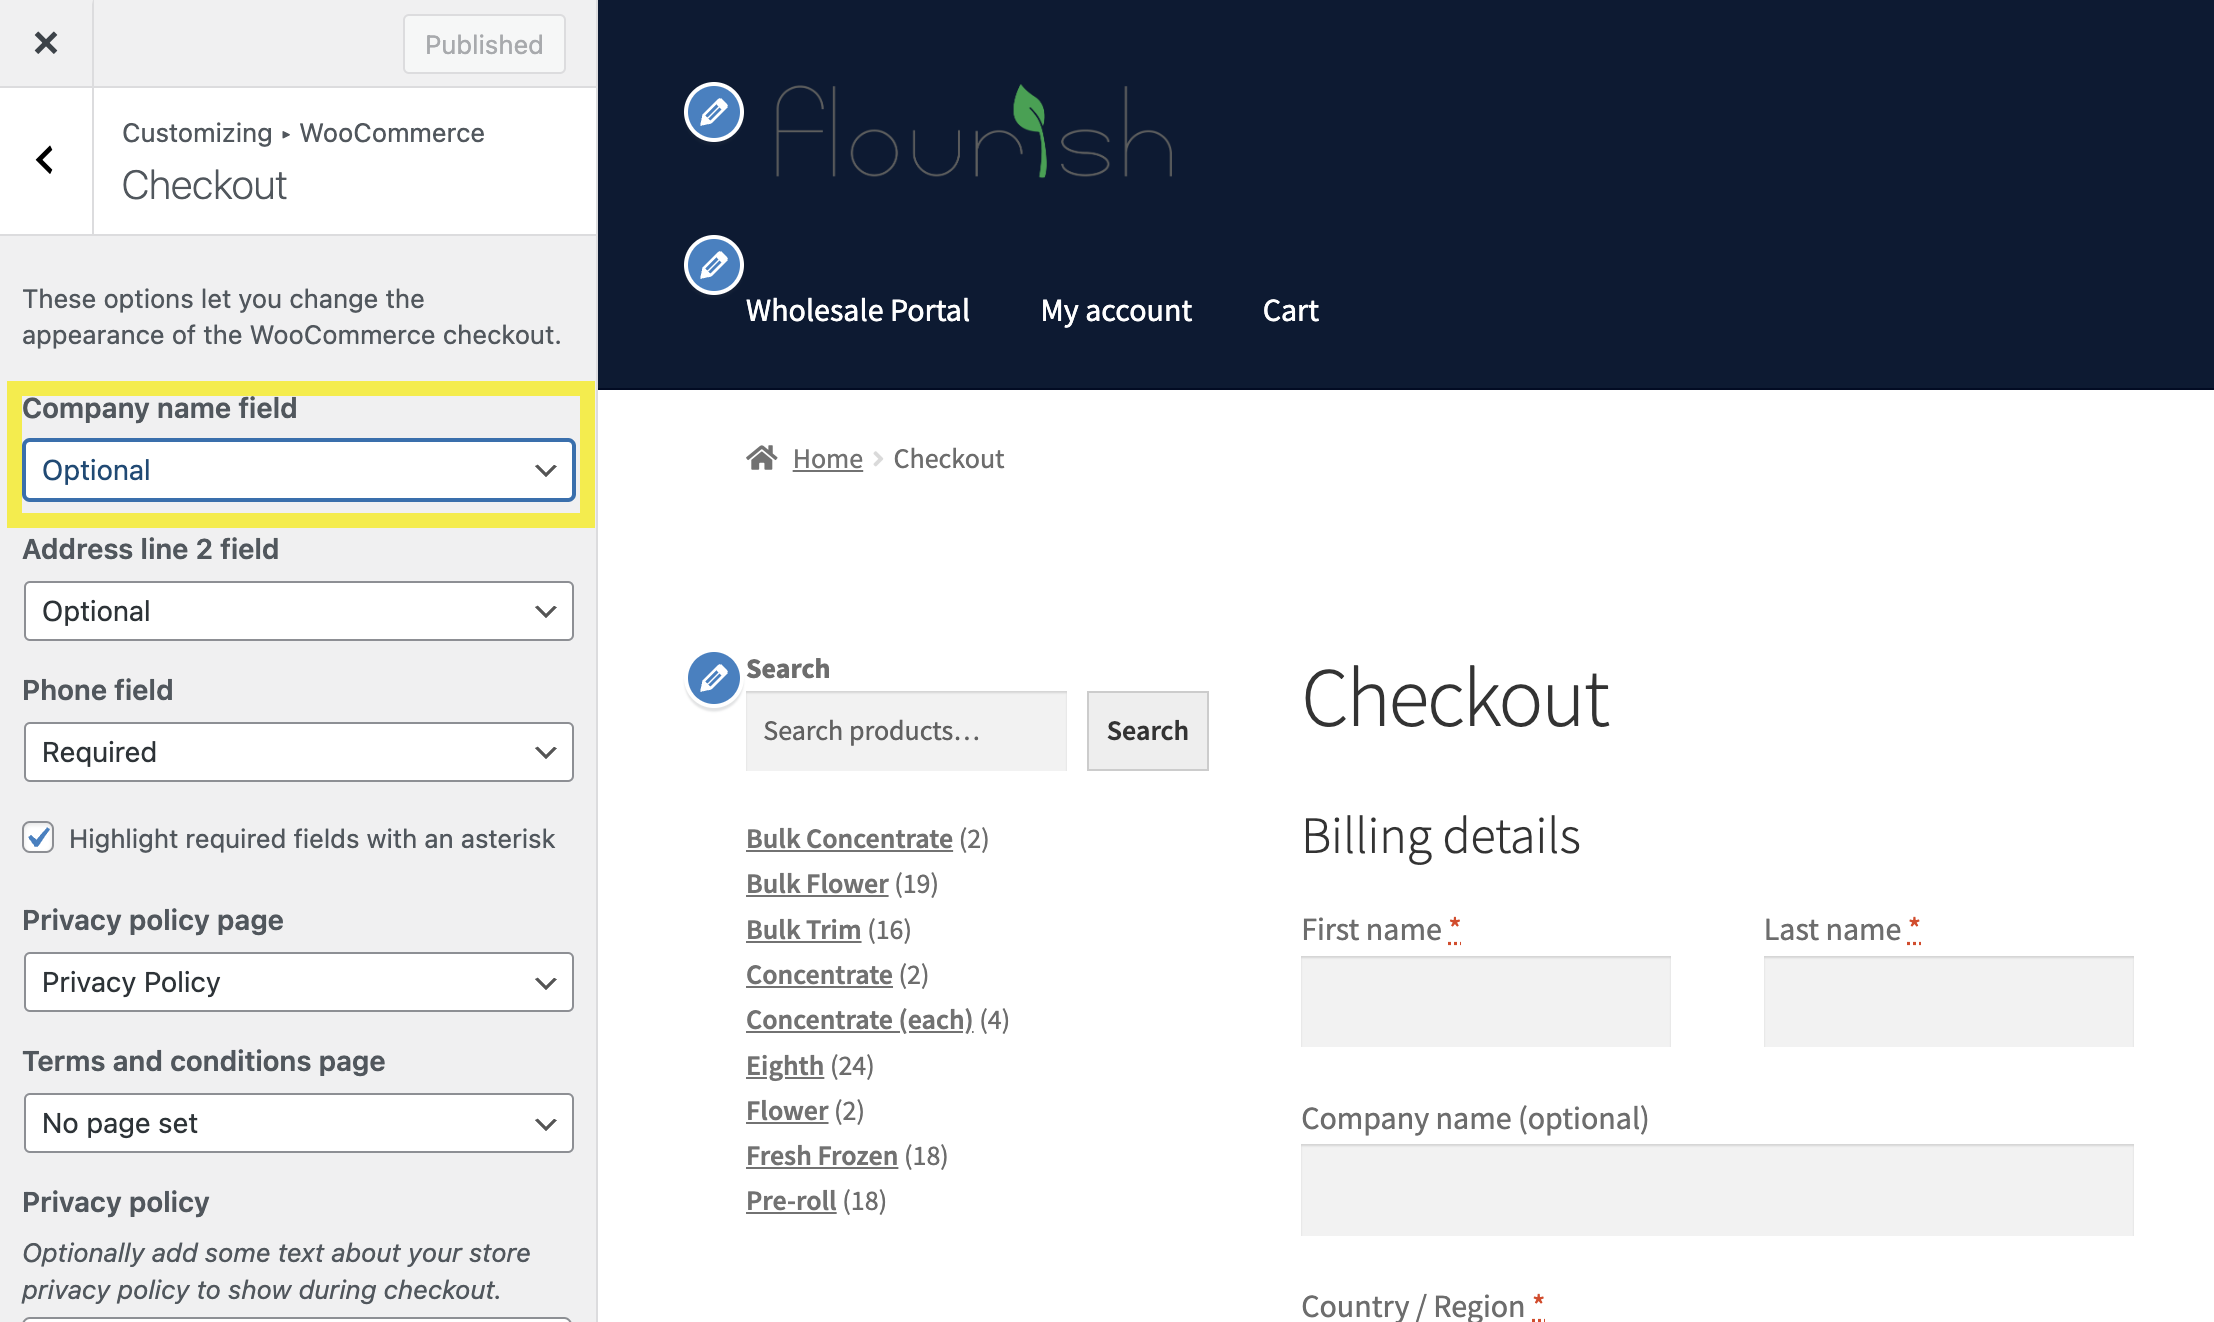
- Setting up the Checkout Page *REQUIRED
You will need to set the required fields during checkout (Company Name, License Number for B2B and DOB for B2C). The exact steps depend on the theme installed. For example:
- Go to Appearance > Checkout on the side nav bar
- Click WooCommerce > Checkout
- Make the Company Name Field required
Theme
Please contact Flourish for guidance on installing a pre-built theme. Flourish is using the Angro theme for most client deployments. You can use any theme you desire or even create one from scratch, however you'll want to validate compatibility with Flourish's plugin. A Theme is the code that controls the look and feel of the site. WordPress and WooCommerce are open-source technologies, and there are thousands of options to choose from here.
Plugins
WordPress works through a collection of plugins. In fact, WooCommerce is just a plugin.
Flourish Plugin
- Navigate to the Release Page and download the .zip file.
- Select "Tags" to find the latest version.
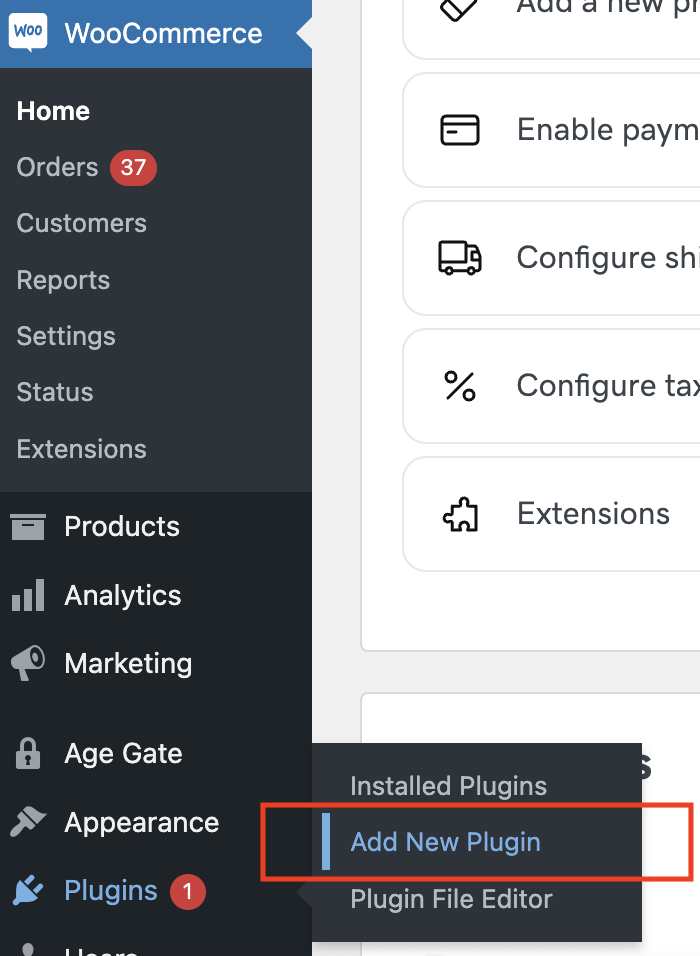
- Go to: WordPress Admin > Plugins > Add New to upload.
- Click Upload Plugin at the top.
- Click Choose File and select the .zip file you downloaded in step 2.
- Select Choose.
- Click Install Now.
- Click Activate.
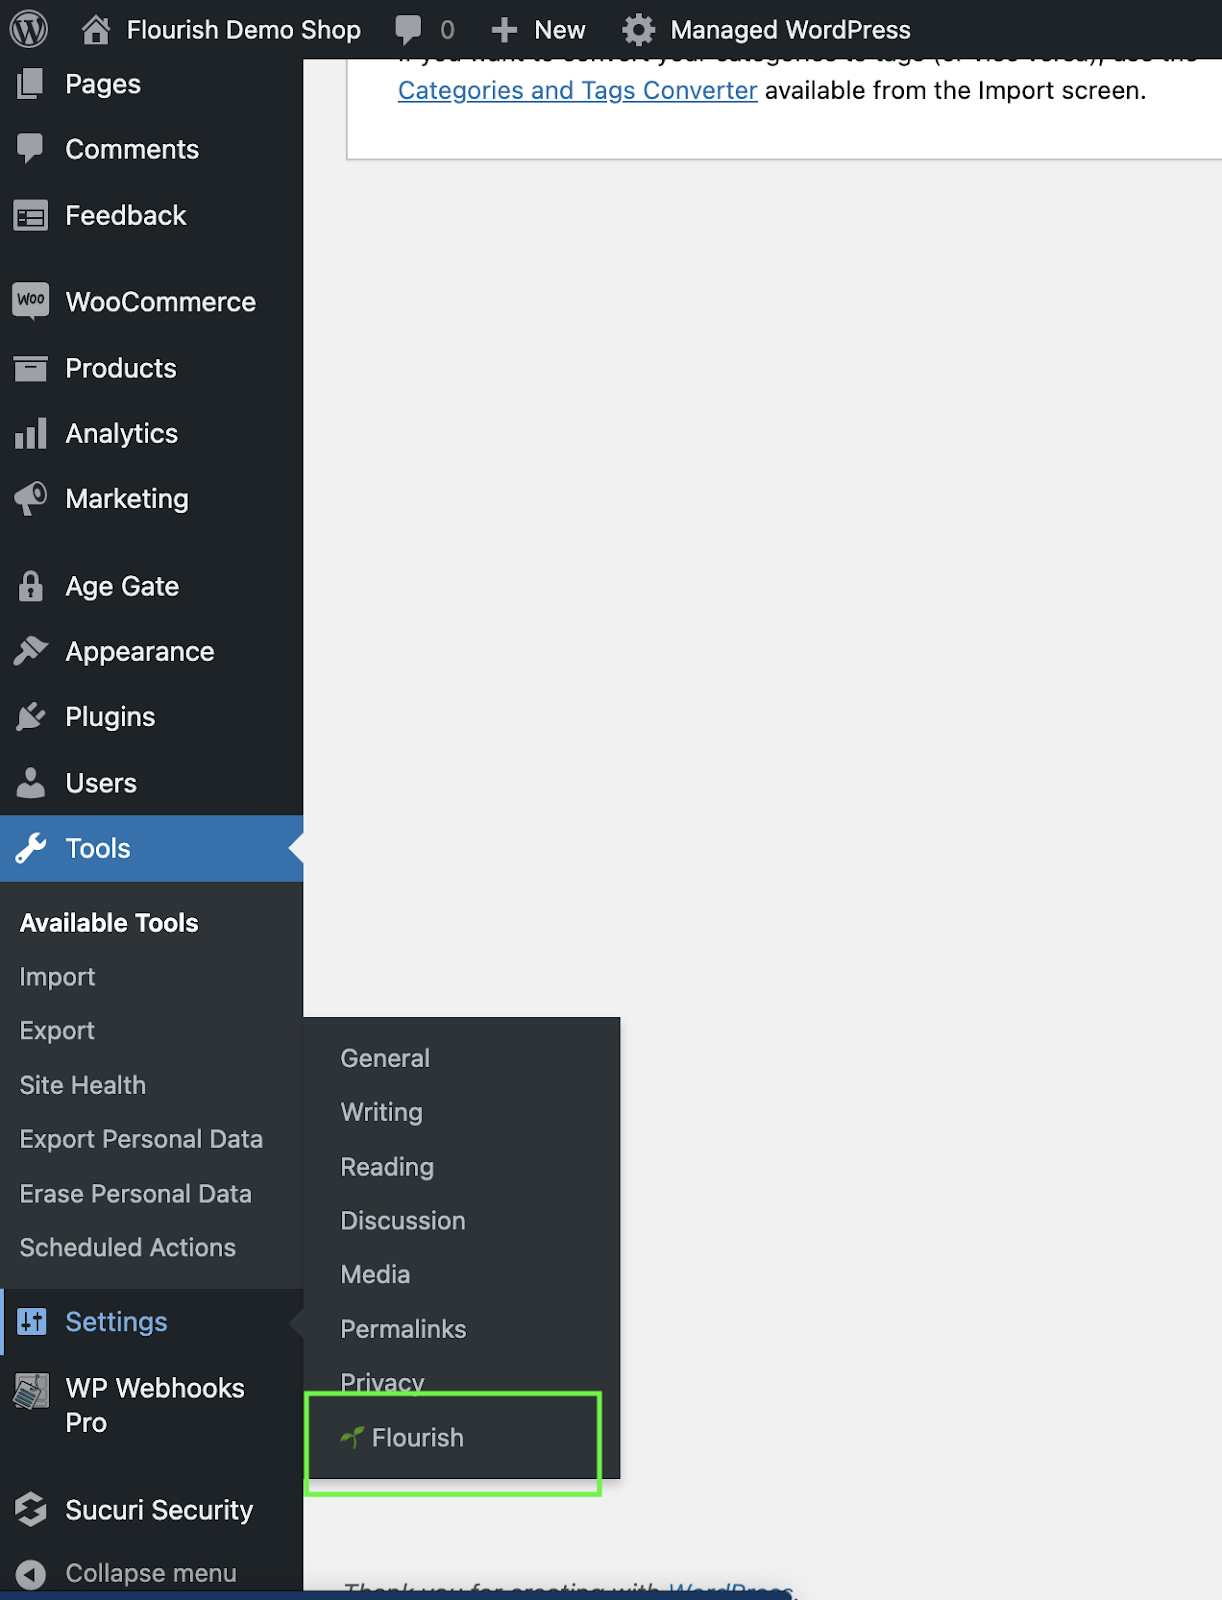
Once the Flourish plugin is installed and activated on your WordPress site, you can access it through the “Settings” tab in the left navigation bar.
Updating the Plugin
When we release an update, you can download the latest .zip from the Release Page. Follow the same Procedure as above to upload the new .zip file. Instead of installing, WooCommerce will prompt you to upgrade.
The next step will be to configure the Flourish plugin and the site.
Age Gate
Age Gate Plugin: To restrict access based on age, consider installing the "Age Gate" plugin.
Bulk Order Form for WooCommerce
Useful for quickly placing an order, avoiding navigating browsing the shop.
Password Protection
- Password Protect WordPress Lite. You can also use this plugin to restrict site content access.
- Flourish WooCommerce Lock Plugin. This plugin restricts access to WooCommerce pages for users who are not logged in and redirects them to the login page. It also modifies Elementor widget content for non-logged users.
This setting in the Age Gate plugin should be enabled to work correctly on the first load. This lock is not guaranteed to work with other age gate plugins or other page builders, but it will work for Elementor, blocks, and regular WP sites.
Steps to activate this plugin: | Add New Plugin. | Upload Plugin. |
|  |  |
PDF Invoice: PDF Invoices & Packing Slips for WooCommerce
Allows your buyer to download an invoice. You can also configure this to attach the invoice to the order.
Subaccounts & Multi-User Accounts
Use this to associate multiple buyers to one account. This is very useful in a multi-store environment where buyers want to see eachother's order history.
User Switching
Use this as an administrator to login as a user. This is useful when verifying the user experience or placing an order on behalf of a user.
WP Activity Log
This is a useful plugin to improve logging for troubleshooting and accountability.
WP Mail SMTP
Use this to connect to your email client and send authenticated emails from your domain. Contact Flourish about the Pro version.
How did we do?
Flourish WooCommerce Wholesale Configuration Guide