Table of Contents
- Grouping & Organization
- Create Strains, Cultivation Items, and packages
Connecticut BioTrack Cultivation Guide
This guide covers how to use Flourish cannabis cultivation software to manage your grow operation while syncing to BioTrack software.
- Grouping & Organization
- Create Strains, Cultivation Items, and packages
Use this guide to work on your Grow module in Flourish Software.
Grouping & Organization
Flourish provides the following stages of organization. Each has a Plants screen and a Group screen. Drying and Processing have a Plants and Harvest screen.
- Inventory: Where clones, seeds, and tissue culture barcodes are located
- Mother: Where mother plants are located
- Vegetation
- Flower
- Drying (Harvested plants)
- Processing (Where we “cure” the plants)
The cultivation facility has Areas. The same area can handle more than one phase. Configure the Areas in Settings.
Area Type | Area Name |
Inventory | Clone |
Mother | Prop Room 1 |
Vegetation | Prop Room 1 |
Flower | Flower Room 1 |
Drying | Drying Room |
Processing | Drying Room |
Within Flourish, we use groups to organize the plants and move them to new phases, new rooms, and to harvest. We can move plants between groups. Groups have one or more strains. We can also move an entire set of plants for a strain within a group to a new group. When we pull the data from BioTrack directly, we organize the plants into “default” groups: “Room Name - Strain Name.” Plants need to be moved out of these default groups to be acted on with all functions.
Group Naming
To best utilize the grouping feature, please define a group naming strategy. Whatever will be most meaningful to your operation. It is best to maintain consistency once a group naming convention has been established. Here are some recommendations:
- Example 1: [Strain Name] - [Cycle] - SPR-23-001
- Example 2: [Strain Name - Cut Date] - Fire OG Clones - 10-01-23
- Example 3: [Strain Name - Room - Cut Date] - GG4 - Prop 1 - 10-4-23
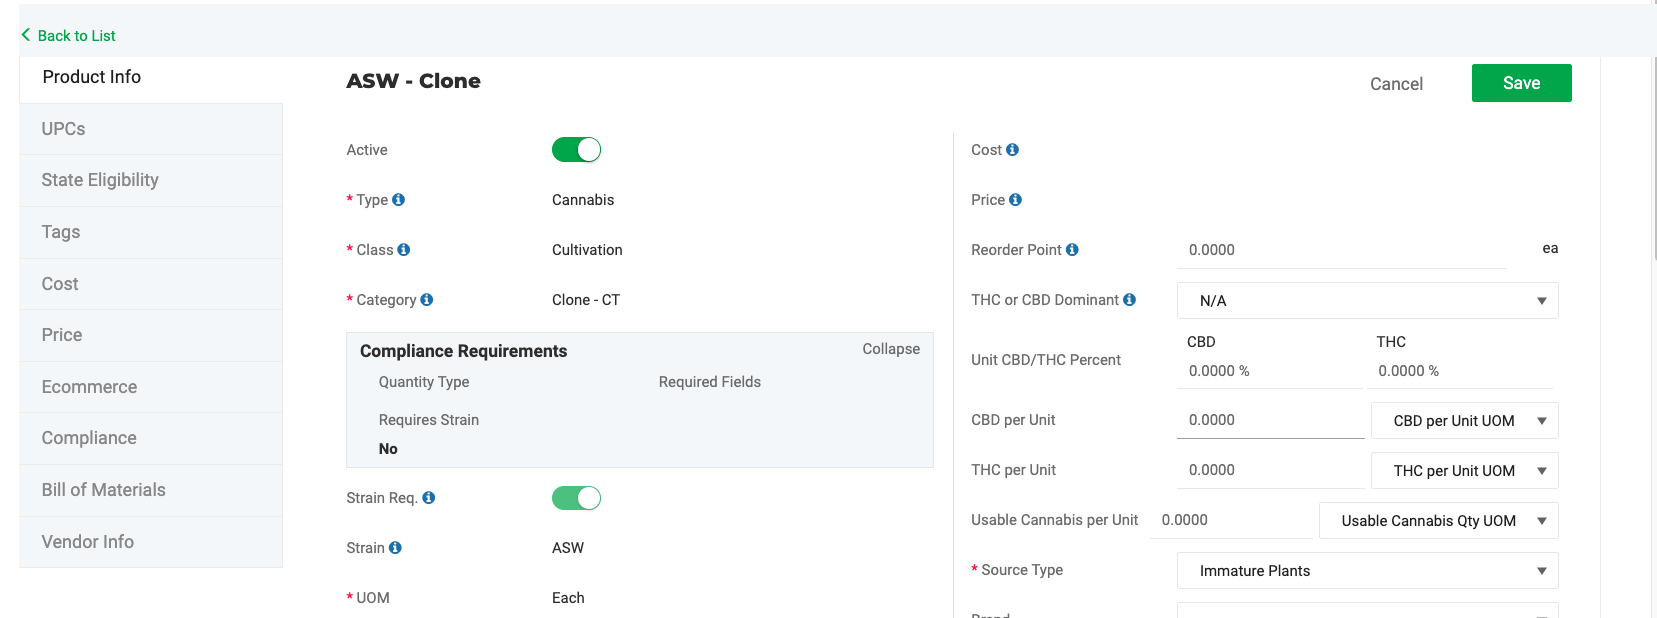
Create Strains, Cultivation Items, and packages
In BioTrack clones, seeds, and tissue cultures are assigned a barcode (package ID) and stored within Inventory. You use the packages you create to create plants.
Before you create a plant, you need three things:
- Strains.
- Items of Clones/Seeds/Tissue Cultures.
- Packages of Clones/Seeds/Tissue Cultures.
This article uses the example of a Clone Item, and the Seeds/Tissue Cultures process is the same.
Create strains
|
 |
Create Strain Video
Create Clone Items
You can create your Clone Items inventory in two ways.
- Create a "Clone Item" for every strain (Strain Specific Item). You have multiple items, one per strain, and when you create a package of clones, you will not need to designate the Strain.
- Create one "Clone Item" for all the strains. When you create a package of clones, you designate the strain.
Create a Strain-Specific Clone Item
|
 |
Video
Create a Clone item to use for any strain
You can also create a clone item with no strain designated and use it to create a package of clones of any strain.
|
 |
Video
Create a package of clones
Video
Using a Strain-specific Item
Use the steps below to create a package of clones using the Strain-Specific Clone Item.
| 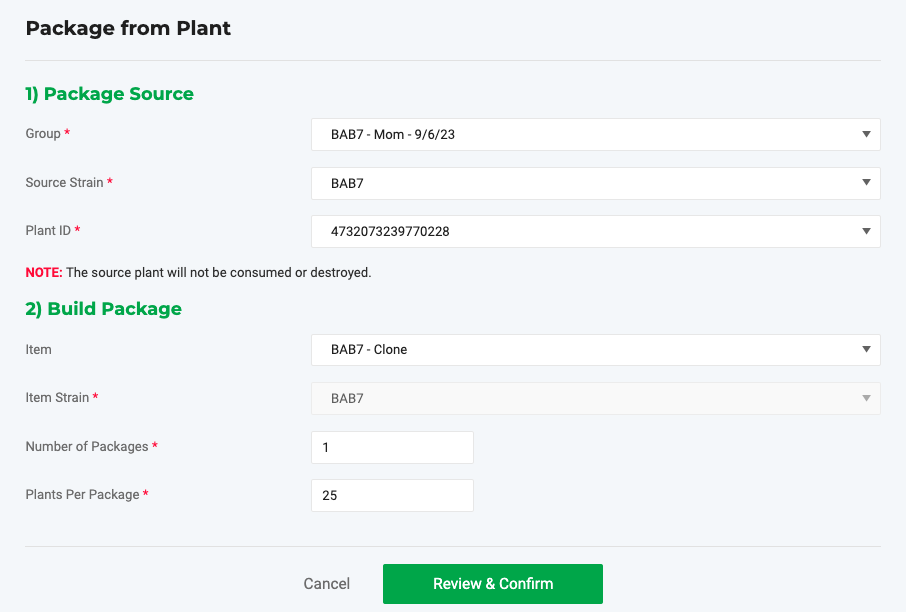 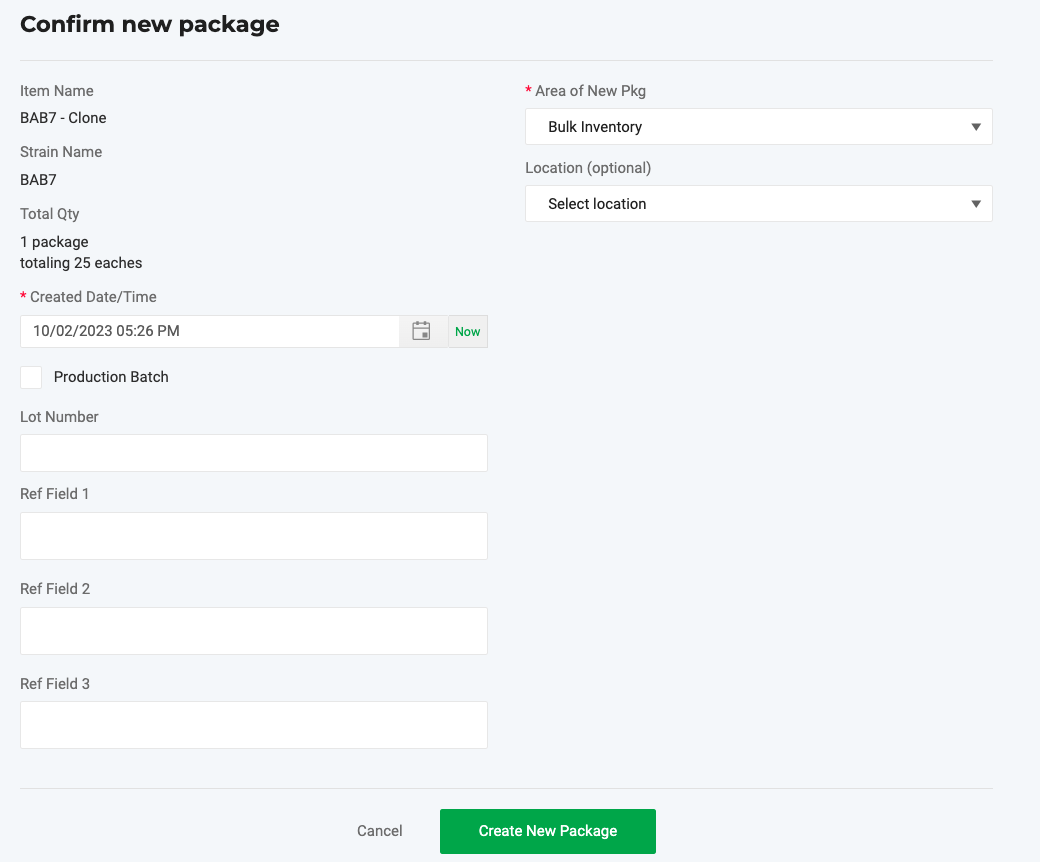 |
Using An - "All Strains" Item
Use the steps below to create a package of clones using an item with no strain designated.
| 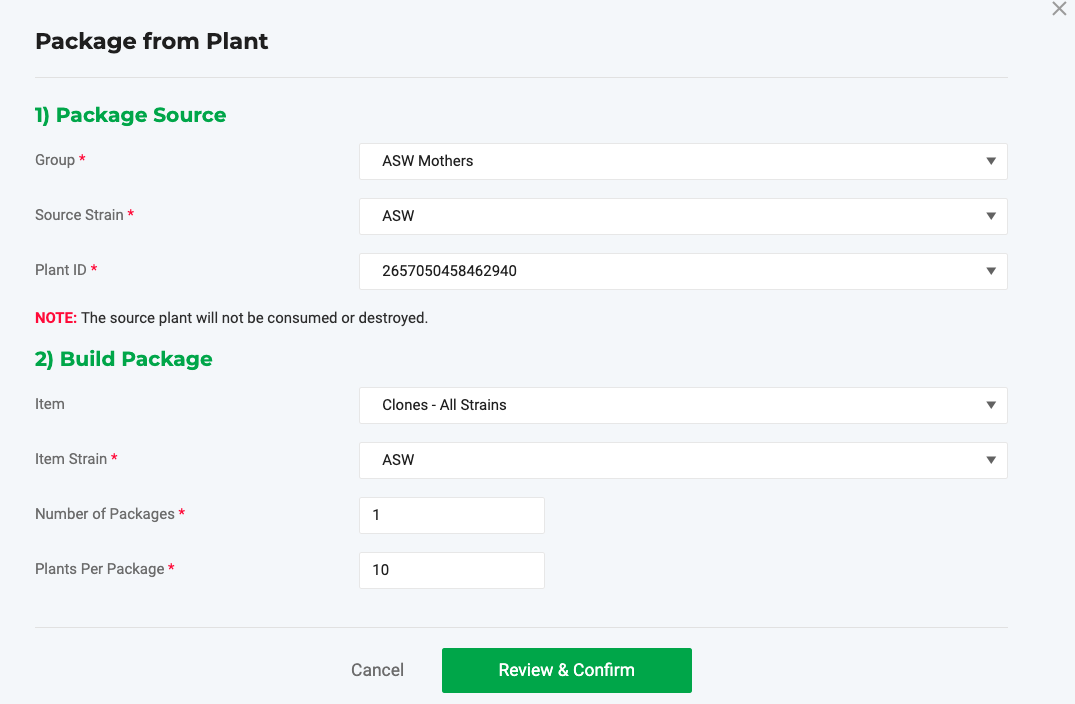 |
Create Plants from Clones, Seeds, and Tissue Culture
We will pull from Inventory and create plant barcodes for individual plants. Within Flourish, all plants are part of a Group. Groups are useful for organizing the cultivation operation and moving plants in bulk between phases and locations. You can split, combine, and rename groups as needed.
Set-up
- Define a group naming convention
- Ensure at least one area is created within each phase
Actions
- Navigate to the Inventory screen in Flourish and find the barcode of clones/seeds/tissue culture that you are going to plant into
- Use the Action /Create plants. This is equivalent to clicking New Plant under Shortcuts in BioTrack
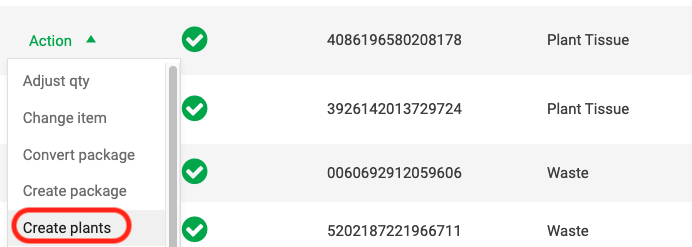
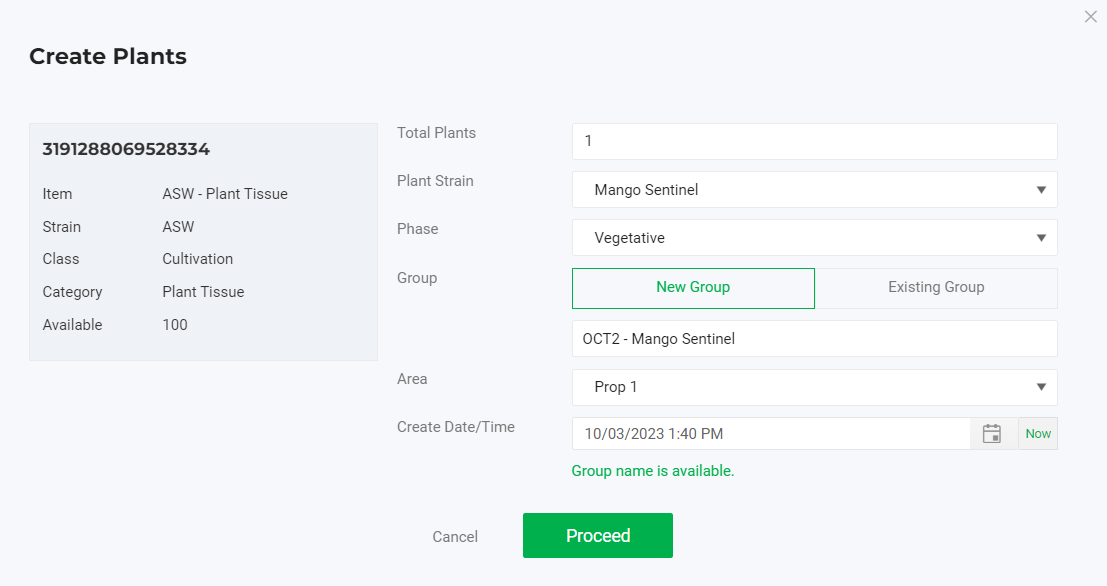
- Fill out the screen (see screenshot below).
- Type Total Plants.This number can not exceed the “Available” quantity in the source package/barcode. See the screenshot below.
- Plant Strain is selected according to the source.
- Phase (Vegetative, Mother, Flowering)
- Group - New or add to Existing Group
- Choose an Area (Room in BioTrack)
- Select Create Date/Time.
- Type Total Plants.
- Click Proceed
Video
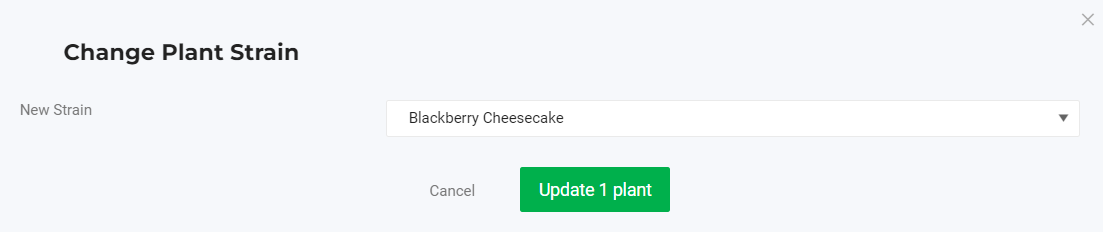
Change Strains
If a plant was accidentally assigned the wrong strain, it can be easily corrected.
- Select one or more plants from the Vegetative or Flower plant grid
- From the action menu, click "Change Strain"
- Within the Change Plant Strain modal, select the correct Strain
- Click "Update # plant(s)"
Video
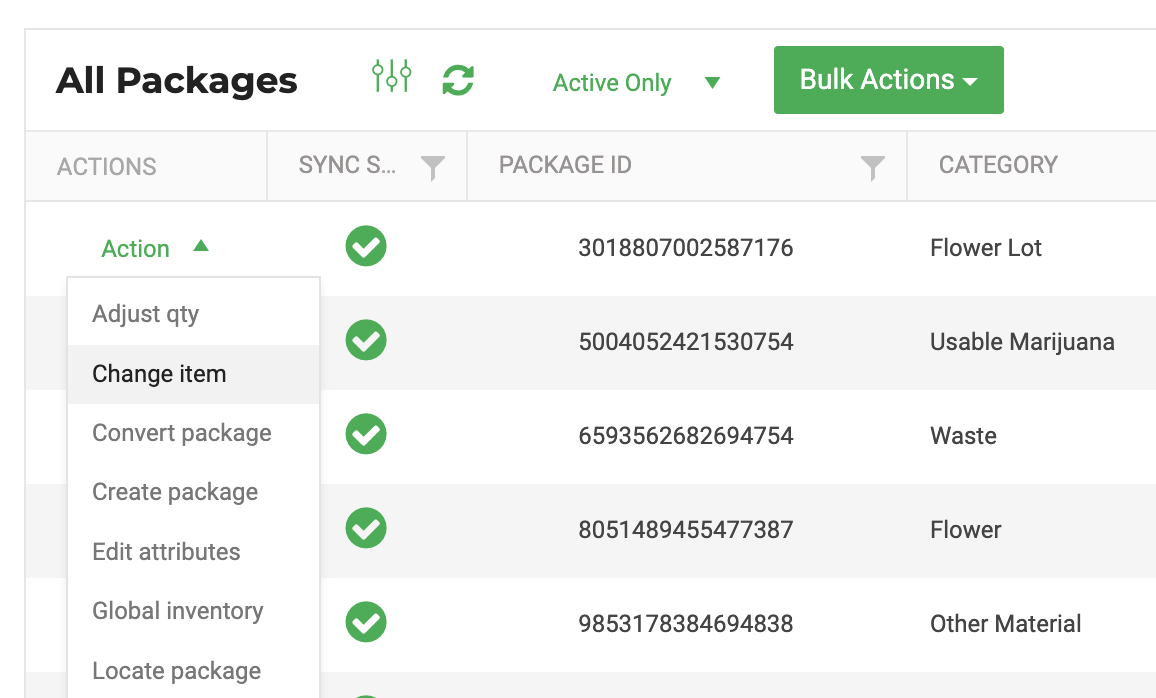
Change Items
You can change the item's name if the wrong item was selected on a new package creation.
|
 |
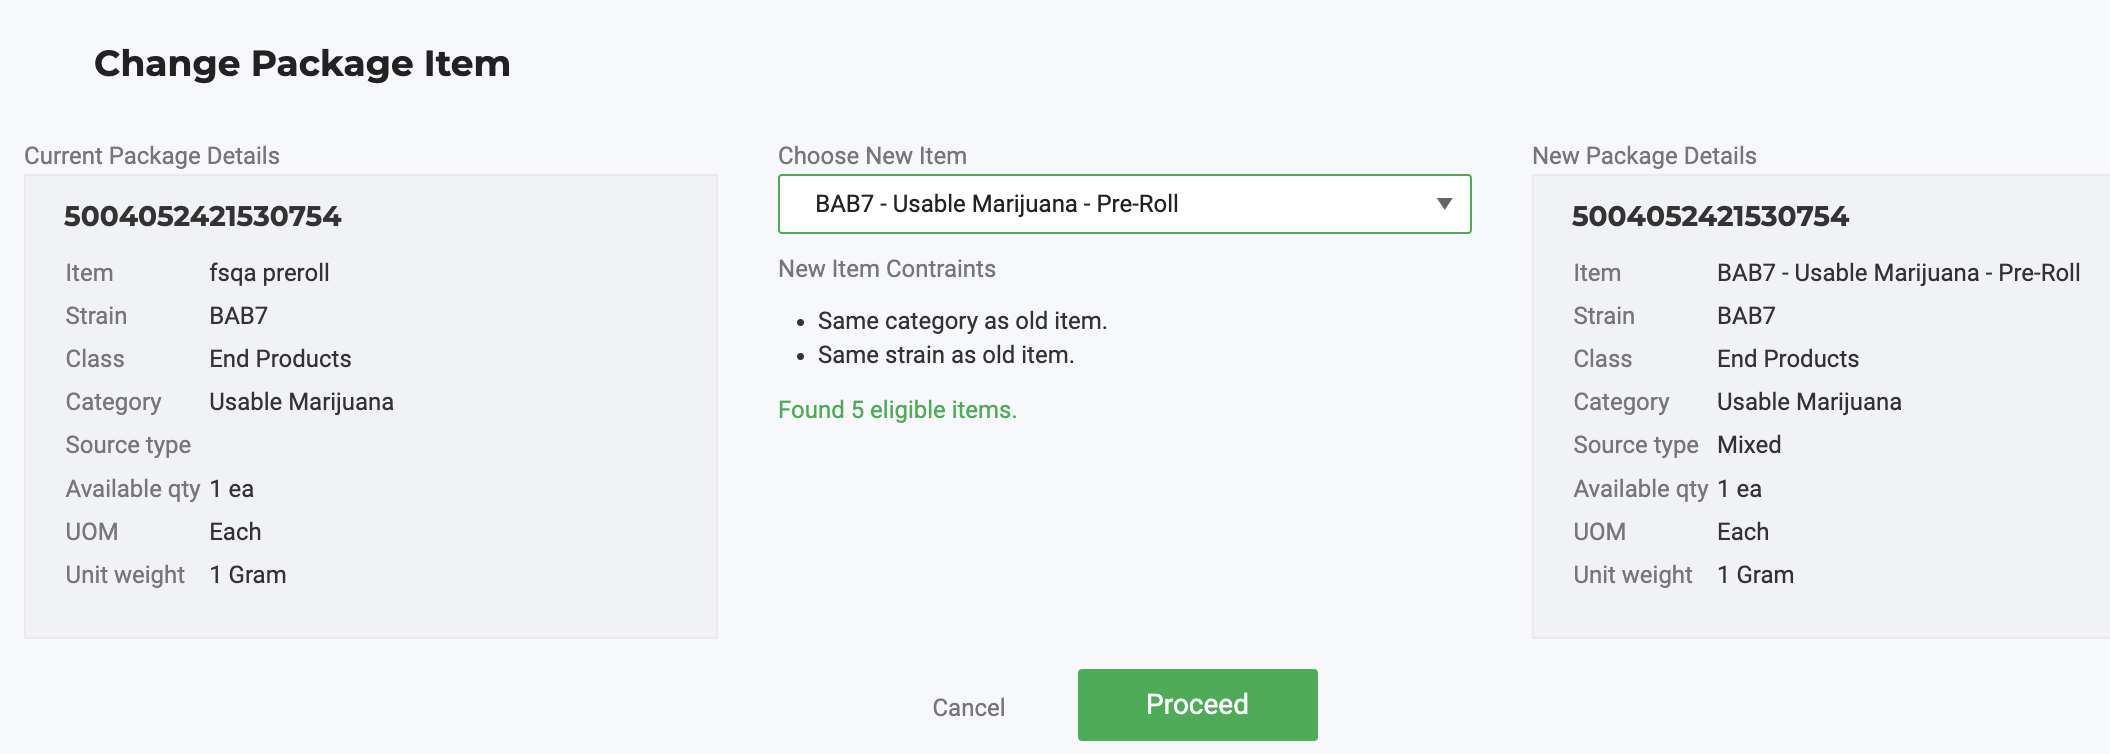 |
Video
Move plants: Locations and growing phases
BioTrack has no designation between vegetative, mother, or flowering growth stages or locations. These actions will update the “Room” for the plants.
Set-up
- In Flourish we create Areas for each phase
Video
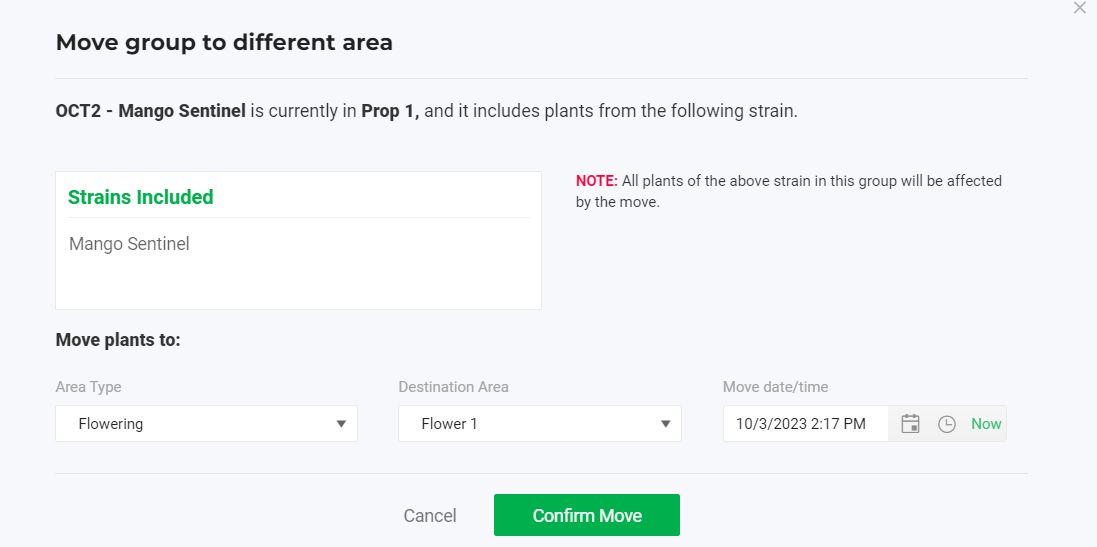
Move Plants
- Move an entire Group
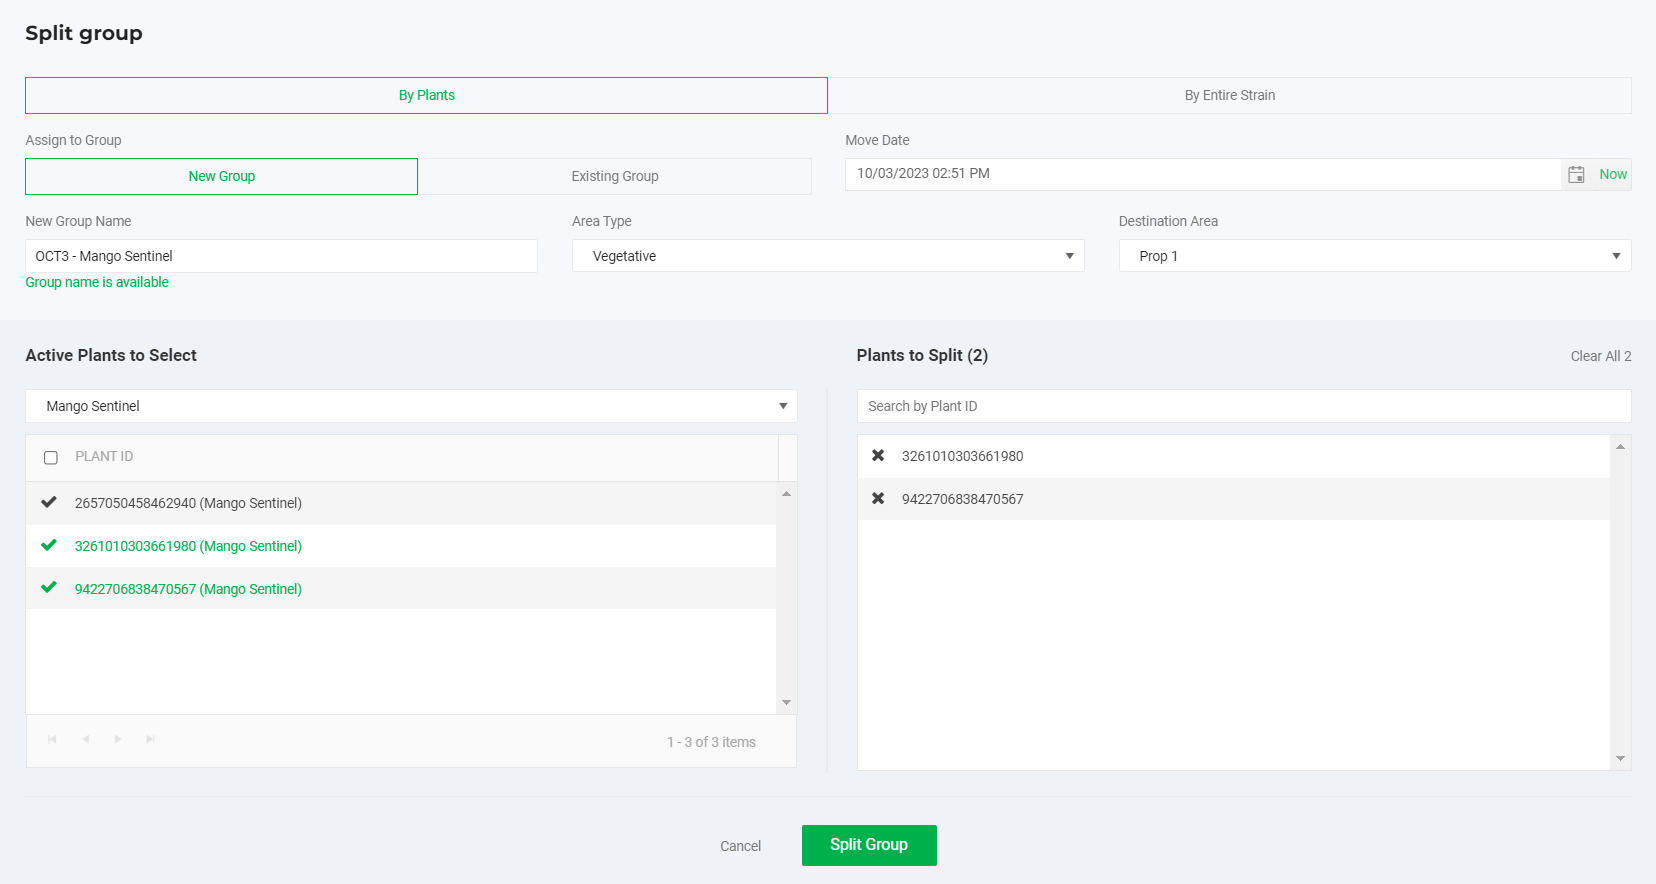
- Move part of a group using Split Group
- Move a set of plants, which will call the Split Group screen
Move an entire Group:
|  |
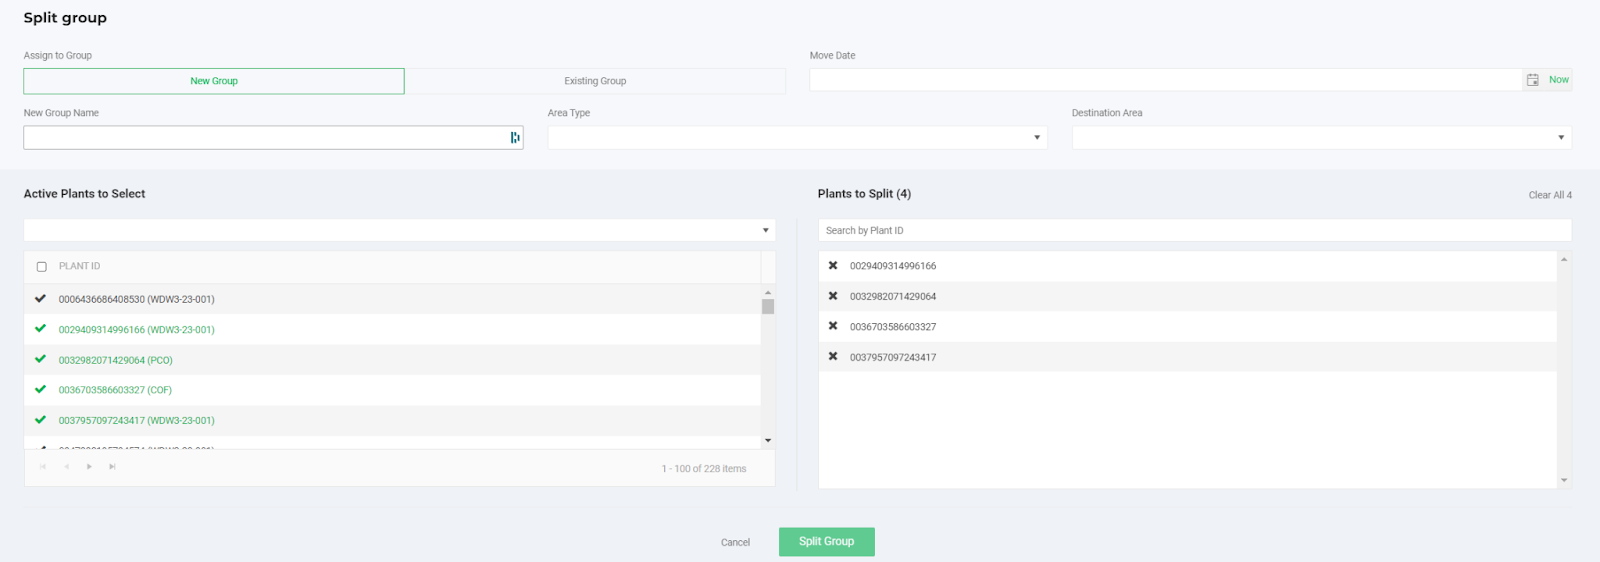
Move part of a group using Split Group:
|  |
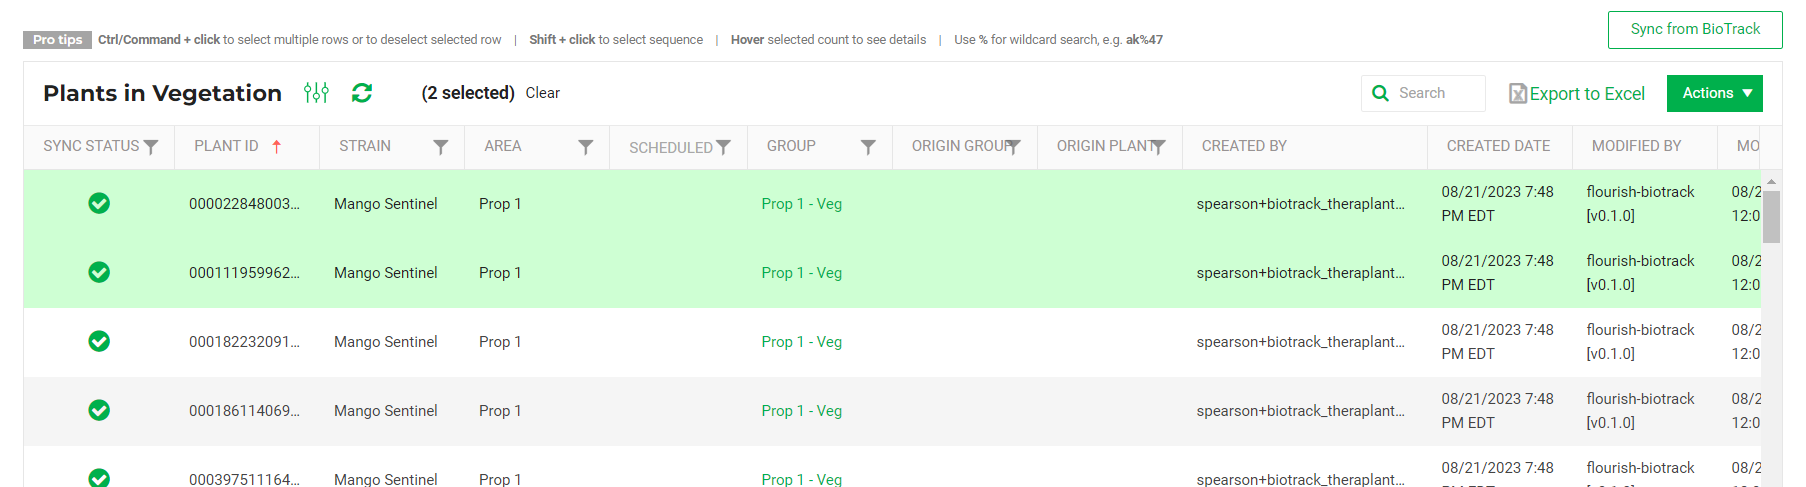
Move a set of plants:
|   |
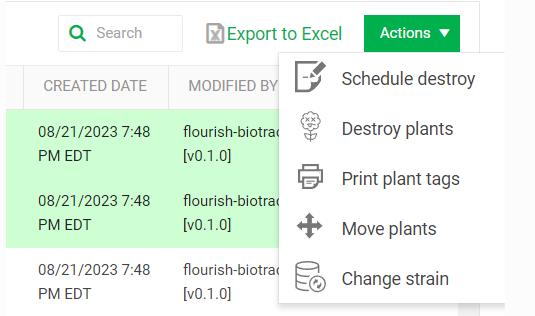
Destroy Plants
Destroying a plant "Schedules" it for destruction. Flourish automatically completes the destruction after a 72 hour waiting period. View the plants scheduled for destruction in the Inventory > Plants grid. In this grid you can "unschedule" a destruction to correct a mistake.
- Select one or more plants from the Vegetative Plants or Flowering Plants grid or from Inventory Module > "Plants" drop-down menu > All Plants grid.You can hold Shift and click multiple rows.
- Navigate to the Action menu and click "Schedule Destroy"
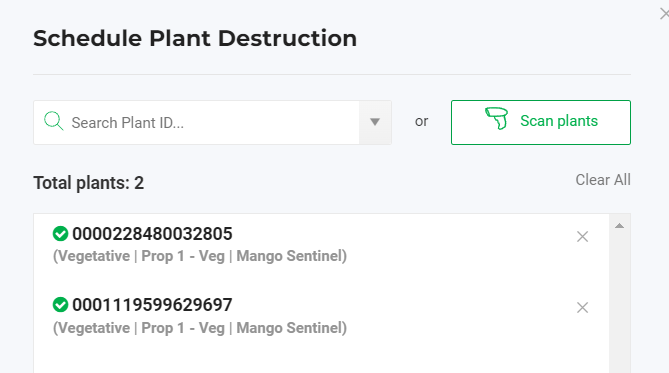
- Fill out the Required fields:
- Destroy Date
- Note
- Pick a reason from the drop-down
- Select the plants scheduled for destruction and click “Destroy Plants” in the action menu
🔍 Find and Resolve out of Sync Plants
If a plant is destroyed in Flourish Software but shows as out of sync, it means the destruction did not complete successfully in BioTrack. The plant is considered destroyed in Flourish, but it still exists in BioTrack until the sync is successful.
A successful sync will update BioTrack and mark the plant as destroyed there as well.
- Go to the Inventory module.
- Click Plants/All plants.

- Select Plants:Dead from the dropdown to locate any that might have sync issues.

- Use the Sync Status filter to locate "Out of Sync" plants.
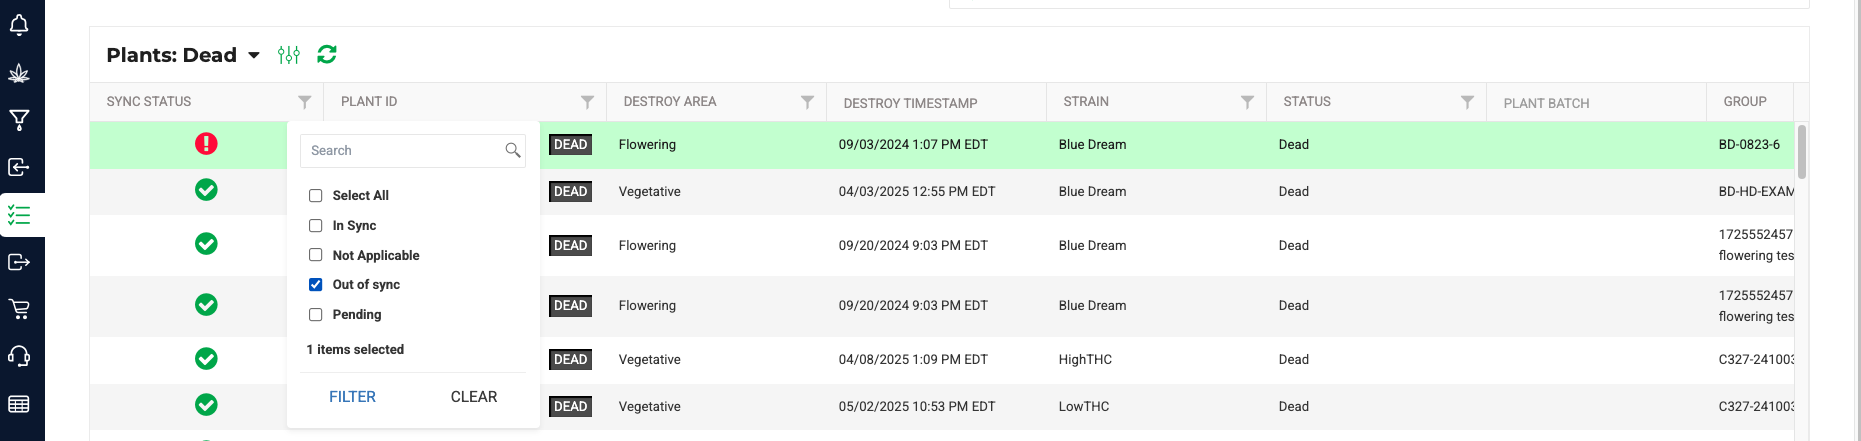

- Click the red sync status icon
 to open the Sync Status Detail modal, where you can review the error.
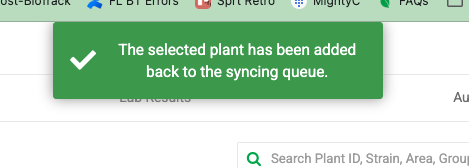
 - Click “Retry” directly in that modal to attempt resyncing.
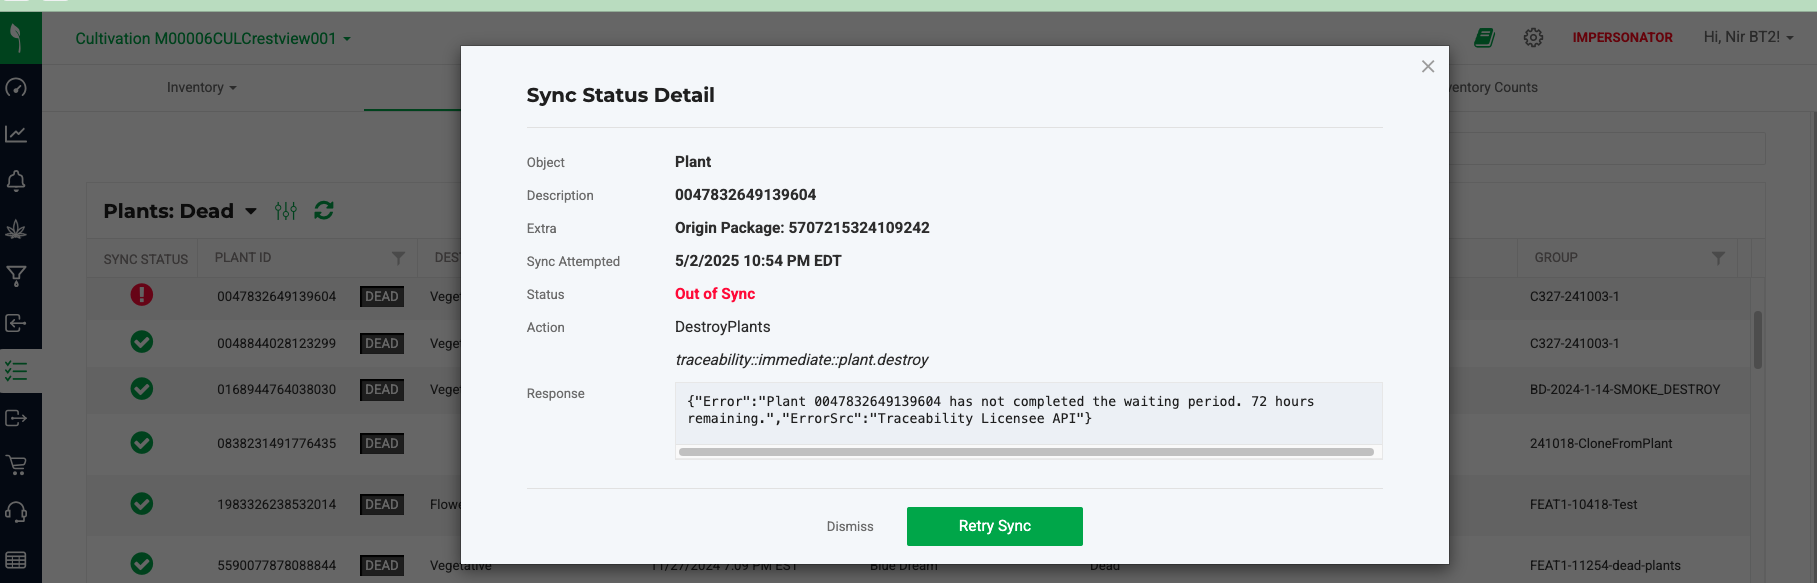
- View the message.
- Ensure the plant is in sync.
Video
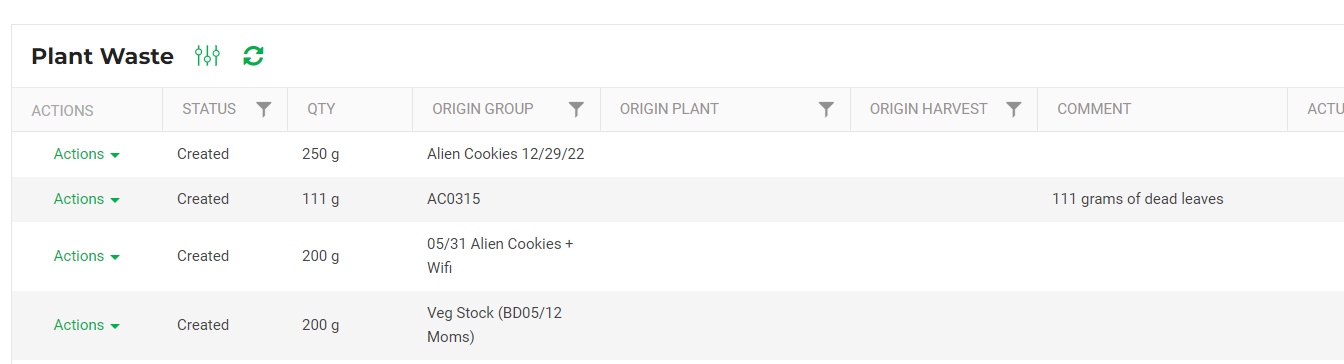
Log Plant Waste
Plant waste is recorded on a plant group basis
- Select the Vegetative or Flowering Group
- Navigate to the action menu, click "Record Waste"
- From the Record Waste modal enter the Required fields:
- Waste Weight
- Date
- Click "Record Waste for Group"
Video
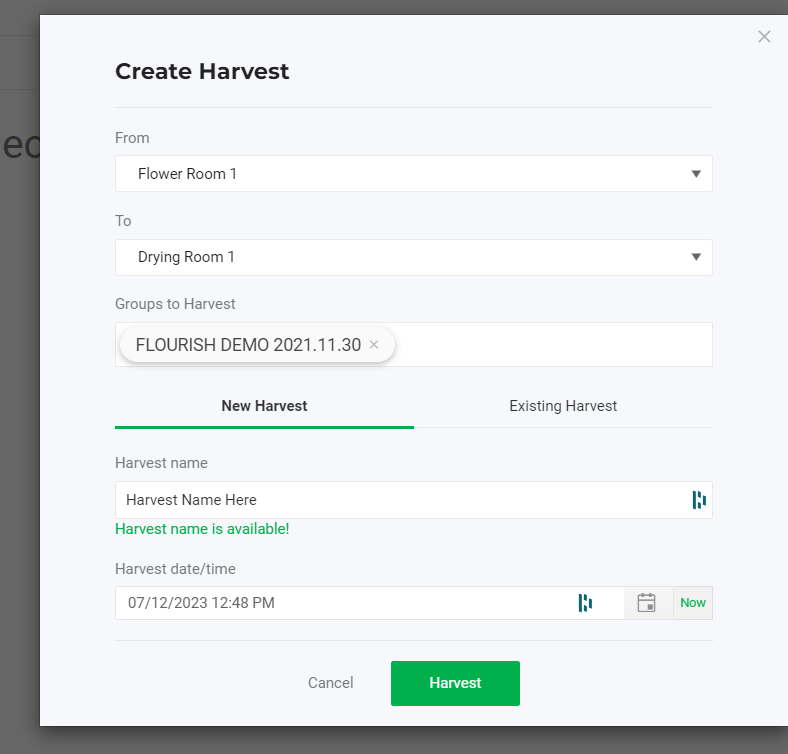
BioTrack Harvest
Regular Harvest Workflow
This is the typical workflow of cutting down the plants to harvest them.
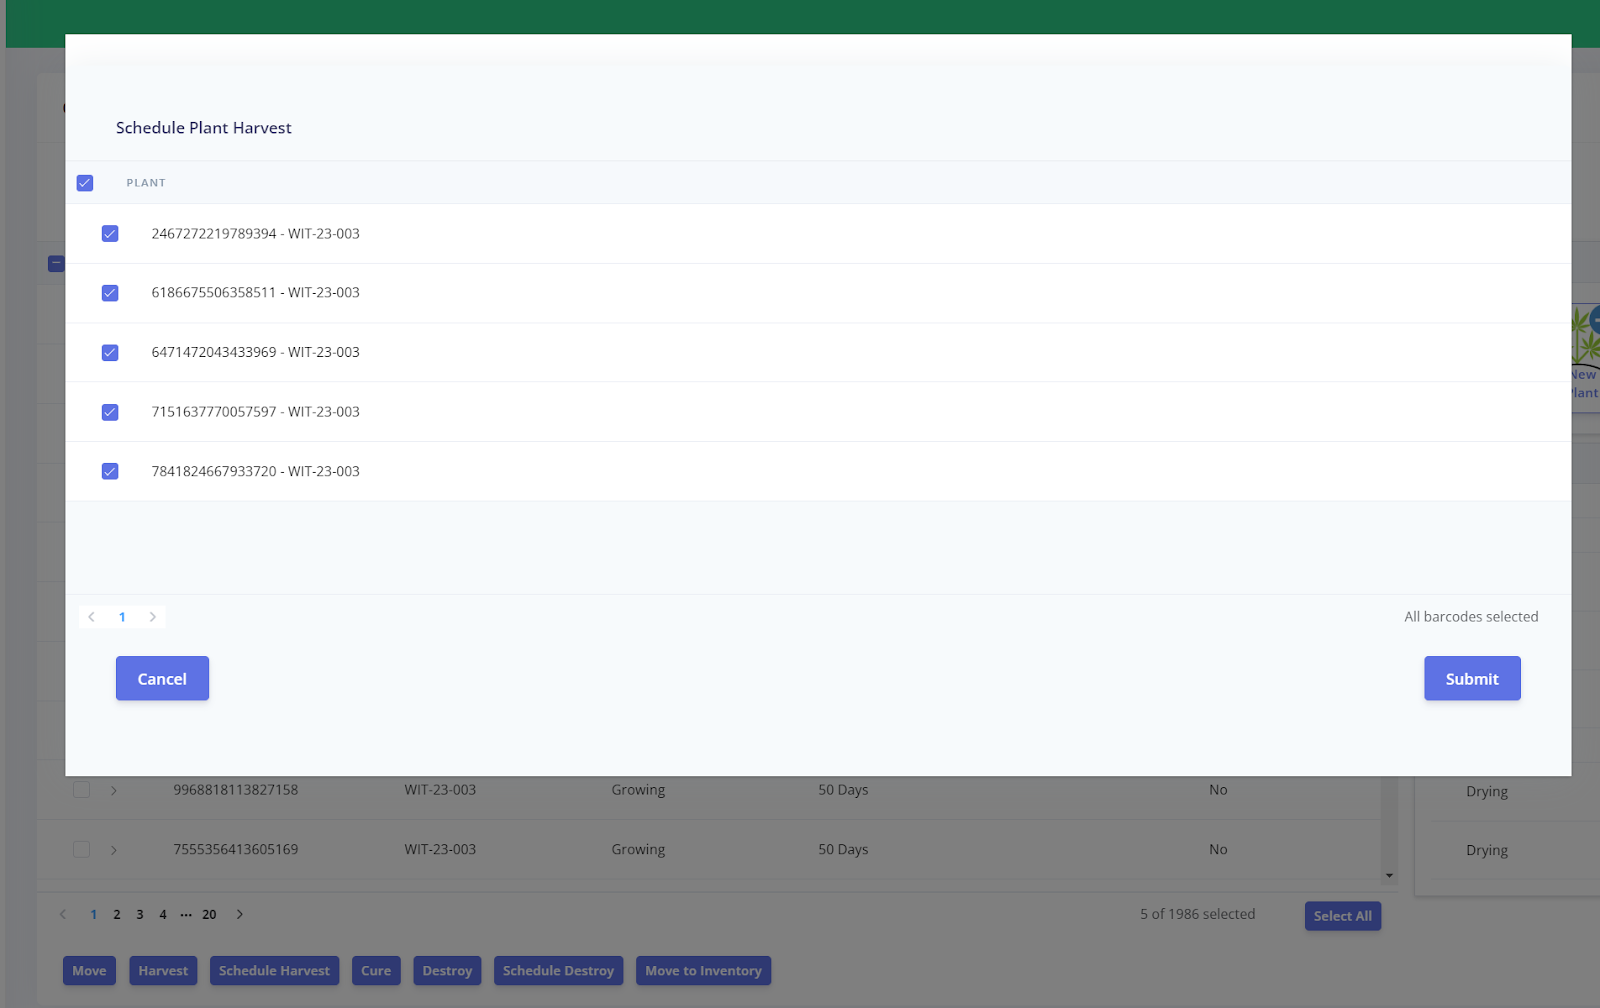
Schedule Harvest
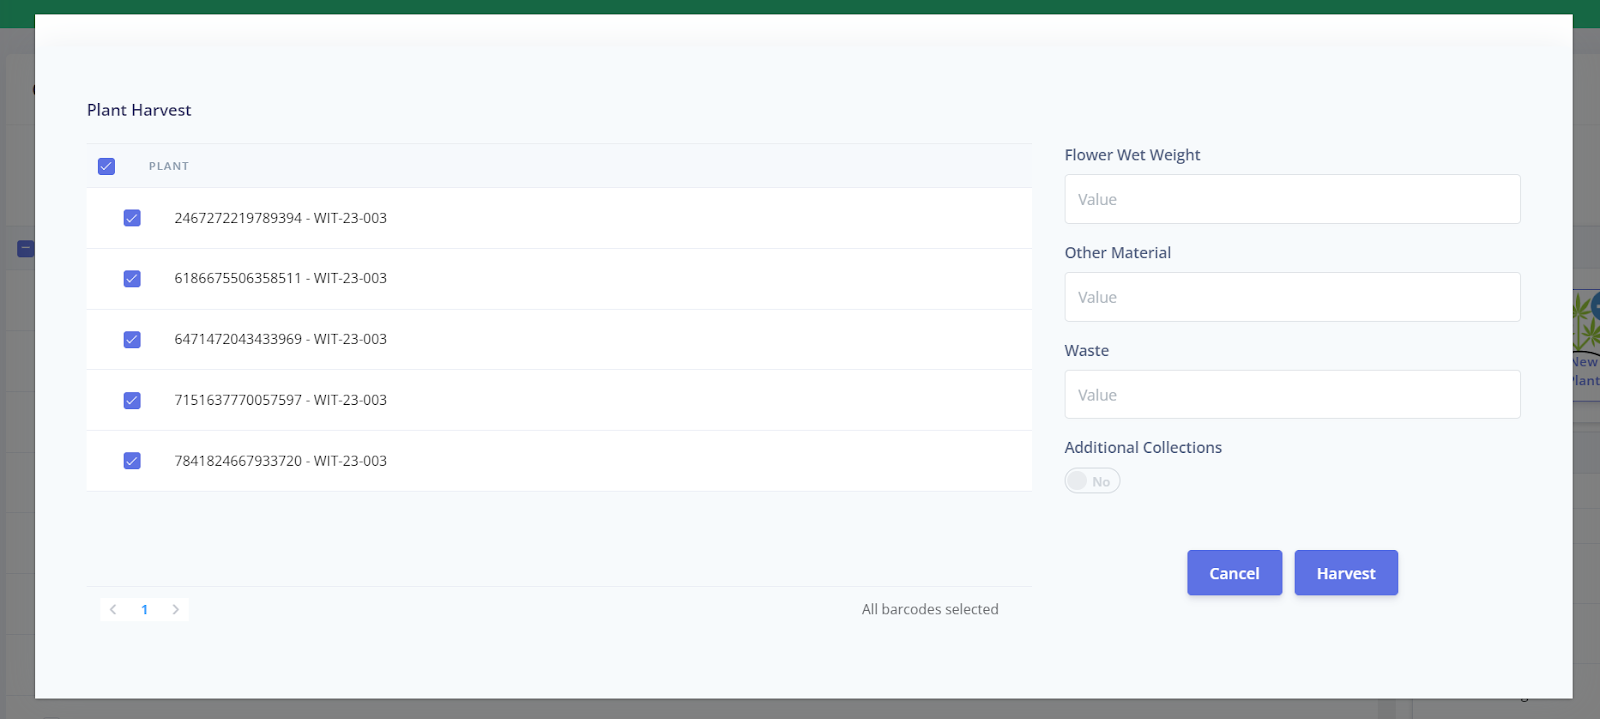
- Select a Flower Group and click Create a Harvest from the action menu
- Choose the Drying Room
- Provide a Harvest Name
- Chose the Date/Time to harvest
- Click “Harvest”
- In BioTrack this “Schedules the Harvest” and “Moves” the Plants to this location
Flourish | BioTrack |
 |  |
Video
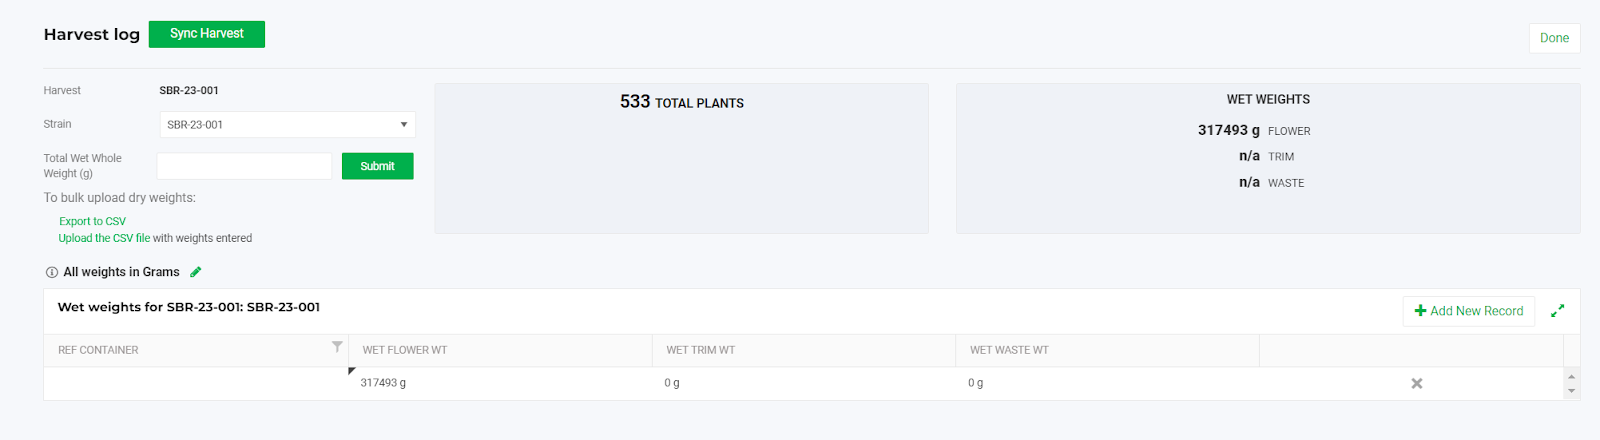
Log Wet Weights
Now proceed to log the wet weights for the plants.
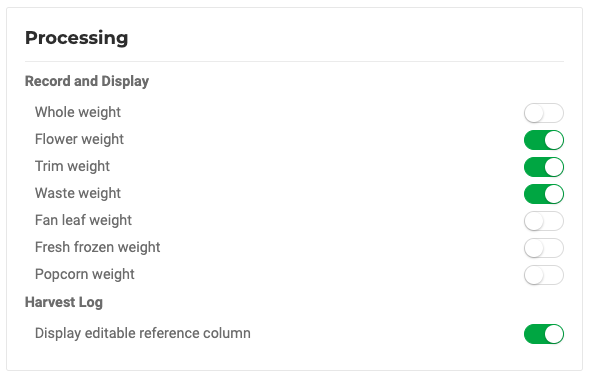
- Go to Settings
- Select Configuration
- For multiple facilities, select the Cultivation facility
- Locate the Harvest card and use this setup:
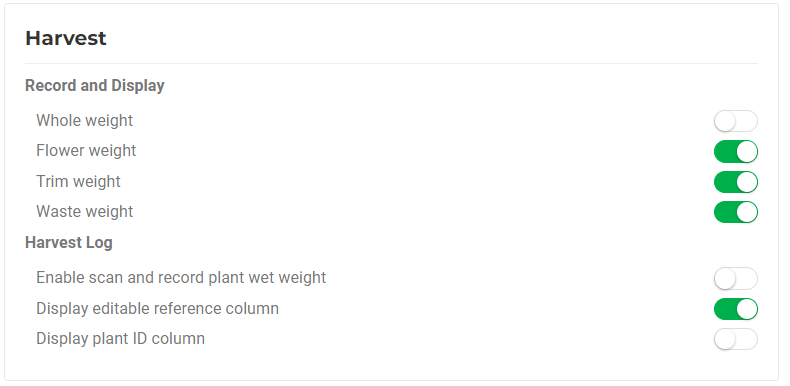
What do the settings mean?
In Flourish - Harvest Log Column | In BioTrack | Notes |
Display Editable Ref Column | N/A | Optional. Used for internal purposes. Not sent to BioTrack. |
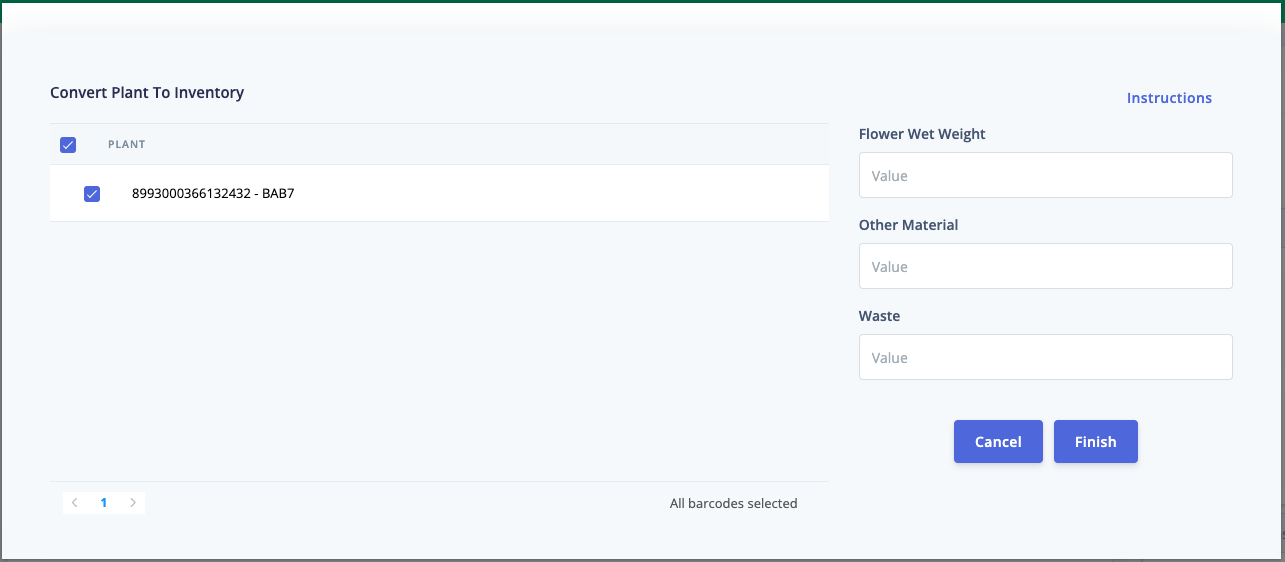
Wet Flower | Flower Wet Weight | Required |
Wet Trim | Other Material | Optional |
Wet Waste | Waste | Optional |
Actions
- Select the Harvest Group.
- Click "Edit Harvest Wet Weights"
- Enter the weight(s) as needed in the Harvest Log
- You can enter multiple lines by clicking “+Add New Record” if weighing the plants in batches. You’ll see the total weight at the top right of the screen.
- Click Done.
Video
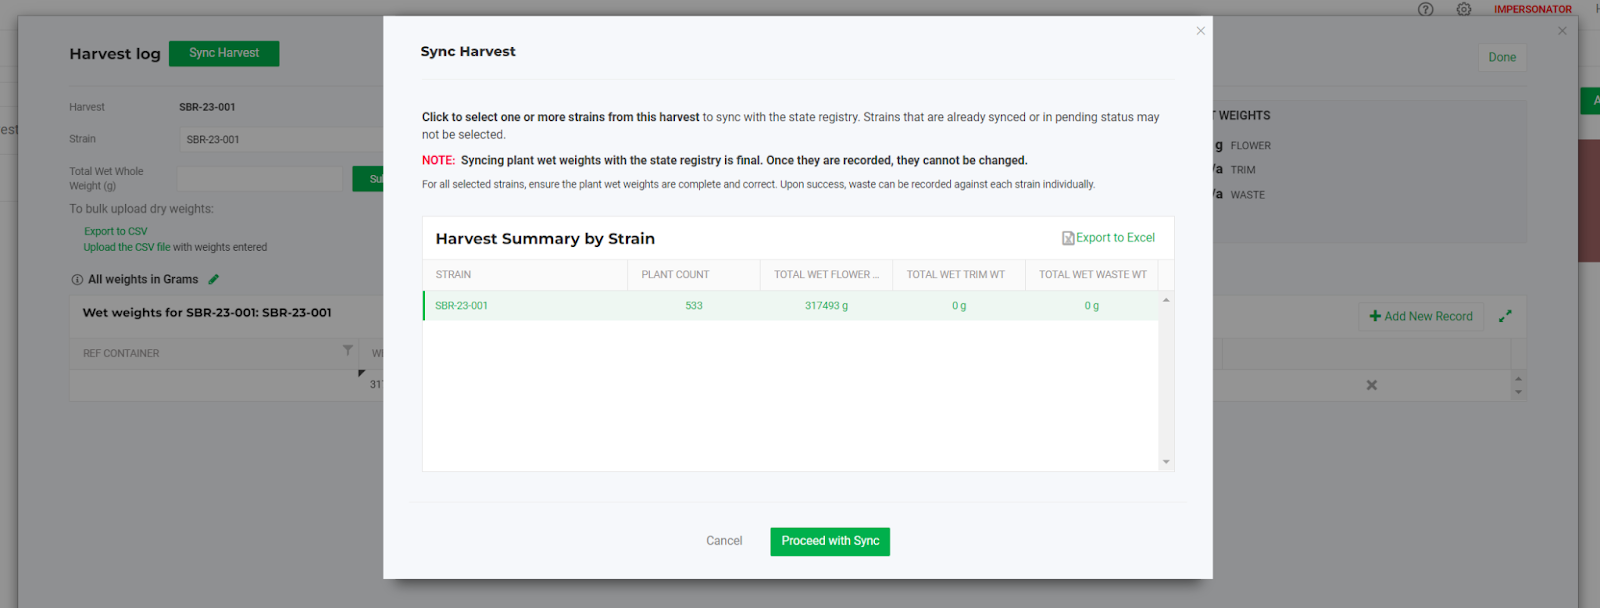
Submit Wet Weights from Flourish to “Harvest” in BioTrack
Once the wet weights are logged, we must submit them to BioTrack.
- Click “Sync Harvest” at the top left of the screen
- Verify the weights are as expected
- Click on the "Strain(s)" to sync. You’ll see the row turn green.
- Click “Proceed with Sync”
Sync Harvest Screen | Corresponding BioTrack Screen |
 |  |
Submit weights/sync video
Move the Harvest in Flourish to Processing
When we’re ready to record the dry weights.
- Select a Harvest Group and click "Move Harvest" from the action menu
- Select a Destination Area
- Choose a Move date/time
- Click "Confirm Move"
Log Dry Weights
- Go to Settings
- Select Configuration
- For multiple facilities, select the Cultivation facility
- Locate the Processing card and use this setup:
What do the settings mean?
Harvest Log Column | In BioTrack | Notes |
Display Editable Ref Column | N/A | Optional. Used for internal purposes. Not sent to BioTrack. |
Dry Flower | Flower Wet Weight | Required |
Dry Trim | Other Material | Optional |
Dry Waste | Waste | Optional |
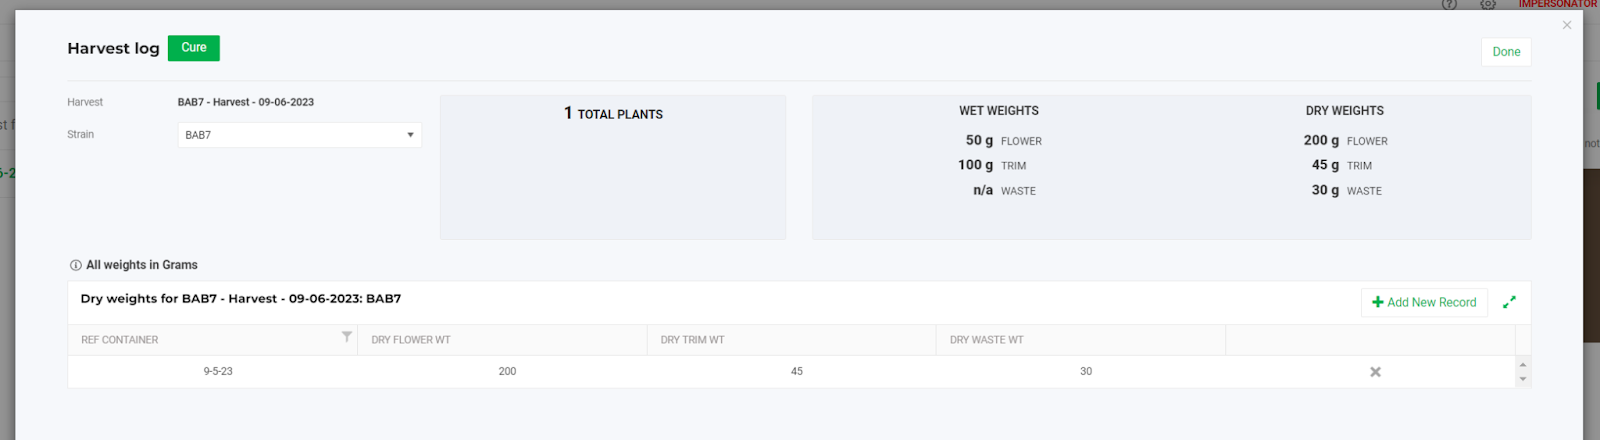
Record Dry Weights
- Select Processing Harvest Group
- Click "Edit Harvest Dry Weights"
- Enter the weight(s) as needed in the Harvest Log
- Click Done.
Dry Weights video
Cure Harvest into Inventory
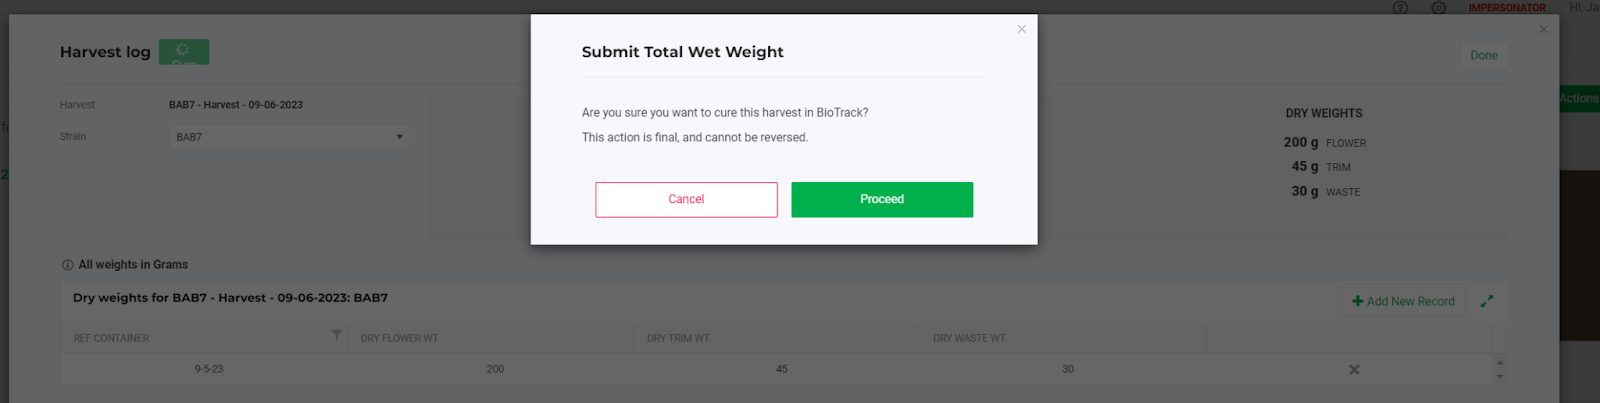
You “Cure” the Harvest to create inventory from previously logged dry weights.
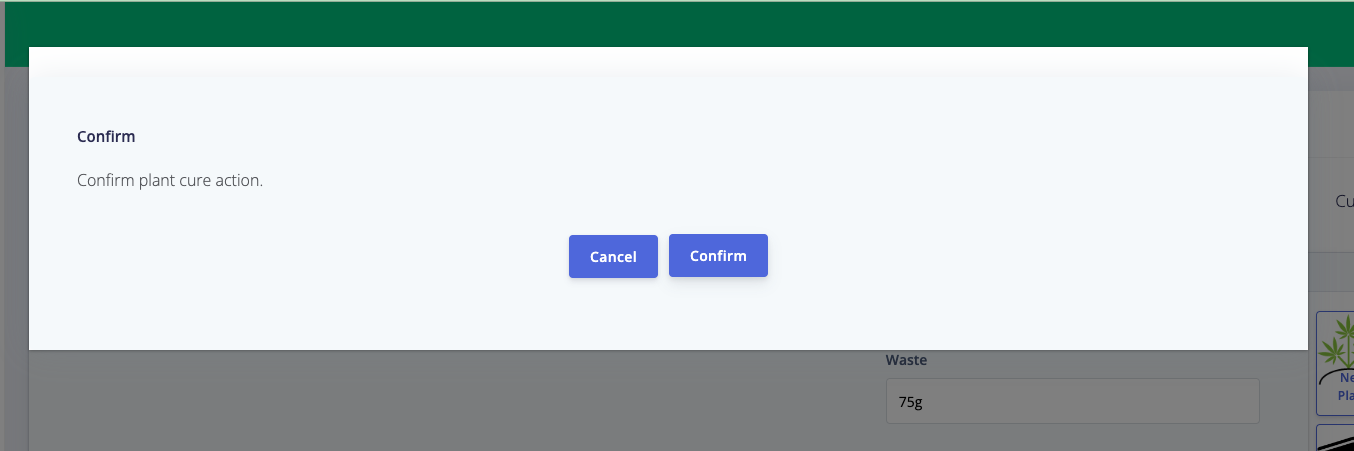
- Click “Cure” at the top left of the harvest log
- Click “Proceed” to confirm
- For reference, after clicking the 'Cure' button in BioTrack:
- Harvest Log with Cure Completed
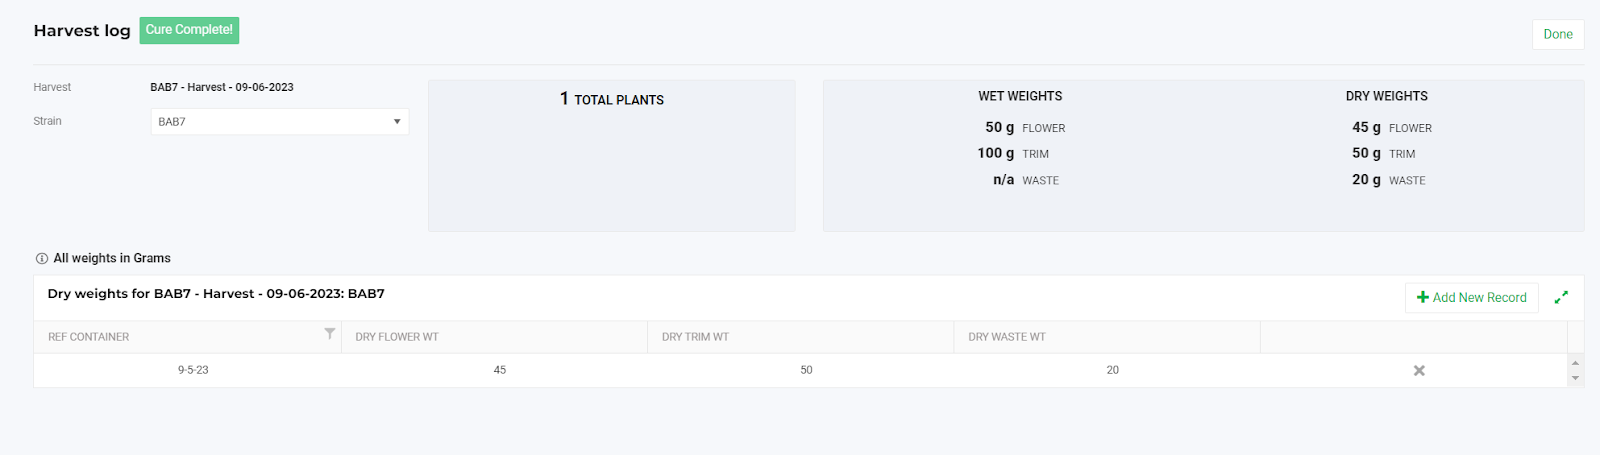
Results
- This is a “Final” action in BioTrack
- This does the following:
- Records the weights across all plants
- Marks them as cured
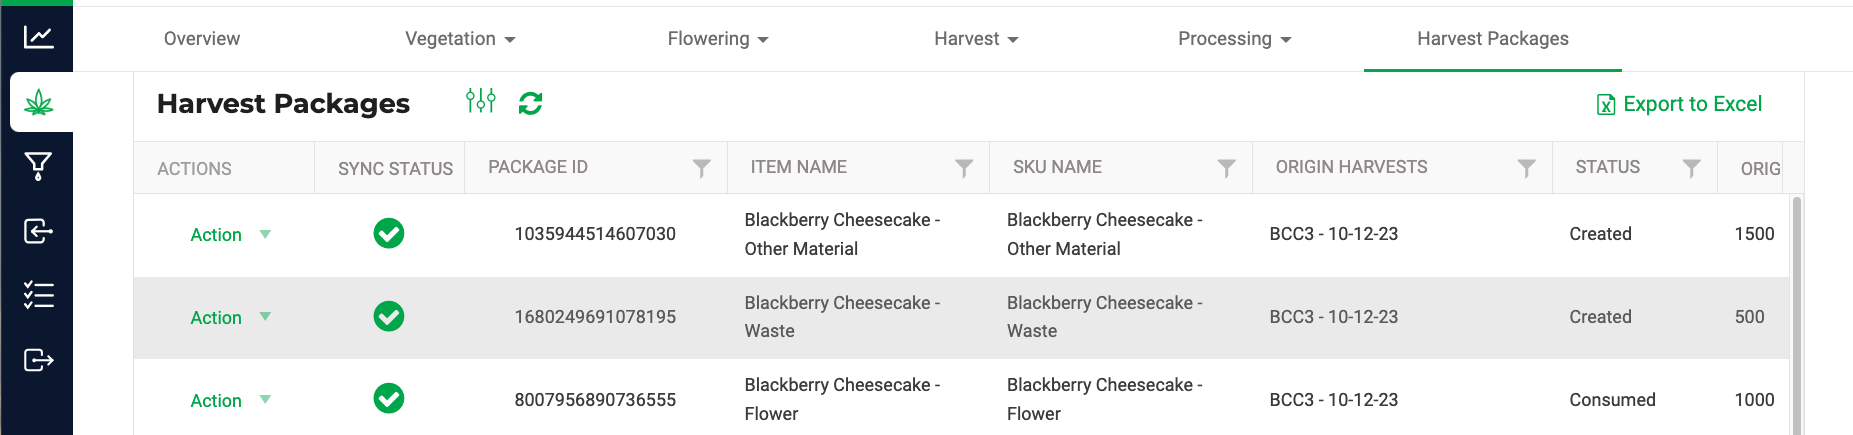
- Creates a package in inventory of Flower for the total Dry Flower with Item name of “Flower - Strain Name”
- Creates a package in inventory of Other Plant Material for the total Dry Trim with Item name of “Other Plant Material - Strain Name”
- Creates a waste entry for the total Waste, and a package in inventory of Waste with Item name of “Waste - Strain Name”
You can see these in the Harvest Packages
Also visible in Inventory
 |
 |
 |
Manicure Harvest Flow
COMING SOON
The Next Step
The next Step - BioTrack Inventory.
How did we do?
Sync BioTrack Transfers and Receive Packages
Connecticut BioTrack Manifest Requirements