Table of Contents
Flourish Software External API Key Management
Flourish Software previously supported generating External API keys at the user level. While this method is still available, we highly recommend transitioning to the new service-based API key managem…
Flourish Software previously supported generating External API keys at the user level. While this method is still available, we highly recommend transitioning to the new service-based API key management, as the legacy approach will be sunset at July 2026.
For now, use the legacy method only for certain partner integration.
Previous vs. New API Key Management
Key reasons to adopt the new method:
- Not tied to individual users—no disruption if users leave or are deactivated.
- Enhanced security—API access is scoped to only the services and data needed.
- Easier to manage—centralized and consistent key control.
👉 Review our full API documentation here: https://api-docs.flourishsoftware.com/
Prerequisites
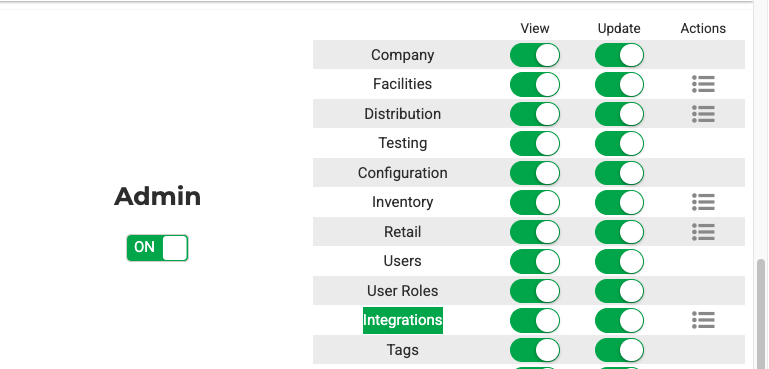
To manage API keys, your user role must have 'Update' access to Integrations. Follow these steps:
- Go to Settings → User Roles – Open the User Roles section from Settings.
- Select the Facility – Choose the facility where you want to manage roles.
- Select the Role – Pick the specific user role to update.
- Find 'Integrations' and click Configure – Locate the Integrations section and select Configure.
- Locate the Admin card – Within the configuration, find the Admin permission card.
- Enable 'Update' access for Integrations – Ensure the 'Update' checkbox is selected.
- Click Save – Save your changes to apply the new permission settings.
API Keys Management
Generate a New API Key
- Go to
Settings. - Select
Integrations. - Click the pencil icon on the "API Keys" card.
- Click the ‘+’ icon on the top right to create a new API Key.
- Provide:
- Name
- Description
- Expiration Date (via quick selectors or date picker)
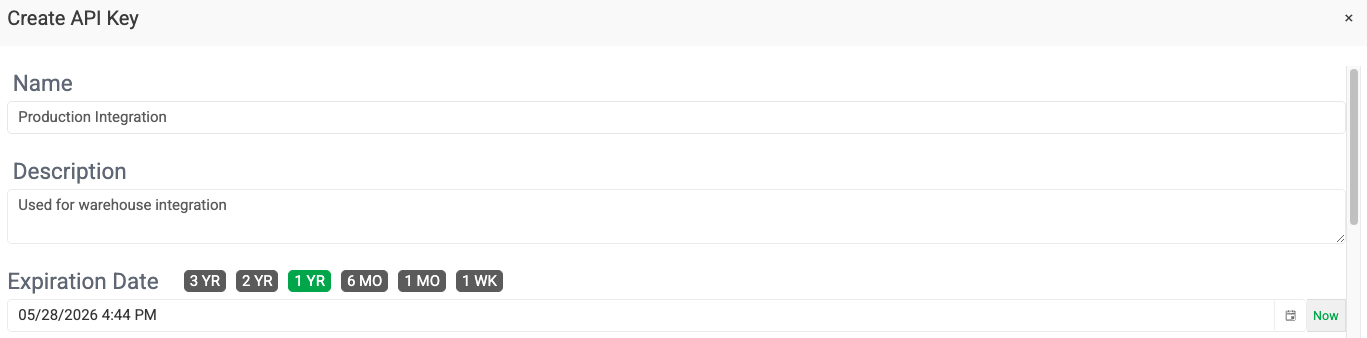
- Set permissions—choose one of two methods:
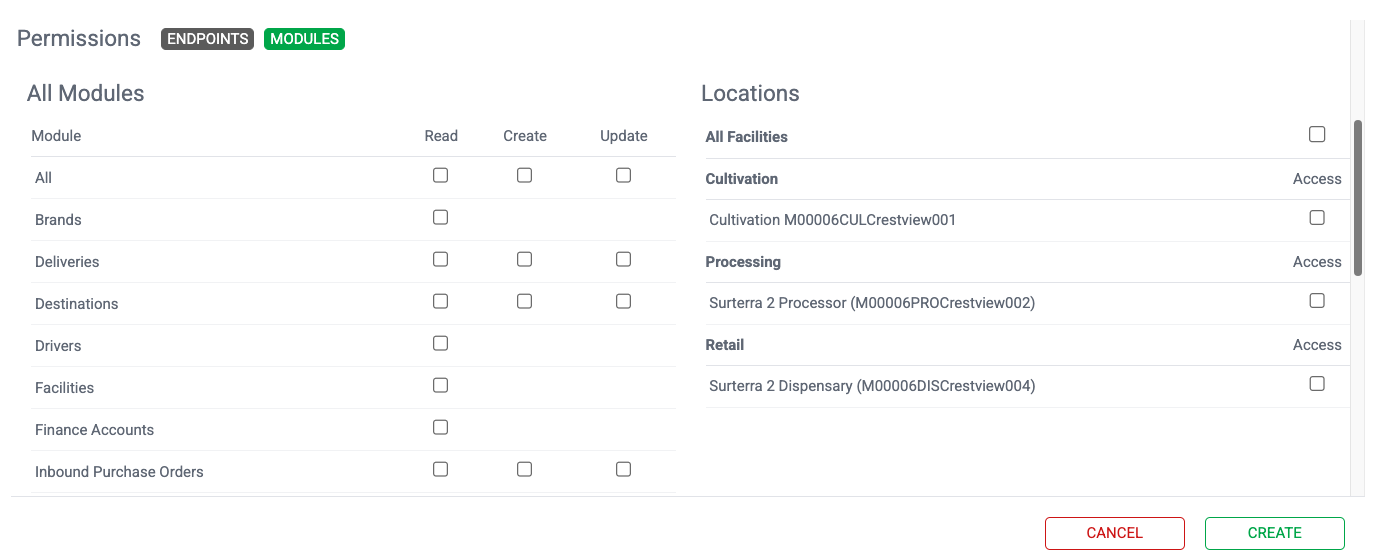
- By Modules and Locations (Default)

- Select MODULES. For each module, check boxes under
Read,Create, orUpdate. - Locations: Select specific facilities or choose "All Facilities".
- Select MODULES. For each module, check boxes under
- By EndPoints and Locations

- Select ENDPOINTS.
- Check boxes under Company Endpoints and Facility Endpoints, or use "All".
- Locations: Select individual facilities or "All Facilities".
- By Modules and Locations (Default)
- Click CREATE.
- Copy the newly generated API key.
- Click THANKS to finish.
Manage API Keys
Copy, Refresh, and Delete
- Go to
Settings → Integrations. - Click the pencil icon in the "API Keys" card.
- Use the three-dot menu on the right:
- Copy the API Key.
- Refresh:
- Generates a new key with the same settings.
- Set a new expiration.
- Click REFRESH—the old key becomes invalid.
- Delete:
- Confirm the deletion.
- Access is revoked for any services using this key.
Edit the API Key
- Click the key’s name, expiration, or created date to open its details.
- Options:
- Edit the metadata and save.
- Delete the key.
- Refresh:
- Save changes before refreshing.
- If not saved first, the refresh uses the original settings.
How did we do?
Securing your webhooks
Generate or Reset External API key