Table of Contents
Order Sync Workflow - WooCommerce to Flourish Application
Overview. When a customer places an order in the online store, you control what happens next. Use your WooCommerce settings to either: ✋ Manual Review (Draft Mode) Want to review every order before i…
Table of Contents
Overview
When a customer places an order in the online store, you control what happens next. Use your WooCommerce settings to either:
✋ Manual Review (Draft Mode)
Want to review every order before it's sent to Flourish? Set your WooCommerce orders to Draft, and your team gets to approve each one manually before it syncs. Perfect for businesses that need to double-check orders for accuracy, compliance, or internal process.
Best for: Teams with internal approval workflows or compliance checks.
⚡ Automatic Sync (Processing Mode)
Ready to streamline everything? Set your orders to Processing, and they’ll sync instantly and automatically into Flourish—no clicks needed.
Best for: Teams that prioritize speed and automation.
Set the Workflow
- Log in to the WooCommerce Admin Panel.
- Navigate to Settings > Flourish > Flourish WooCommerce Plugin Settings.
- Locate the Order Type section.
- In the Order Type section, locate the “Outbound Order Status” setting under “Outbound”.
- Choose one of the following:
- Draft - Orders placed in this configuration will appear in WooCommerce with a status of
Draftand require manual intervention before syncing to Flourish. - Processing - Orders placed in this configuration will sync automatically to Flourish and generate a Flourish Order ID immediately upon checkout.
Draft
Processing
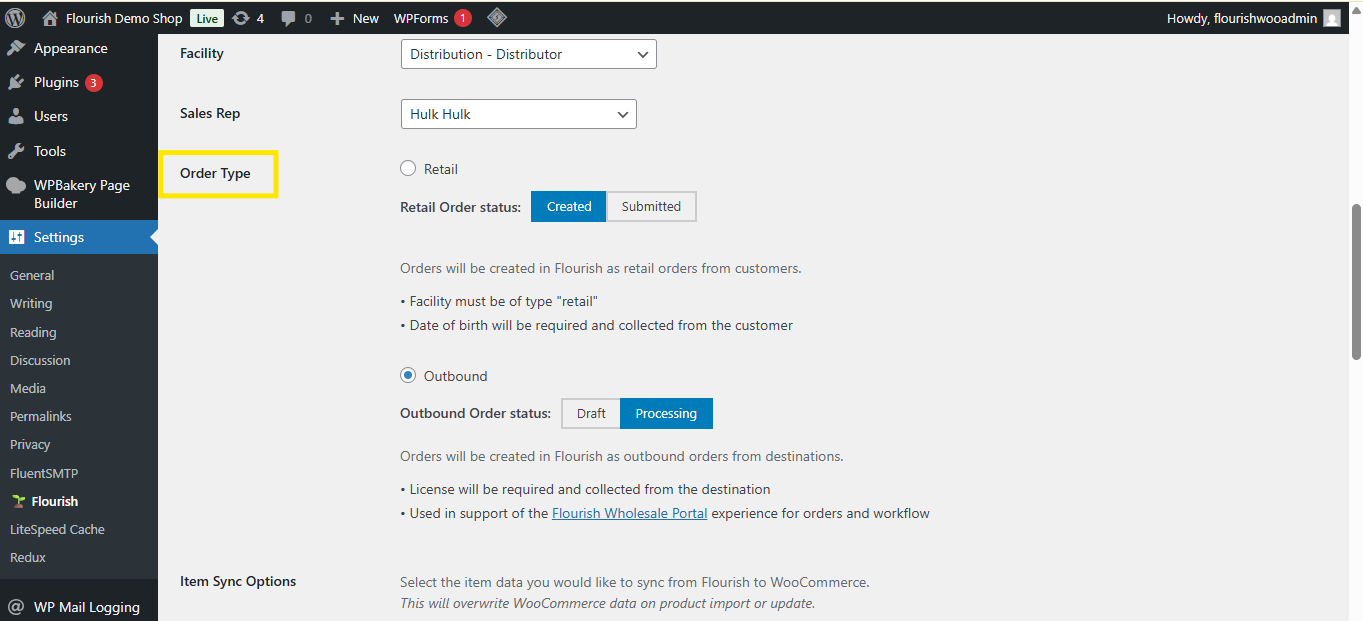
- Draft - Orders placed in this configuration will appear in WooCommerce with a status of
'Draft' Configuration Order Workflow
- Log in to the Shop and place an order by adding items to the cart and completing the checkout.
- Go to WooCommerce > Orders.
- Click the Drafts tab.
- Select the recently placed order.
- Change the status to Processing.
- Click Update. A Flourish Order ID will be generated to confirm the sync.
- Log in to the Flourish Application.
- Select the relevant facility.
- Navigate to Outbound > Orders > All Orders.
- Confirm that the synced order appears on the list with the correct Order ID.
Processing' Configuration Order Workflow
- Log in to the Shop and place an order by adding items to the cart and completing the checkout.
- A Flourish Order ID will be generated instantly upon checkout
- Log in to the Flourish Application.
- Navigate to Outbound > Orders > All Orders
- Confirm that the synced order appears on the list with the correct Order ID.
How did we do?
Flourish Wholesale Portal User Guide for Buyers
