Table of Contents
Facility Area and Location Management
Areas and Locations. Each Flourish facility must have at least one area designated for the storage or management of inventory and plants. Areas represent high-level spaces within your facility, such…
Areas and Locations
Each Flourish facility must have at least one area designated for the storage or management of inventory and plants. Areas represent high-level spaces within your facility, such as rooms or operational zones.
You can create locations under each area to track inventory with greater precision. Locations allow you to organize products and plants within a specific room or space for more accurate internal tracking.
Flourish submits the Area to the state system (BioTrack or METRC) to support compliance reporting and regulatory tracking.
The Area Type defines how the area functions for state reporting. For cultivation, the Area Type identifies the plant stage, such as propagation, vegetative, or flowering.
Required Area Types
Area Type | Description |
Inventory | Every facility needs at least one inventory area. This is the place where your general inventory is located. This includes all your packaged and non-cannabis inventory located in the "Inventory" module. Examples: Warehouse, Freezer, Secure Vault |
Propagation | This area type is used within the Cultivation module to track plants in the clone or propagation stage. If you are using Flourish's Cultivation module, you must set up at least one vegetative area. This area type is not used by BioTrack users once the BioTrack integration is turned on. Example: Clone Room |
Vegetative | This area type is used within the cultivation module to track plants in the vegetative stage. If you are using Flourish's cultivation module, you must set up at least one vegetative area. Example: Veg Room |
Mother | This area type is used within the cultivation module to track mother plants. If you are using Flourish's cultivation module, we recommend creating at least one mother area. Example: Mother Room |
Flowering | This area type is used within the cultivation module to track plants in the flowering stage. If you are using Flourish's cultivation module, you must set up at least one flowering area. Example: Flower Room 1, Flower Room 2 |
Harvest | This area type is used within the cultivation module to track harvested plants. If you are using Flourish's Cultivation module, you must set up at least one harvest area. Example: Dry Room |
Processing | This area type is used within the cultivation module to track the dry weights collected during harvest. If you are using Flourish's Cultivation module, you must set up at least one processing area. Examples: Dry Room, Trim Room |
Optional Area Types
These can be used for reporting, but they all function the same as inventory.
Area Type | Description |
General | This area type is not typically used. It functions the same as inventory. |
Quarantine | This area type functions the same as inventory. |
Unspecified | This area type functions the same as inventory. |
Waste | This area type functions the same as inventory. |
Access Area and Location Management
- Go to Settings by clicking the gearbox icon in the top-right corner of the screen.
- Click Facilities.
- Select a facility from the Facilities List.
- Select the Areas tab from the side Menu.
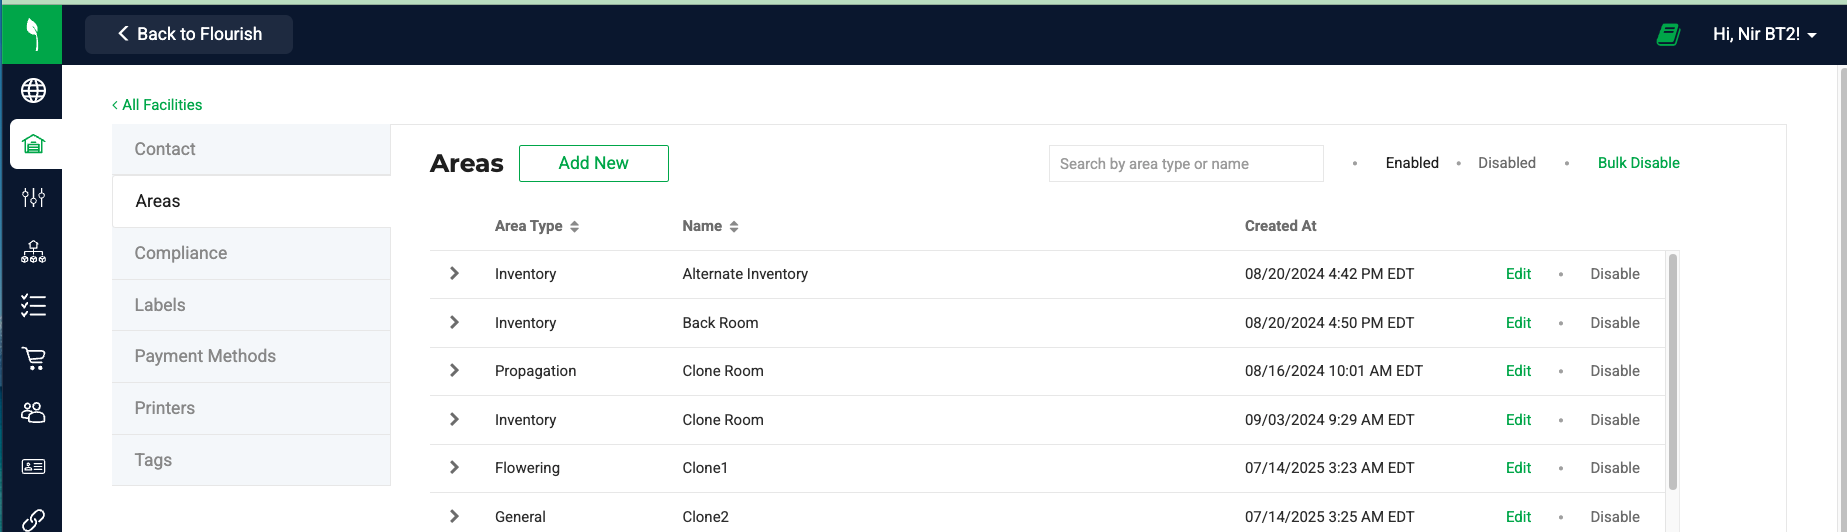
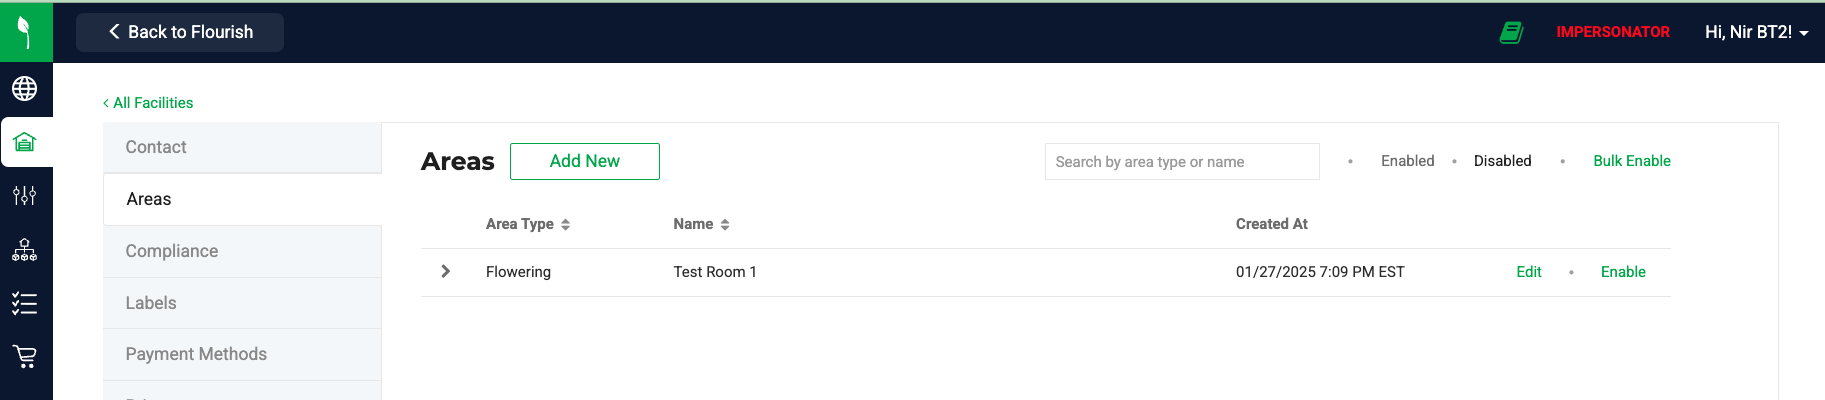
Areas Screen
Use the Areas screen to create, manage, enable, and disable facility locations such as rooms, storage spaces, and operational zones.
Quick Actions and Navigation
Add New Button | Click Add New to create a new area. This opens the area creation form, where you define the Area Type, Name, and other required settings. |
Search Box | Use the search field to quickly find an area by name or type. Type directly into the search bar to filter the list in real time. |
View of Enabled Areas | Click Enabled to display only active areas. Use this view to manage areas currently available for operational use. |
View of Disabled Areas | Click Disabled to display inactive areas. Use this view to review or re-enable previously disabled areas. |
Bulk Disable Action | Click Bulk Disable to disable multiple areas at once. Select the areas you want to disable, then confirm the action. Use this feature when restructuring areas. |
Areas List with Quick Actions and Expand View
Review all areas in the main list. Each row displays:
- Area Type
- Name
- Created At
Use the quick actions on the right side of each row to:
- Click Edit to update the area.
- Click Disable to deactivate the area.
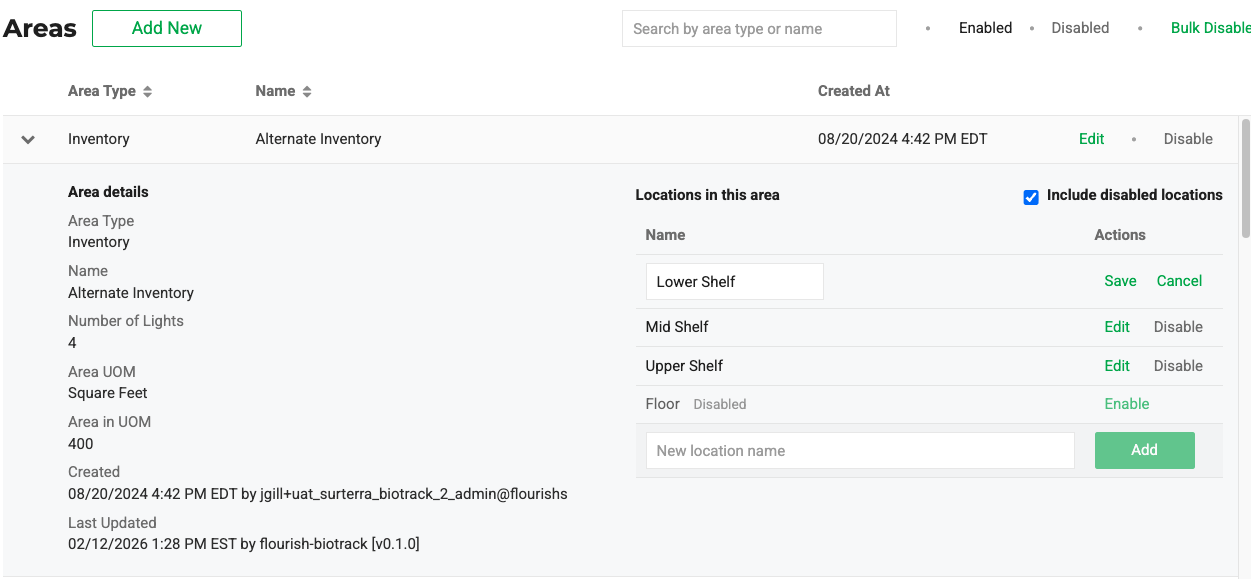
- Click the expand arrow
 on the left side of a row to view additional details for that area. Use the collapse arrow
  to collapse the view.
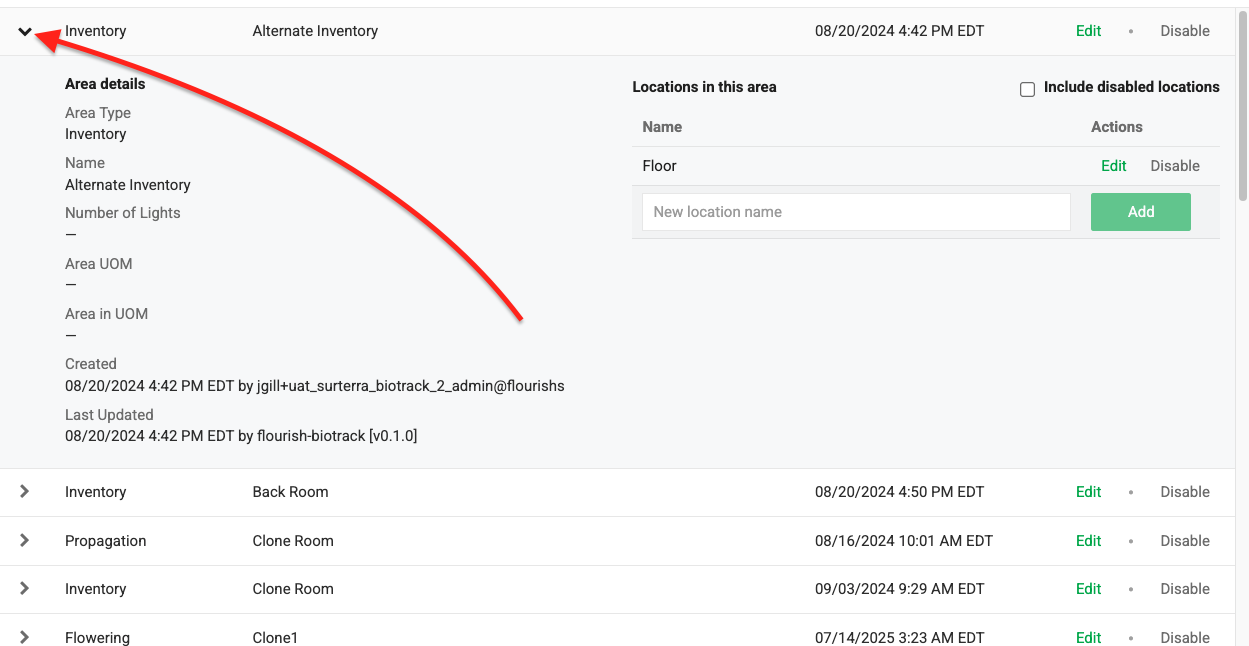
Add a New Area
| METRC-integrated facilities must select the "METRC Location Type" in certain states. The Metrc location type should correspond to the Flourish Area Type. 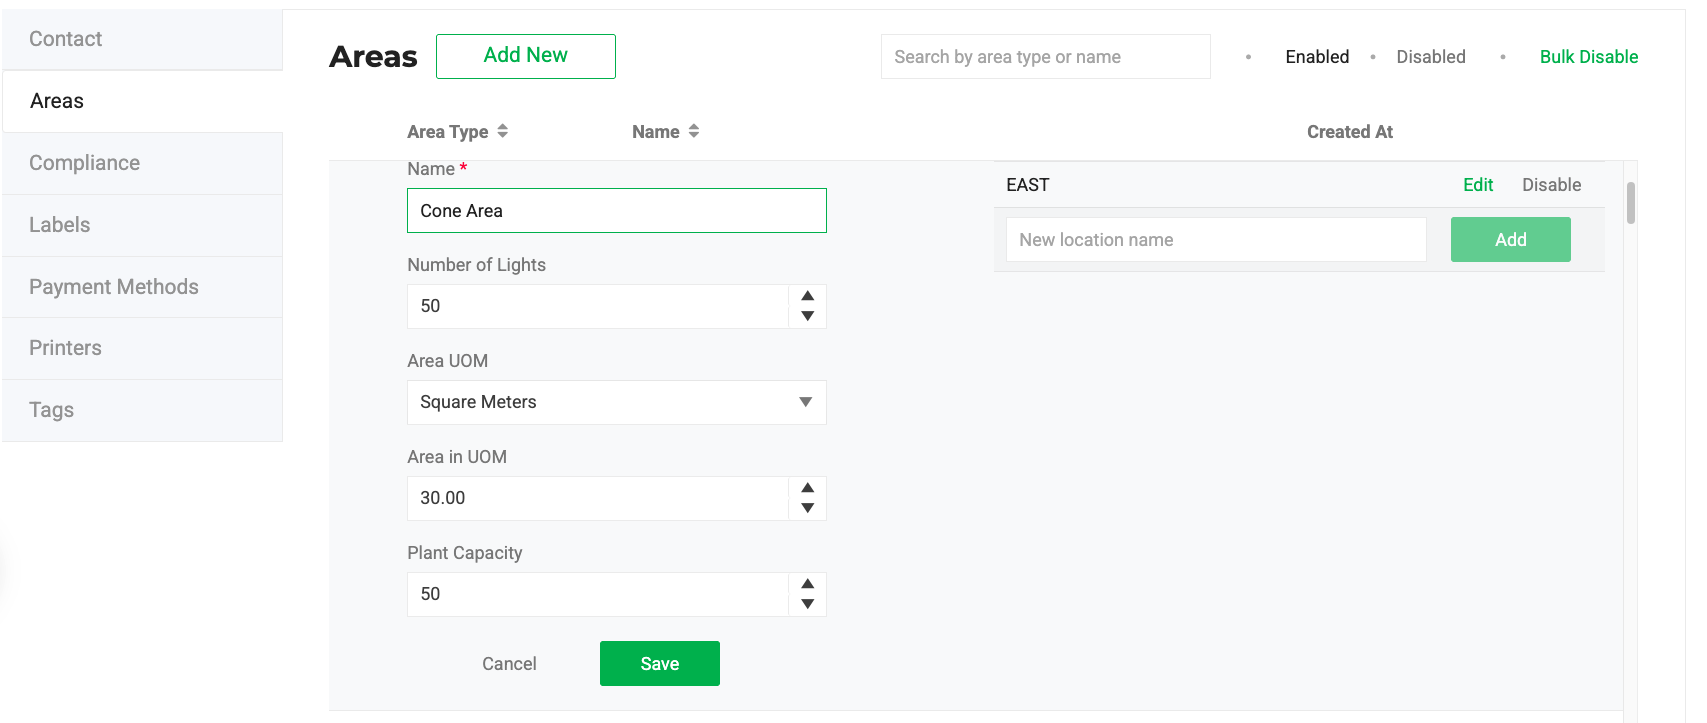 |
Edit an Area
- Click the Edit button. This action expands and displays the Are attributes.
- Edit the Area attributes:
- Name.
- Number of Lights.
- Area UOM.
- Area in UOM.
- Plant Capacity.
- Click Save.
Plant Capacity
Use Plant Capacity to record the maximum number of plants an area or location can hold. This value is optional and is used for reporting in Flourish Analytics. Flourish does not enforce the capacity limit.
Plant Capacity appears in the area form below Area in UOM.
Set Plant Capacity on an Area
- Click Add New to create a new area, or click Edit next to an existing area.
- Enter a value in the Plant Capacity field.
- Click Save.
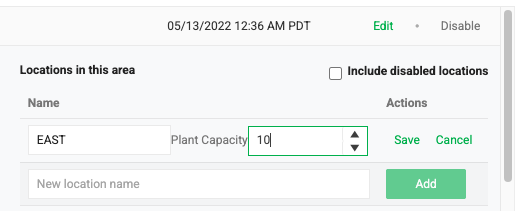
Set Plant Capacity on a Location
- Click the expand arrow on the left side of the area row to expand it.
- Click Edit next to the location.
- Enter a value in the Plant Capacity field.
- Click Save.
Disabling Areas
Disable a Single Area
Click the Disable button

Bulk Disable Areas
- Click Bulk Disable.
- Check the boxes next to the Areas to disable.
- Click Disable Areas.

Enable an Area
- Select the Disabled view
- Click Enable next to the Area
Location Management
Purpose
Use Location Management to organize physical areas within your facility, control which Locations are active, and maintain accurate inventory tracking across all designated spaces.
Access Location Management
- Click the expand arrow on the left side to expand the Are you want to manage location.
- Check the box next to "Include disabled locations" to display the disabled location. Uncheck to display only the enabled Locations.
Actions On Locations
Add a new Location
- Enter the Location name in the Name field.
- Click Add.
Edit a Location name
- Click Edit next to the Location.
- Edit the name.
- Click Save.
Disable a Location
- Locate the Location in the list.
- Click Disable.
View disabled Locations
- Check the box next to Include disabled locations to display disabled Locations.
- Uncheck the box to display only enabled Locations.
Enable a Location
- Check the box next to Include disabled locations.
- Locate the Location in the list.
- Click Enable.
Locations and METRC Sub-Locations
In METRC facilities, Locations sync to METRC as SubLocations. When you create or update a Location in Flourish, the system syncs it to METRC automatically. When a plant's Location changes, Flourish includes the SubLocation in all relevant METRC payloads — moves, phase changes, harvests, and destructions.
If a SubLocation exists in METRC but not yet in Flourish, it is imported automatically the first time a plant referencing that SubLocation is synced. Locations that are not referenced by any plant in METRC will not appear in Flourish automatically. You can always create Locations manually in Flourish under any Area.
Locate Plants
Use the Locate Plants action to assign one or more plants to a specific Location within their current Area. This is available in METRC facilities only.
When you locate a plant, Flourish updates the plant's current Location and includes the corresponding METRC SubLocation in all subsequent METRC payloads for that plant.
All plants selected for a single Locate action must be in the same Area. The Location dropdown shows only Locations belonging to that Area.
Assign Plants to a Location
- Navigate to Grow.
- Select All Plants.
- Select the plants you want to assign. All selected plants must be in the same Area.
- Click Locate in the action menu.
- Select a Location from the dropdown.
- Click Locate.
Flourish updates each plant's Location and syncs the change to METRC. The Location column in the plant grid reflects the updated assignment.
How did we do?
Update Phone Number
Cultivation Area Attributes