Table of Contents
Creating a Customer Profile
Before you can create an order, you need to create a profile to store your customer's information. The Customer Profile contains your customer's purchase history, uploaded documents, and more. You ca…
Before you can create an order, you need to create a profile to store your customer's information. The Customer Profile contains your customer's purchase history, uploaded documents, and more. You can create new customer profiles in either the web or point of sale applications. We'll show you both methods here.
In the Web App
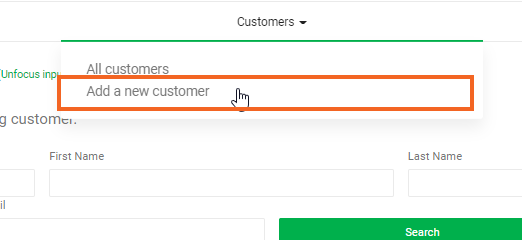
- In Flourish, navigate to Retail > Customers, then click Add a New Customer.
- Fill out all required fields (marked with an asterisk) in the Member Info card.
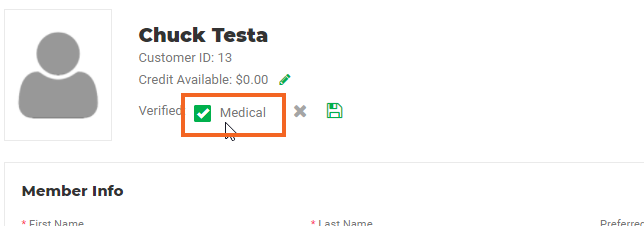
- If this is a medical customer, make sure to click the checkbox next to Medical under the customer's name.
- When you're done, click the Save button in the top right.
In the POS
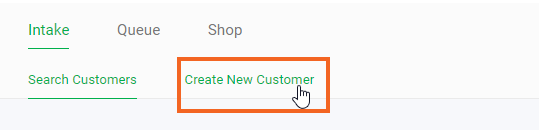
- In the top left corner of the POS, click on Create New Customer.
- Fill out all required fields (marked with an asterisk) in the Member Info card.
- If this is a medical customer, make sure to click the Verified dropdown and change it to Yes.
- When you're done, click the Save button in the top right.
Required Fields
The following are required when creating new customer profiles:
- First Name
- Last Name
- Date of Birth
- Phone Number
Physicians
A physician is only required when the customer is a medical customer purchasing cannabis items at a medical license. The customer profile must be saved before adding a physician.
- After saving the customer profile, click the pencil icon on the Physician card.
- Use the dropdown to select a physician's name.
- When you're done, click Save.
Registry Info
Valid state registry information is required for medical customers. The customer profile must be saved before adding registry info.
- After saving the customer profile, click the pencil icon in the Registry Info card.
- Fill out the correct State Registry ID, State, and State Registry Expiration.
- When you're done, click Save.
Optional Fields
These fields are not required to save a customer profile, but they can be very helpful!
Documents
This section allows you to upload copies of a customer's driver's license, passport, etc. This can be done in either the web or POS applications.
- After the customer profile has been created, click Add Document.
- Select the type of document, the state, and the document's expiration date.
- Click Upload Document File in the preview window, then click Select File and locate it on your computer.
- After you've selected your file, click Upload.
- You should see a preview of your image in the image preview window. If it looks good, click Save.
Customer Group
Assigning a customer to a group is a great way to help configure discounts and keep track of your customers. Customer groups include:
- Employee
- First Responder
- Industry
- Student
- Veteran
Disciplinary Status
These statuses don't prevent customers from making purchases, but they can be a good way to communicate internally about customer behavior.
- No Issues
- Warning - Level 1
- Warning - Level 2
- Banned
Allergies
This is a freeform text field that allows you to enter any customer allergies. This does not prevent the customer from purchasing items that may contain these allergens, so please use caution.
Notes
Notes are internal and can be seen by anyone who can open a customer's profile. This is great for storing information like the customer's product preferences or notes about their experience.
How did we do?
Adding a Physician
Deleting a Customer