Table of Contents
LeafLink Integration Setup and Activation
Before we can go live, we need to enable webhooks in LeafLink and get some information to make the connection successful. A LeafLink user with admin access will need to begin this process. To make yo…
Before we can go live, we need to enable webhooks in LeafLink and get some information to make the connection successful. A LeafLink user with admin access will need to begin this process.
Adding the Webhook to LeafLink
We'll need to make sure that LeafLink is getting data from Flourish to integrate the two successfully. To start, we'll enable webhooks in LeafLink.
- In Leaflink, go to Settings > Company Information.
- Scroll down and locate the Developer access area.
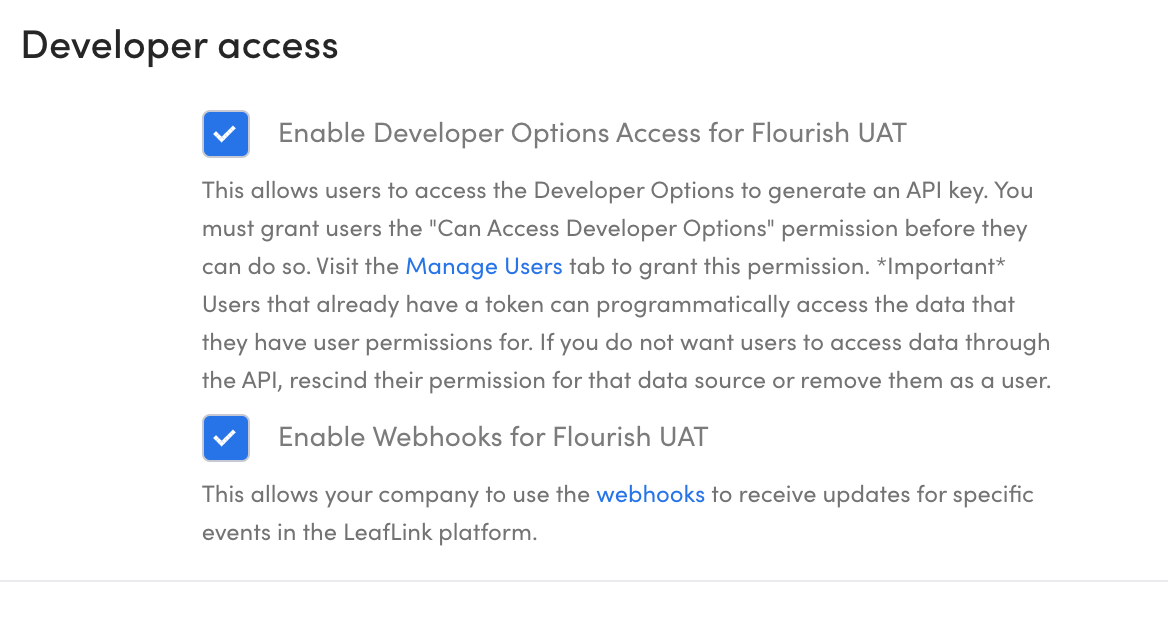
- Check the Enable Developer Options box and the Enable Webhooks box.
- Checking the boxes activates the +Add Webhook button under Settings > Developer Options.
- Click Save.
- In Settings > Developer Options, click the + Add Webhook button.

- Type Flourish in the Name field.
- Without closing your browser tab, open a new tab and log in to Flourish.
- Navigate to Settings > Integrations > LeafLink and click Configure.
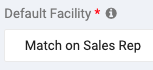
- Click the Default Facility dropdown and select your default facility from the list.If you are routing orders from LeafLink to multiple Flourish facilities, select Match on Sales Rep.
Learn more about Sales Rep Setup.
- Click the
 copy button to copy the Webhook URL. Ensure it is the one you want.
- Without closing your browser tab, return to LeafLink and paste the Webhook URL in the Url field.
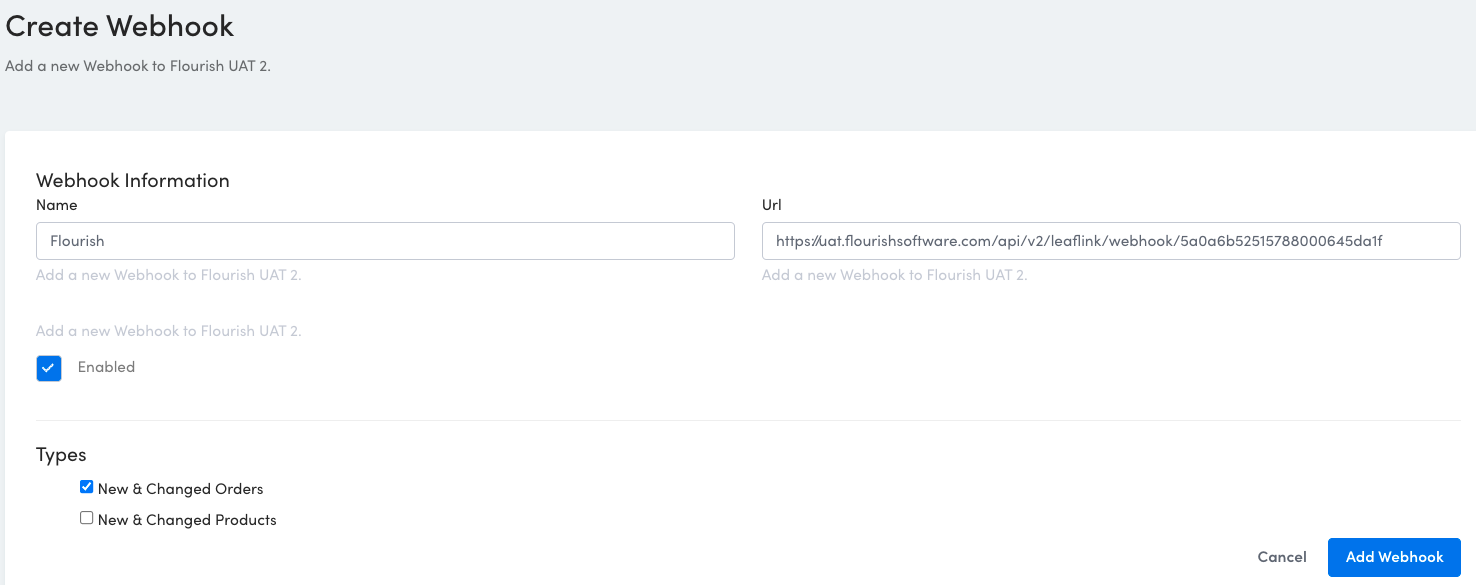
- Check the New & Changed Orders box.
- Click Add Webhook.
Here is an example of what a complete webhook setup looks like:

Completing Webhook Setup in Flourish
We've completed setup in Leaflink, and in step 7 above, we started setting up the integration in Flourish. We'll complete the setup in Flourish so that orders can flow through from LeafLink.
We will need the following information from LeafLink to initiate the integration in Flourish Software:
- API key
- Company Webhook key
- Company ID - populates automatically once the other fields have information in them.
Getting Information from LeafLink
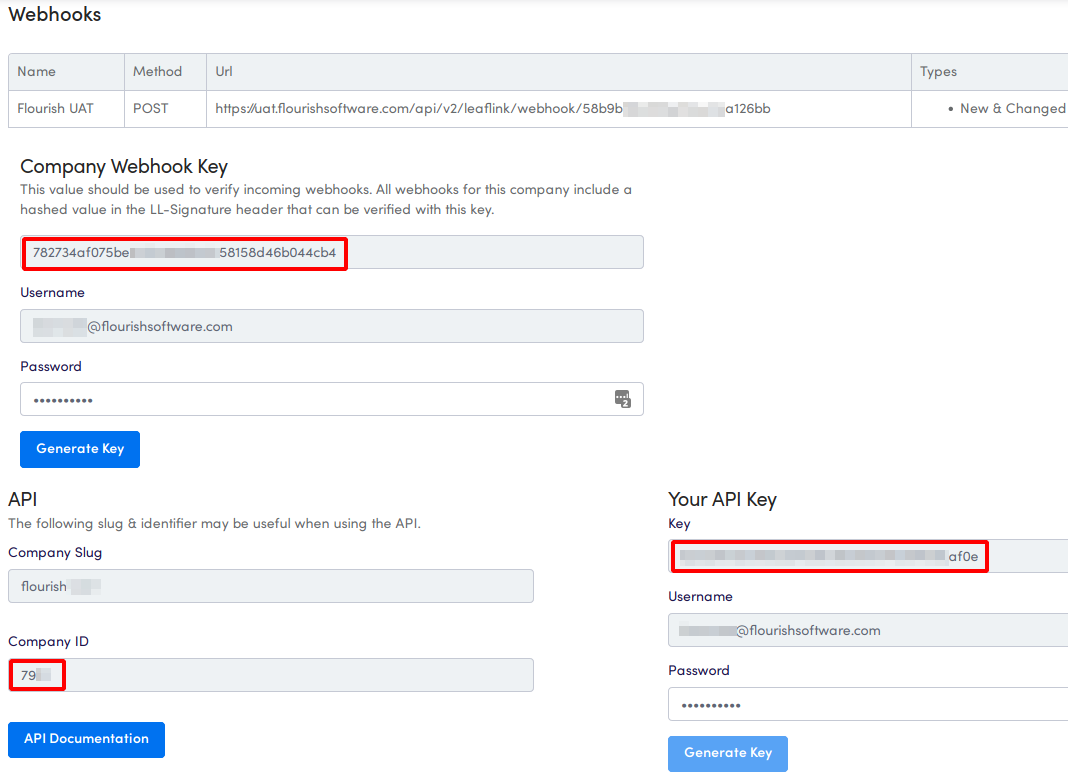
- In LeafLink, navigate to Settings > Company Information > Developer Options.
- Click Generate Key under Company Webhook Key, then click OK to confirm.
- Click Generate Key under Your API Key.
- Make a note of the Company ID information.
Pasting Information from LeafLink into Flourish
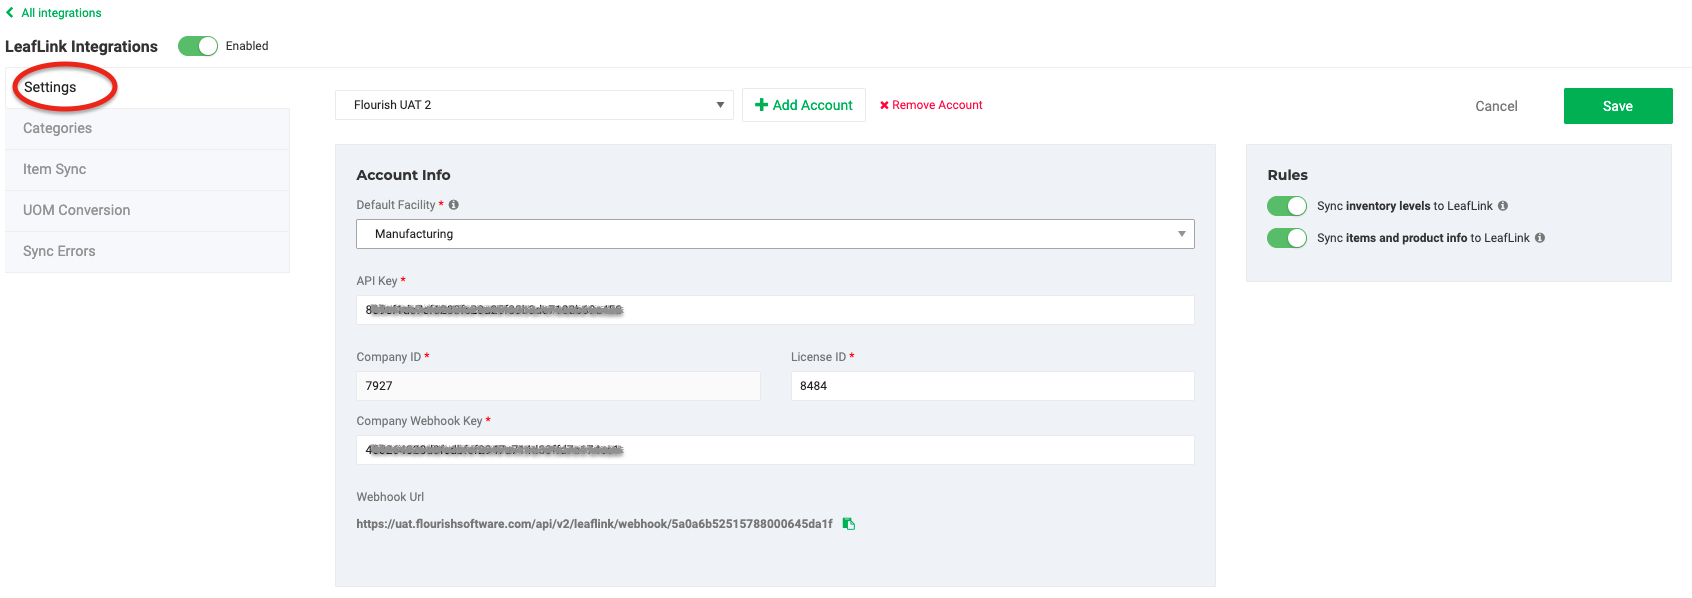
- In Flourish, navigate to Settings > Integrations > LeafLink and click Configure.
- Verify your selection / select your Default Facility from the Default Facility dropdown.
- Inventory levels will be pulled from the default facility
- If you need to route your orders to more than one facility, select the Match on Sales Rep option.
- If you select "Match on Sales Rep", your inventory levels are pulled from all the facilities
- Copy your API Key from LeafLink and paste it into the API Key field.
- Copy the Company ID from LeafLink under the API section and paste it in the Company ID field.
- Copy the Company Webhook Key from LeafLink and paste it into the Company Webhook Key field.
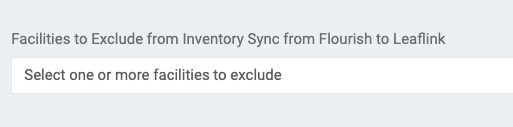
- Suppose you want to exclude a facility's inventory level from being synced from Flourish to Leaflink. In that case, it must be added to the Facilities to Exlcude from Inventory Sync from Flourish to Leaflink field:
Rules Setup
Configuration Video Overview
What are the Rules?
Rules define the nature of the integration in two ways:
- Inventory / Item Sync Rules - define the nature of new items you sync to LeafLink. For any new items you sync, the following item attributes are pushed from Flourish to LeafLink based on the toggles and scenarios below.
- Sync orders to Flourish based on Leaflink statuses - You can set the Status of Leaflink orders you want to sync into Flourish Software.
Inventory/Item Sync Rules
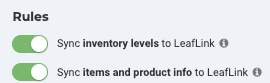
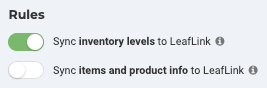
- Sync Inventory Levels to LeafLink will sync the Sellable quantity in Flourish as the Available quantity in LeafLink. This setup is useful when you want to manage your items in LeafLink, but you want Flourish to help manage the quantity of those items.
- If you choose to Sync Inventory Levels to LeafLink, and you have more than one facility (license), you must set the facility or facilities that updates that inventory level. Learn more here on how to set the inventory level updates.
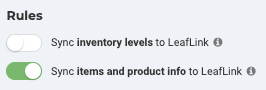
- Sync Items and Product Info to LeafLink will allow Flourish to create new items in LeafLink. This toggle is useful when you want Flourish to manage your items in LeafLink.
You can use one, both, or neither of these toggles in your LeafLink integration. To help you make the best decision, we'll explain a little more below.
Sync/Overwrite All
Enabling both toggles will allow you to create and manage item information in Flourish and push that information to LeafLink. You can still add brands, images, etc., in LeafLink directly.
What item information does Flourish send to LeafLink?
- Retail Display Name
- Strain
- UOM: Flourish (Each) = LeafLink = (Unit)
- Sellable Quantity
- Item Category
- Price - As Wholesale Price
- Description
- Product Line
Sync Sellable Quantity
You can use the Sync Inventory Levels to LeafLink toggle if you have existing items in LeafLink and want to manage brands, pictures, etc. exclusively in LeafLink.
What item information does Flourish send to LeafLink?
- Retail Display Name
- UOM: Flourish (Each) = LeafLink (Unit)
- Sellable Quantity
If you have a new item in Flourish and you want it to sync to LeafLink:
- Create the new item in LeafLink.
- Ensure the SKU matches exactly in both Flourish and LeafLink. Learn more here.
- Sync the item to LeafLink. Learn more here.
Sync Item Information
Enable the Sync Items and Product Info to LeafLink toggle when you want to sell products you may not have inventory for, and you marked ‘Unmanaged’ inventory in LeafLink.
What item information does Flourish send to LeafLink?
- Retail Display Name
- UOM: Flourish (Each) = LeafLink (Unit)
- Item Category
- Price - As Wholesale Price
- Description
- Product Line
Sync orders to Flourish based on Leaflink statuses
You can set the Status of Leaflink orders you want to sync into Flourish Software. Learn more here
Set inventory levels updates
- When syncing to LeafLink, we count all the quantities across all facilities to ensure accurate numbers.
- You can remove a facility or more from that calculation if you don't want to send their inventory numbers to Leaflink.
- Learn here how to do that.
Save the Integration
After setting your rules, Save your work and enable the integration:
- Toggle Enabled to on.
- Click Save.
What's Next?
After the integration is on, it's time to sync your data and start working!
How did we do?
Before Setting Up LeafLink Integration
Configure LeafLink Integration: Category Mapping, UOM, and Sync