Table of Contents
Create And Manage Drivers
Ensuring that shipments have drivers attached is crucial for maintaining compliance with state regulators. This document will provide a clear explanation of the process for creating and managing drivers, as well as the selection of which driver corresponds to each dispatched facility.
Ensuring that shipments have drivers attached is crucial for maintaining compliance with state regulators. This document explains the process for creating and managing drivers and selecting which driver corresponds to each dispatched facility.
Access Drivers Management
- Go to Settings.
- Select Distribution.
- Click Drivers.
Actions on Drivers
Action | Description |
Creates a new driver within Flourish. | |
Editing a driver's profile allows you to update any attribute or information related to the driver. | |
Deactivates a driver from Flourish. | |
Reactivates an existing driver from Flourish | |
Assign a driver to a specific facility. |
Adding Drivers
To create a new driver, follow these steps:
- Go to Settings.
- Select Distribution.
- Click Drivers.
- Select Add New.
- Add your Driver's information where applicable:
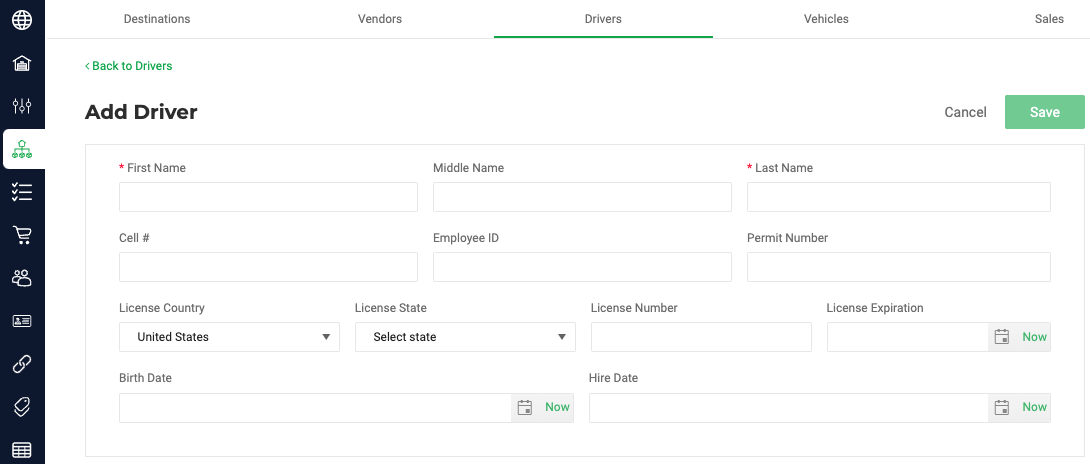
- Required Field(s)
- First Name.
- Last Name.
- Required Field(s)
- Click Save.
Editing Drivers
To edit a driver, follow these steps:
- Go to Settings.
- Select Distribution.
- Click Drivers.
- Click on the CONFIGURE icon on the Driver you want to Edit.
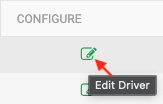
- Make desired edits:
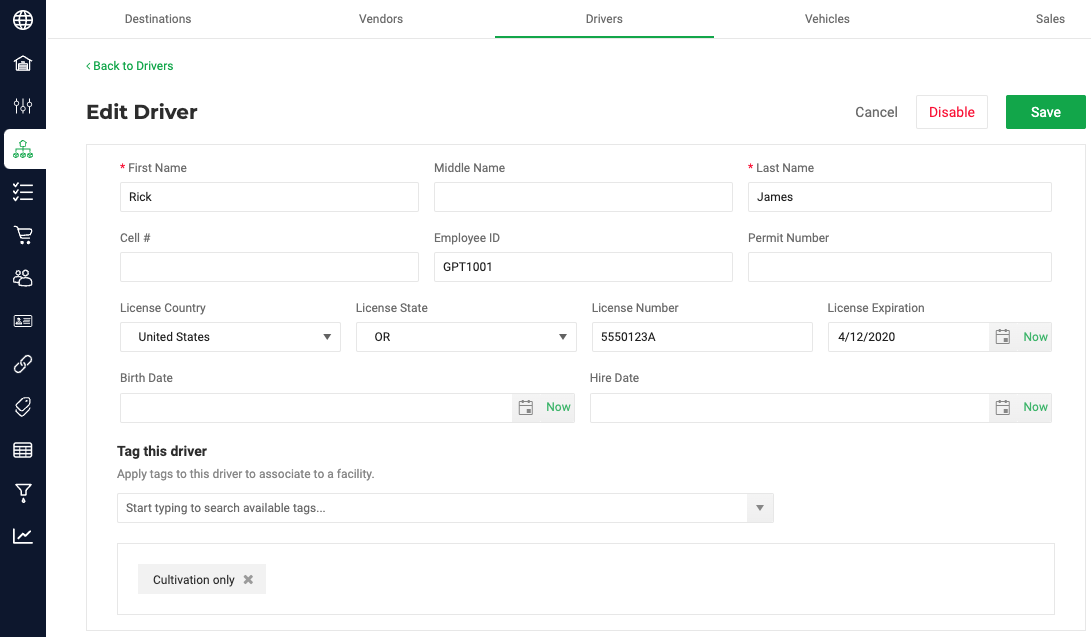
- Click Save.
Deactivating Drivers
To deactivate a driver, follow these steps:
- Go to Settings.
- Select Distribution.
- Click Drivers.
- Click on the CONFIGURE icon on the Driver you want to Deactivate.
- Select Disable.
- The system will display a prompt "This driver will be deactivated. Do you wish to proceed?"
- Toggle ON to confirm
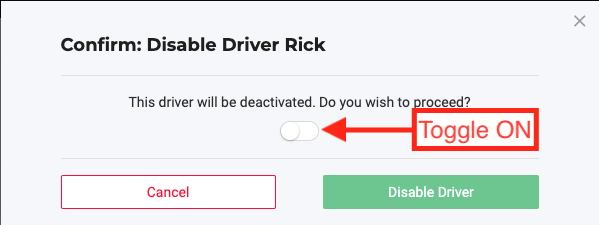
- Toggle ON to confirm
- Click Disable Diver.
- A system message should appear confirming that your Driver has been successfully disabled.
Error message when attempting to Disable a Driver
If the Driver is still assigned to an active Outbound Shipment, then you will see this error message:

Here is how you resolve this:
- Navigate to Outbound>Shipments.
- On the All Shipments grid, filter for the "Driver" you are trying to disable, and also change the "Status" filter to equal "Created," "Orders assigned," and "Manifest printed."
 If you have multiple facilities, then you will need to do this check in all your facilities individually before reattempting to disable the driver.
 - With the results, you will need to either:
- Edit the Shipment to assign a different driver to it;
or, - Ship the Shipment
- Edit the Shipment to assign a different driver to it;
- Once no active shipments are assigned to this driver at any of your facilities, disable that driver in your settings.
Reactivating Drivers
To reactivate a driver, follow these steps:
- Go to Settings.
- Select Distribution.
- Click Drivers.
- Select Disabled.
- Click on the CONFIGURE icon on the Driver you want to Reactivate.
- Select Enable.
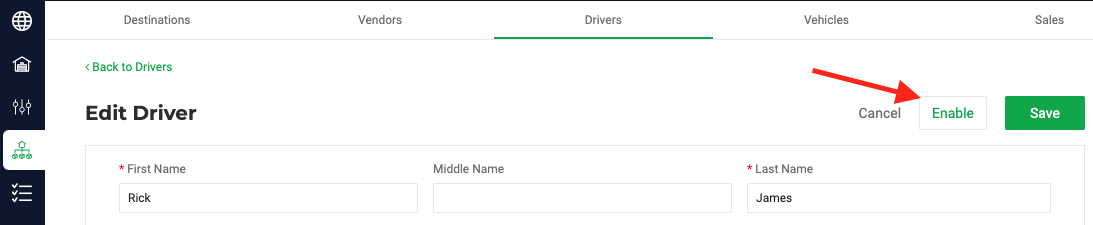
- That's it! A system message should confirm that the driver has been successfully re-enabled.
Tagging Drivers
If you operate on multiple facilities and wish to link a specific driver to a particular facility in your organization, we recommend utilizing tags for efficient management.
Please see these instructions on how to complete this process here
How did we do?
Create and Manage Vehicles
Destinations: Company and Delivery Information