Table of Contents
Reconcile Physical Inventory with Inventory Counts
Inventory Counts is a tool to quickly reconcile your physical inventory to your Flourish inventory and any externally connected systems. Count inventory using the Flourish mobile app , scanner, in th…
Inventory Counts is a tool to quickly reconcile your physical inventory to your Flourish inventory and any externally connected systems. Count inventory using the Flourish mobile app, scanner, in the web app, or print out the counts in a template to submit for review, and make adjustments for any discrepancies within the tool. Filter to certain areas (and other filters) to limit what inventory you're counting, and even configure the counts to be "blind" so that only a reviewer can access the expected counts by item or package.
Prerequisite
- Display inventory count options when starting a new count - When toggles on, this gives you the option to choose which inventory count you wish to perform
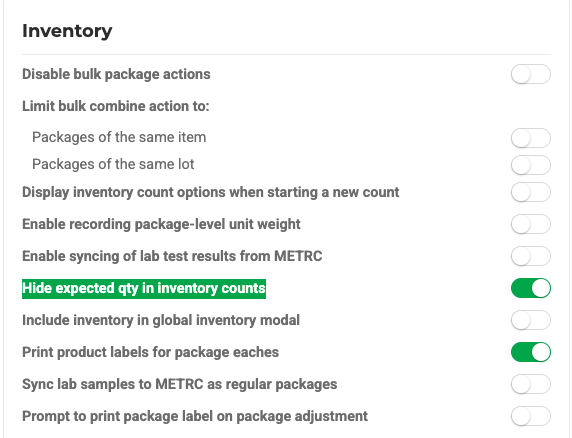
- Hide expected qty in inventory counts - When this is toggled on, the expected counted quantity is hidden when performing the inventory count
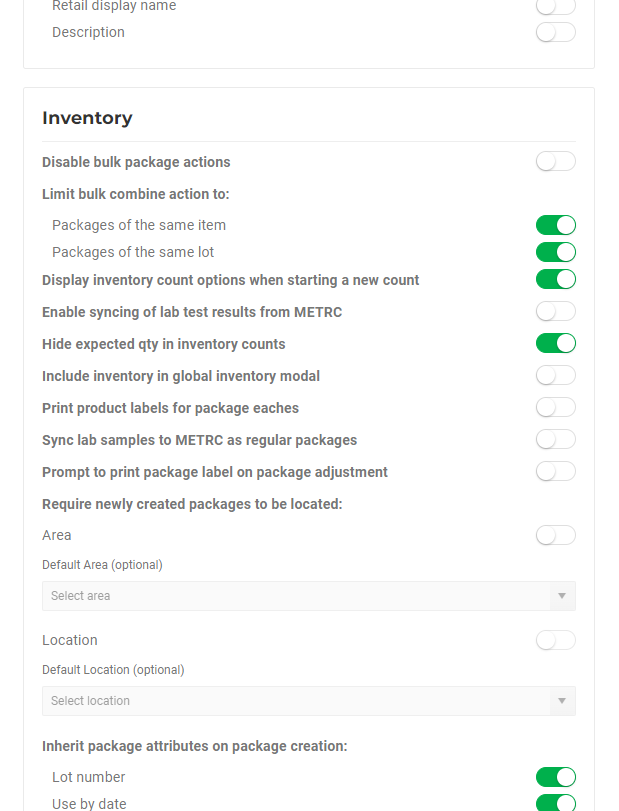
Hide expected quantity in inventory counts
To ensure process integrity, you can hide the expected quantity from users. This configuration is specific to each facility and can be managed using the steps outlined below:
|  |
 Settings.
 .
.Start an Inventory Count
- Navigate to Inventory > Inventory Counts.
- Select New Inventory Count.
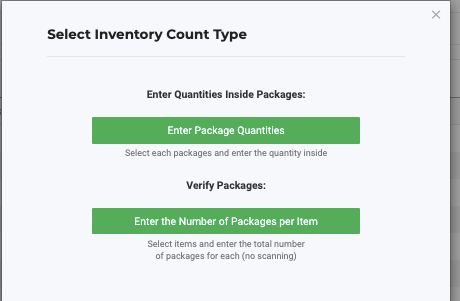
- Select Inventory Count Type: Choose between Inventory Counts by Packages (quantity per package) or by Item (count packages per Item):
- When selecting
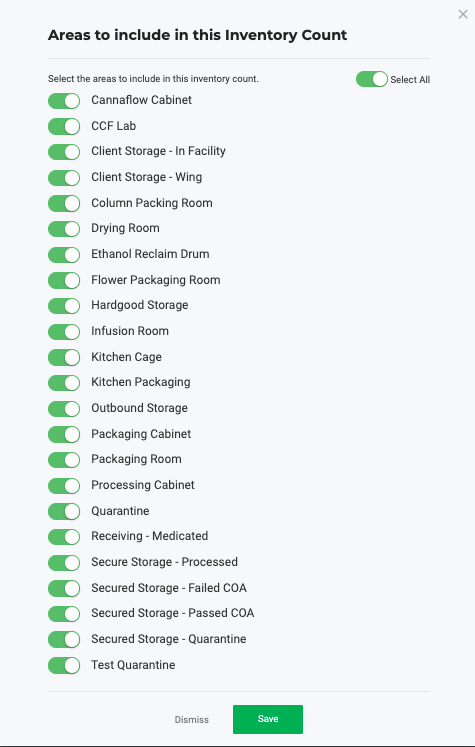
 Set the Areas to include in the Inventory count (see below)
There are two sets of filters:
1. Cannabis, Non-Cannabis, Locked or Unlocked (choose one, or the default is All)
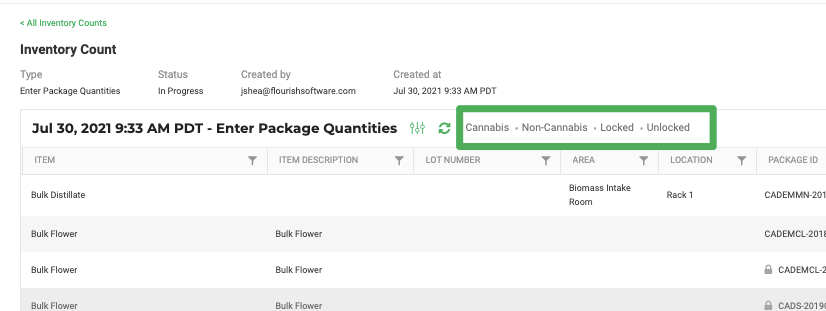
2. Header filters to count by Area/Location or maybe a specific Batch/Lot, use the filtering capabilities. Otherwise, all Inventory under the facility will appear. Available header filters are:

- Item
- Item Description
- Lot Number
- Area
- Location
- Package ID
- Item Category
- Part Number
- Enter the counts per package or item line for:
- Available inventory (not assigned to order) or
- Assigned (assigned to an order but still in the facility)
- Click Submit for Review
Now, someone with User Role permission to Review Inventory Counts can log in to view the counts before completing them.
Once an Inventory Count is submitted for review, a reviewer will choose between three views:
- All (view all inventory for the facility, counted or not)
- Counted (only packages or items with counts submitted will appear)
- Discrepancy Only (only those with a differing Actual vs. Expected Qty will show up)
From here, a reviewer can make the adjustments for all missing inventory with any notes needed for compliance reasons before completing the count or saving to return to later.
Set the Areas to include in the Inventory count
Set your Inventory Count to show you only the areas you want to include in the count!
- Go to Inventory
- Select Inventory Counts
- Click on New Inventory Count
- When selecting You will see the Areas to include in this Inventory Count (see below)
- Toggle 'On' the areas to include in this inventory count.
- Click Save.
- Start your Inventory Count.
Refreshing Inventory Count Details
Sometimes, a user can start an inventory count, and before the count is completed, different users can assign inventory to orders or manufacturing runs, which creates confusion and discrepancies.
We created the process here to resolve the discrepancies.
Complete an Inventory Count
* If you want to complete the count without an adjustment, leave the Discrepancy Reason Code blank and optionally add Discrepancy Notes.
- Start by reviewing your counted items and checking for discrepancies. (Insert second screenshot here showing Expected Qty vs Actual Qty)
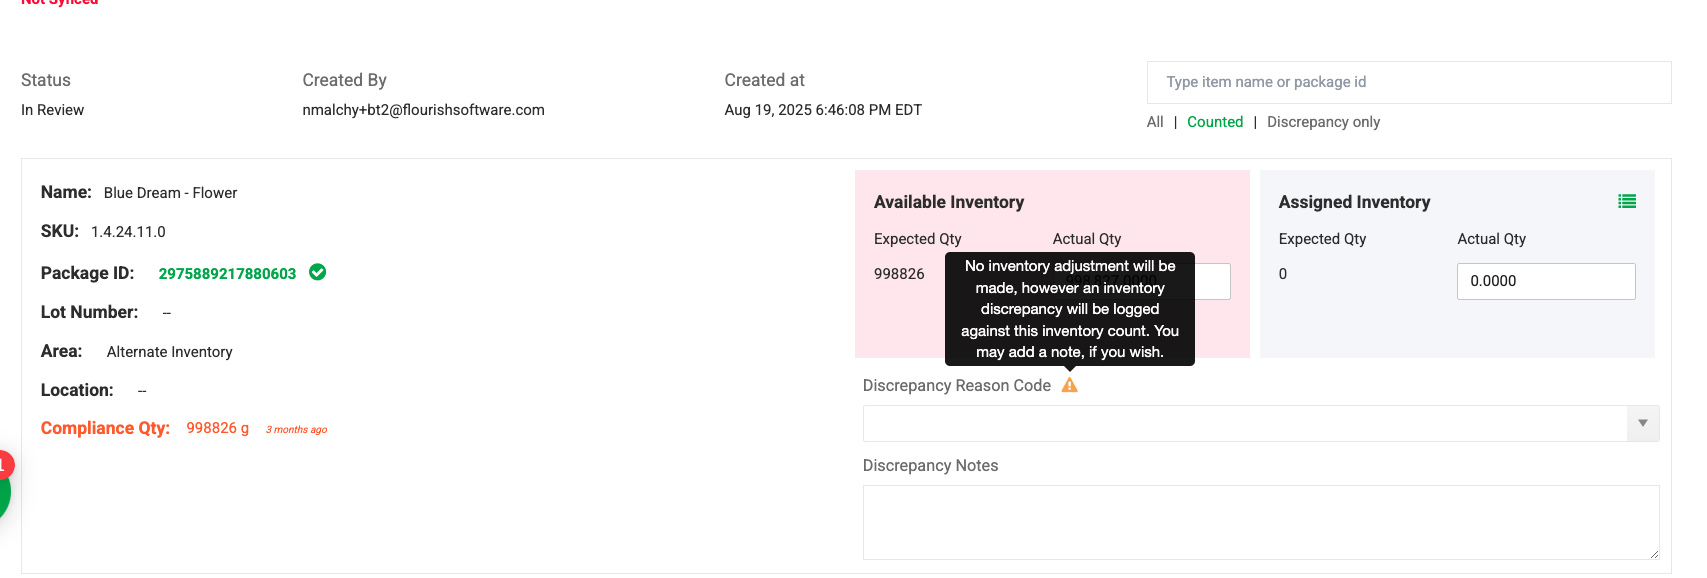
- If you want to complete the count with an adjustment, select a Discrepancy Reason Code and optionally add Discrepancy Notes.
- If you want to complete the count without an adjustment, leave the Discrepancy Reason Code blank and optionally add Discrepancy Notes.
- Click Complete. A confirmation box will appear.

- If a reason code was selected, Flourish will adjust the package or inventory line. If no reason code was provided, Flourish will not adjust the package or inventory line, but the discrepancy will still be logged.
- Click Yes to confirm and finish the count, or No to return and review.
How did we do?
Web Inventory Counts: Enter the Number of Packages per Item