Create Inventory Packages from a Harvest
Create one or many packages from a harvest, each with its own weight, lot number, and area. Draw down or declare weights, and package into a different strain.
Purpose
Creating packages from a harvest converts harvest material into trackable inventory. You can create several packages in one pass, and each package can have its own weight, lot number, packaged date, area, location, and reference field.
This is how you split a harvest into testing lots. If your state caps the size of a testing lot, create every lot from the harvest at once, each with its own lot number and weight, instead of creating one large package and splitting it later.
You can also package into an item with a different strain than the harvest. See Package into a Different Strain below.
Where You Can Package From
Harvest stage | Drying stage |
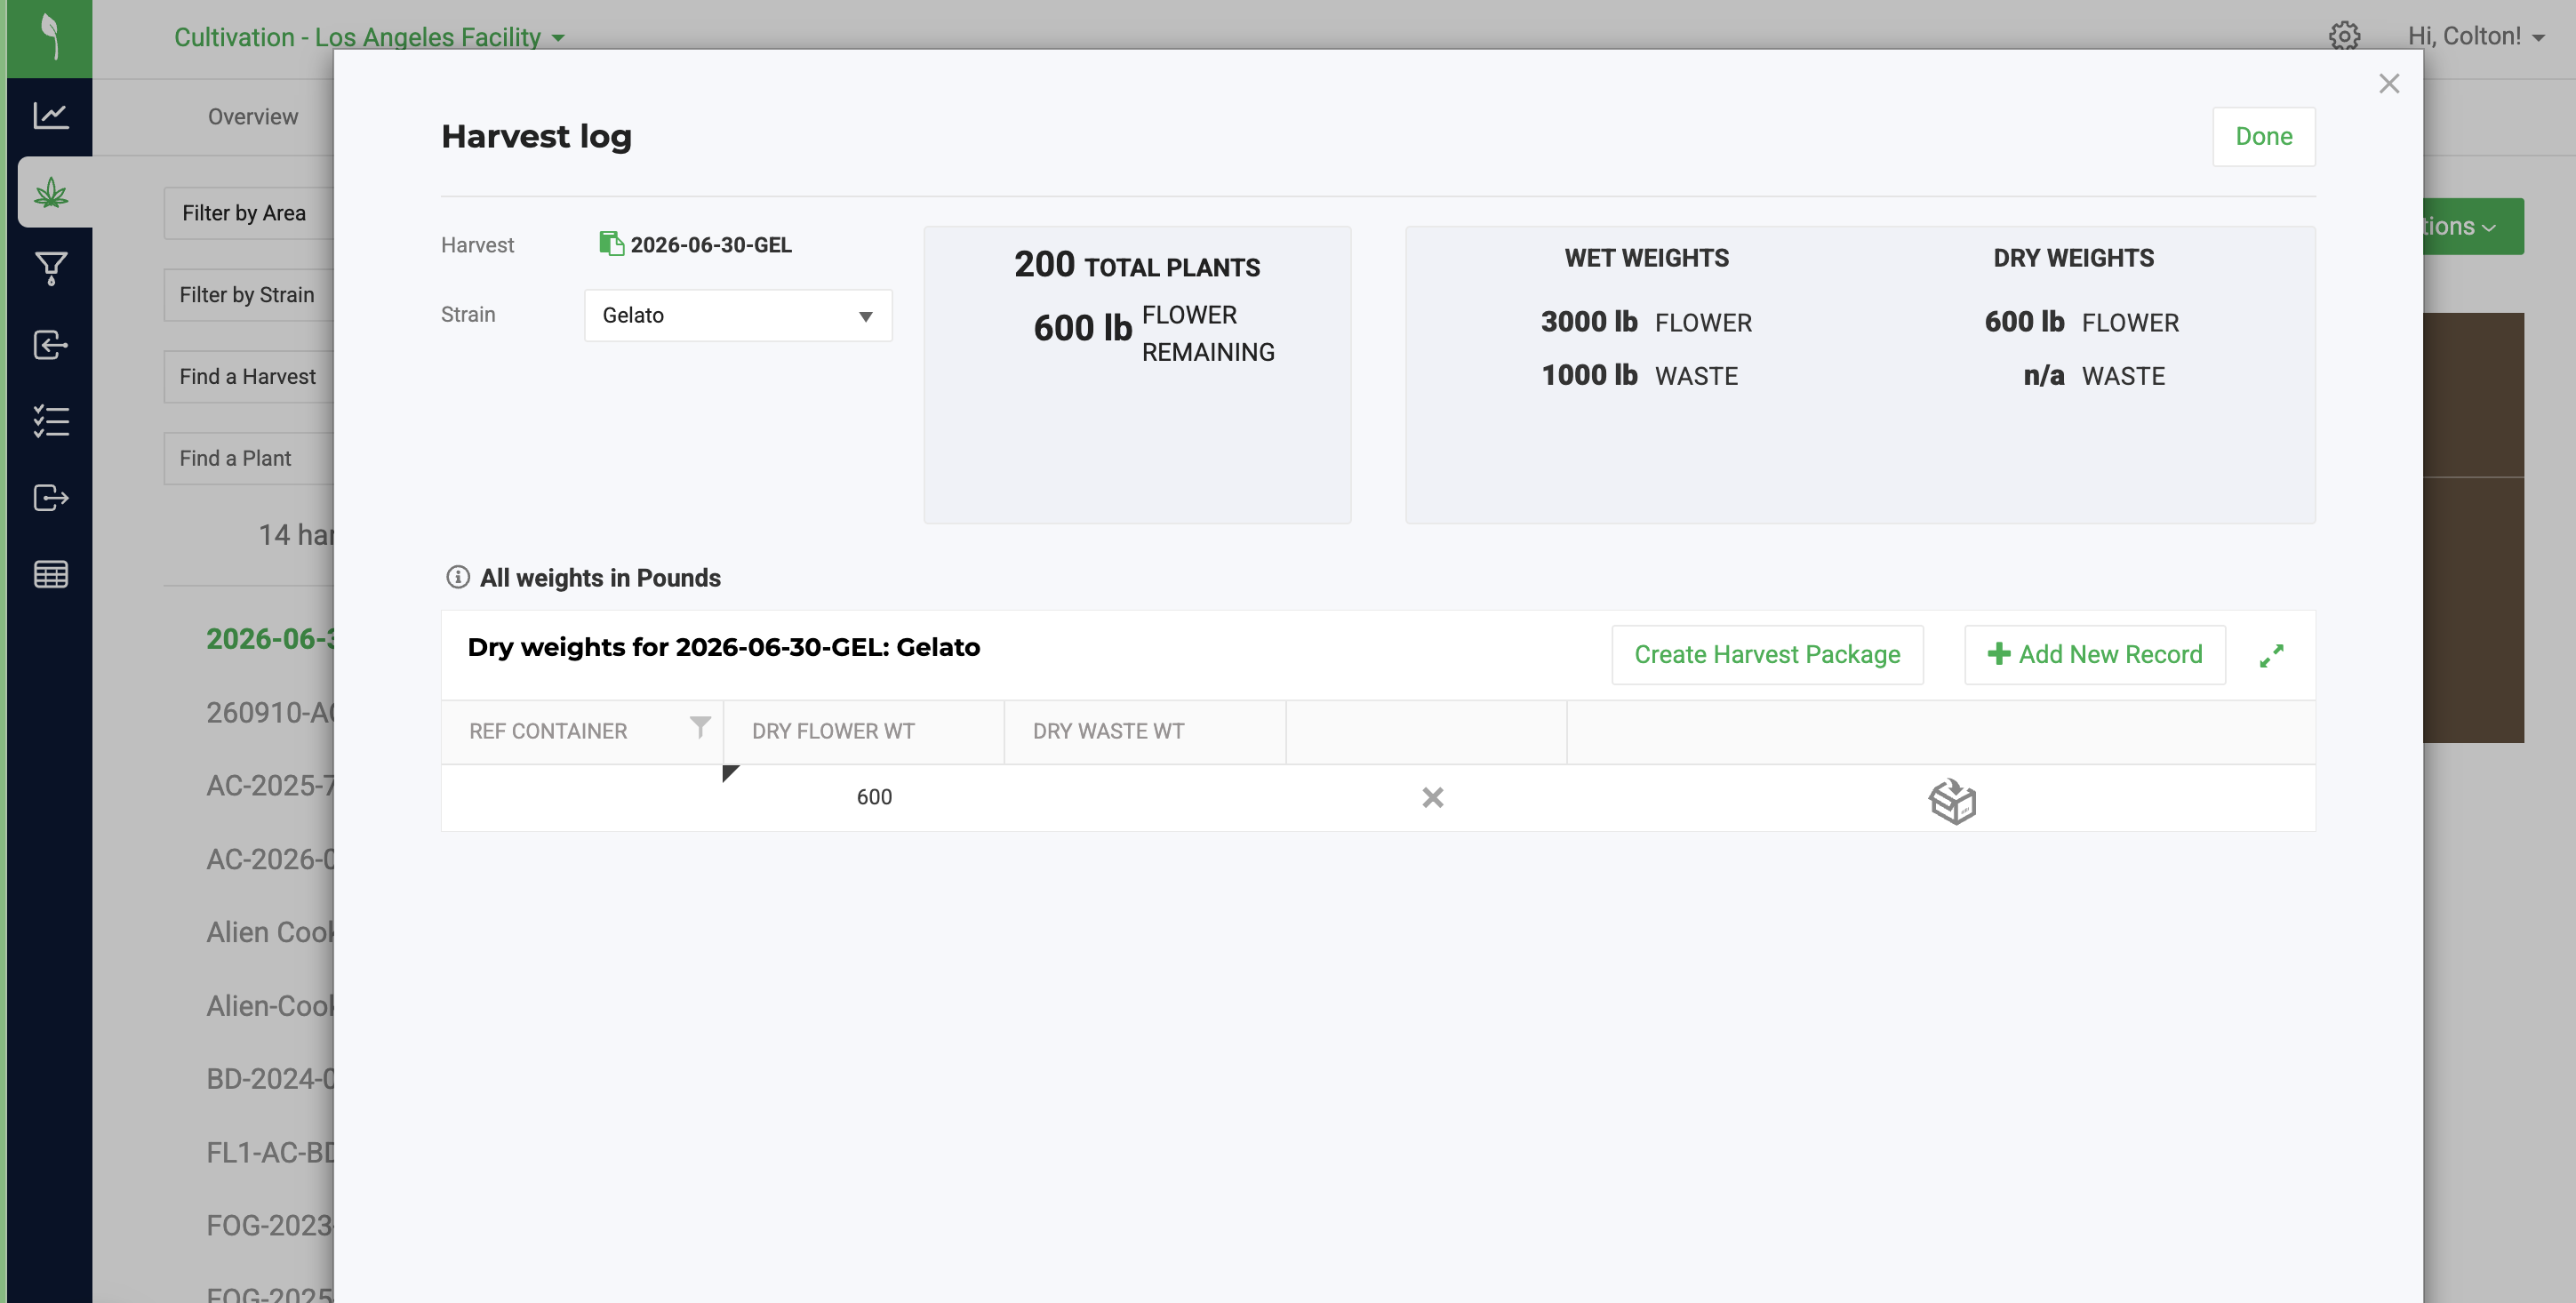
Package from the wet weight you have already recorded; for example, Whole Plant weight packaged as fresh-frozen. Record the wet weight in the harvest log first, then package. Packages always draw down from the recorded weight. | Choose how to handle weight for each packaging run:
|
Both drying methods fill in the same harvest dry weight totals, so harvest history and yield look the same either way.
Prerequisites
- Your user role must include permission to create packages in the Grow module.
- The weight bucket you want to package from (for example Whole Plant, Flower, or Trim) must be turned on for the facility. See Choose Which Harvest and Drying Weights to Record.
- Harvest stage, or Drying with Draw down from harvest: the weight must already be recorded in the harvest log. See Record Dry Weights.
- Metrc facilities: wet weights must be synced to Metrc. You need enough available package tags for the number of packages you are creating. The packaged weight cannot exceed the reported wet weight.
Open the Packaging Screen
You can open Create Package From Harvest from either place:
- Actions menu: select the harvest, click Actions, and select Create package from harvest.
- Harvest log: open the harvest log and click Create Harvest Package.
For example, to package a drying harvest:
- Select Grow from the left navigation.
- Click Drying in the top ribbon, then click Drying Harvests.
- Select the harvest you want to package.
- Click Actions and select Create package from harvest.
To package from the Harvest stage, click Harvest in the top ribbon instead and follow the same steps.
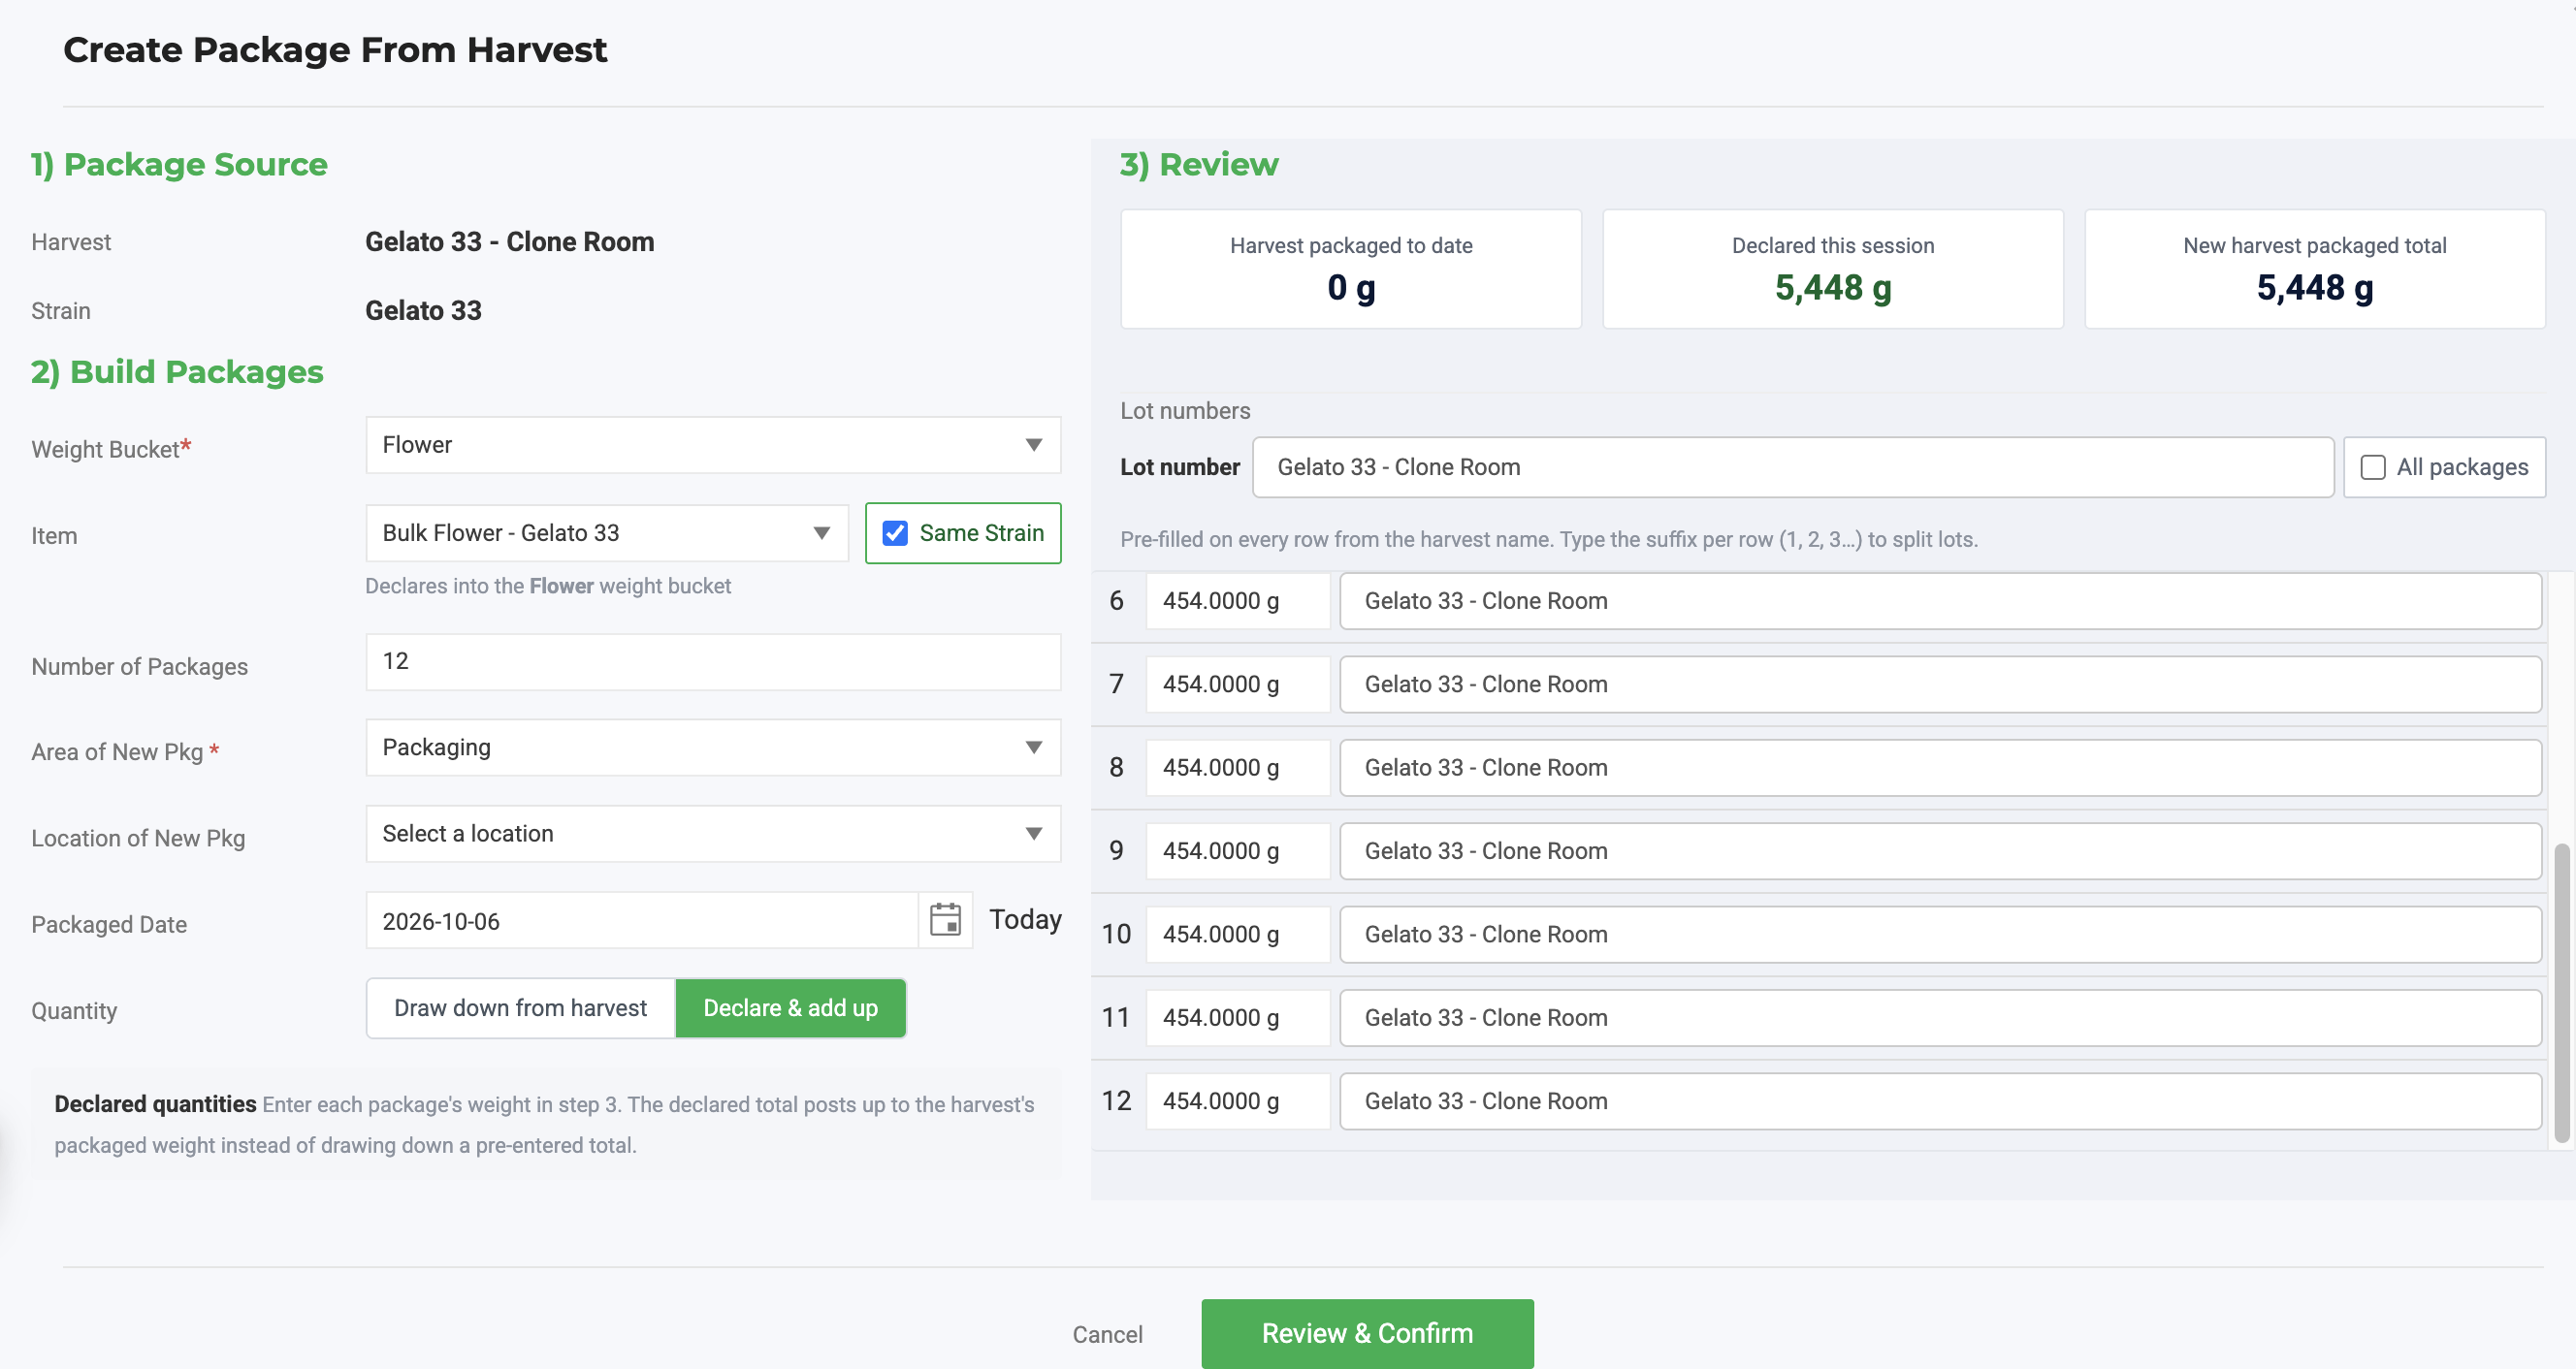
Step 1: Build Packages
The Create Package From Harvest screen has three sections: Package Source (the harvest and strain), Build Packages, and Review.
- Select the Weight Bucket, for example, Flower. This maps to the column you see in the harvest log.
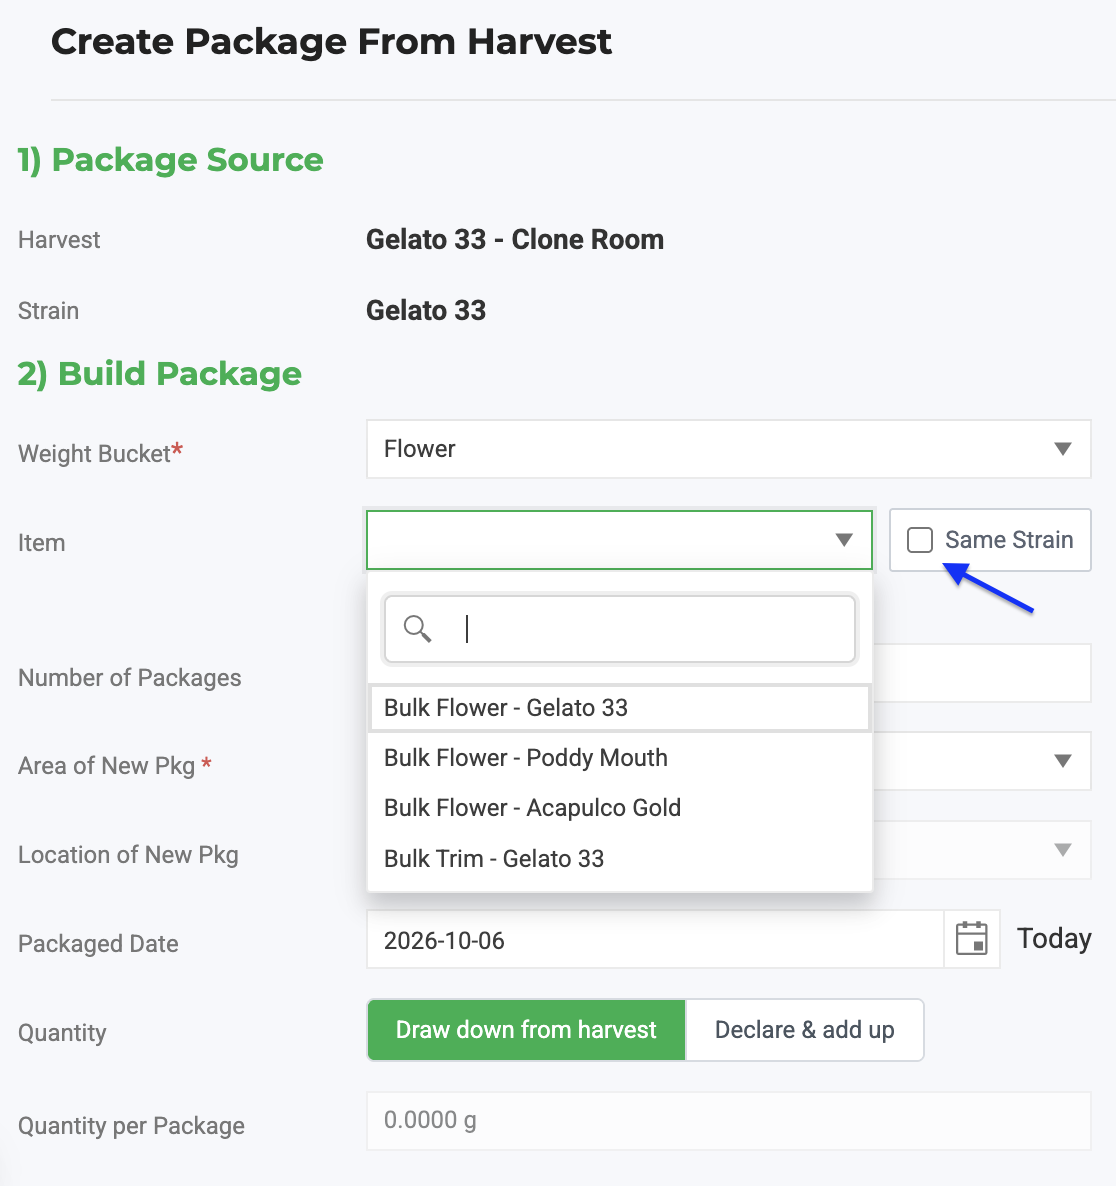
- Select the Item, for example, Bulk Flower - Gelato. The note under the item shows the weight bucket suggested by the item's source type and how much weight is available. The suggestion doesn't limit you: you can package any item from the weight bucket you selected. Same Strain is checked by default, so the list shows items for the strain you are packaging plus items with no strain. To package into an item with a different strain, uncheck Same Strain. See Package into a Different Strain below.
- Enter the Number of Packages. For testing lots, enter the number of lots you need.
- Select the Area of New Pkg, and optionally the Location of New Pkg.
- Confirm the Packaged Date. Click Today to use today's date.
- Drying stage only: under Quantity, choose Draw down from harvest or Declare & add up.
- Enter the Quantity per Package (g). With drawdown, click Allocate All to split the full available weight evenly across the packages.
- Check the Review section. Quantity Available, Quantity Allocated, and Remaining update as you go, and the table lists each package's quantity and lot number.
- Set lot numbers. Every row is pre-filled from the harvest name.
- To give each package its own lot, type a suffix on each row, for example, 2026-06-30-GEL1, 2026-06-30-GEL2.
- To use one lot number for every package, check All packages.
- Click Review & Confirm.
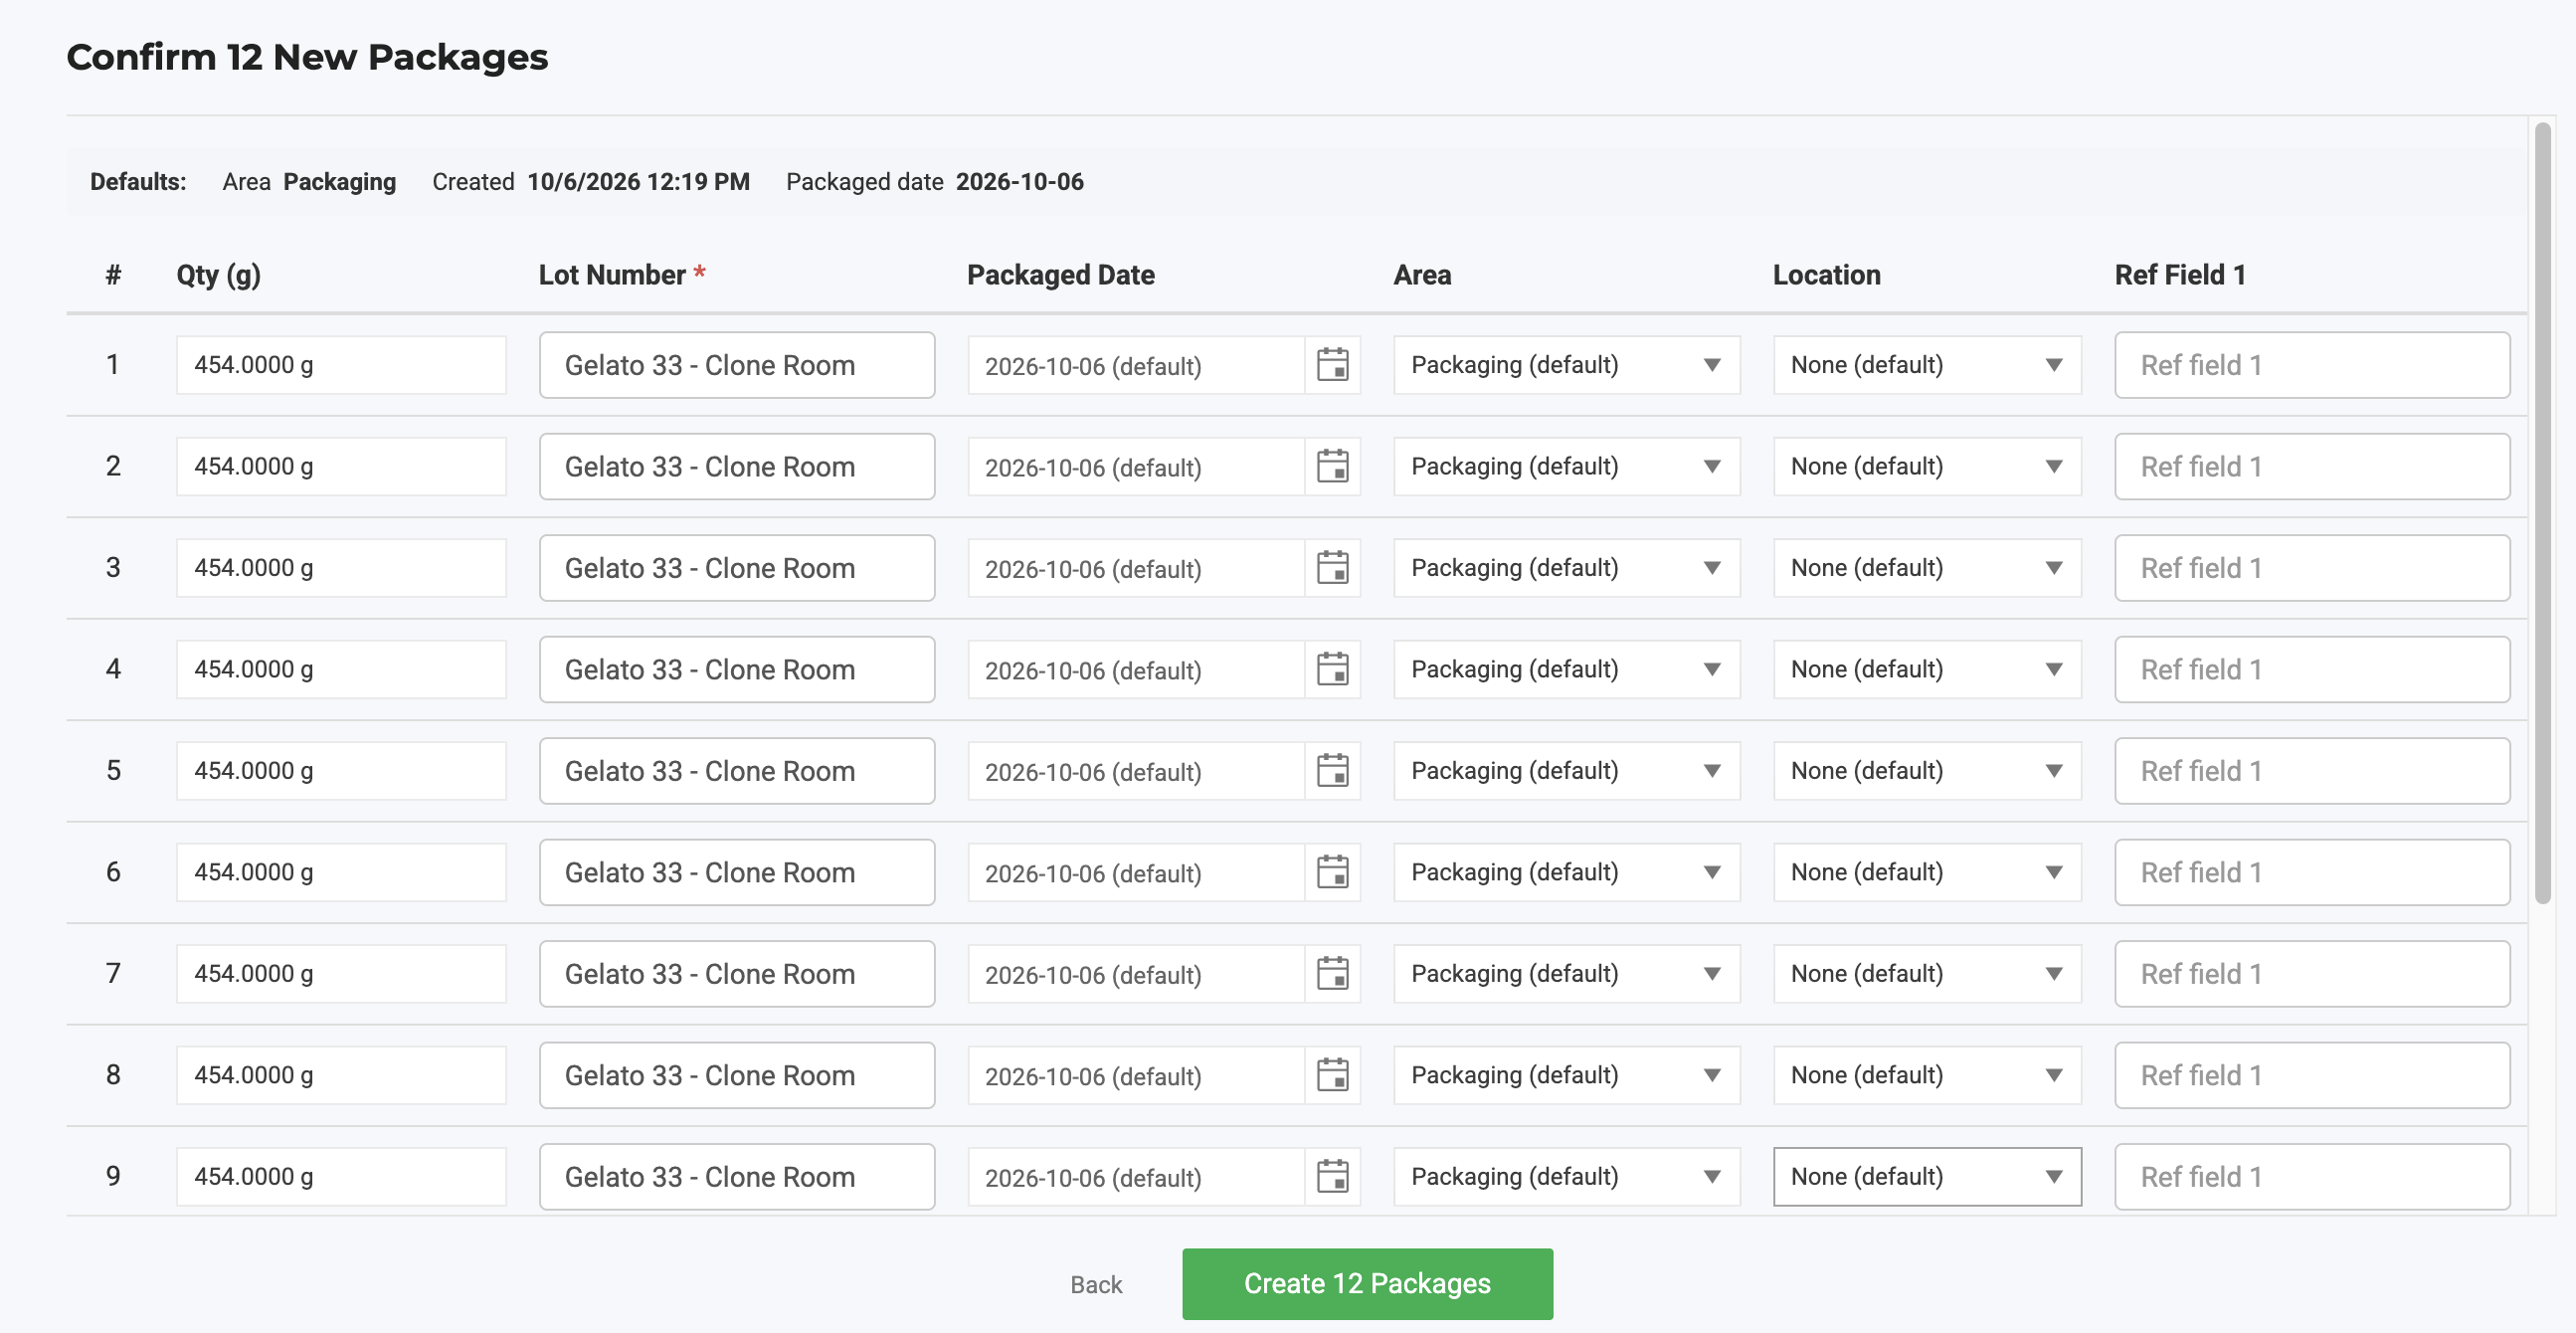
Step 2: Confirm New Packages
The Confirm New Packages screen lists one row per package. The Defaults bar shows the area, created time, and packaged date you chose in Step 1. You can change any value on any row.
- Adjust the Qty (g) on any row if packages should weigh different amounts. The Total and Available amounts appear under the table.
- Review the Lot Number on each row. This field is required.
- Change the Packaged Date, Area, or Location on any row, if needed.
- Enter a Ref Field 1 value on any row. This is optional.
- Metrc facilities: assign a package tag to each row. Pick a starting tag and check Fill the rest sequentially to assign the next tags automatically. You can still change the tag on any row.
- Click Create (the button shows the package count, for example Create 6 Packages).
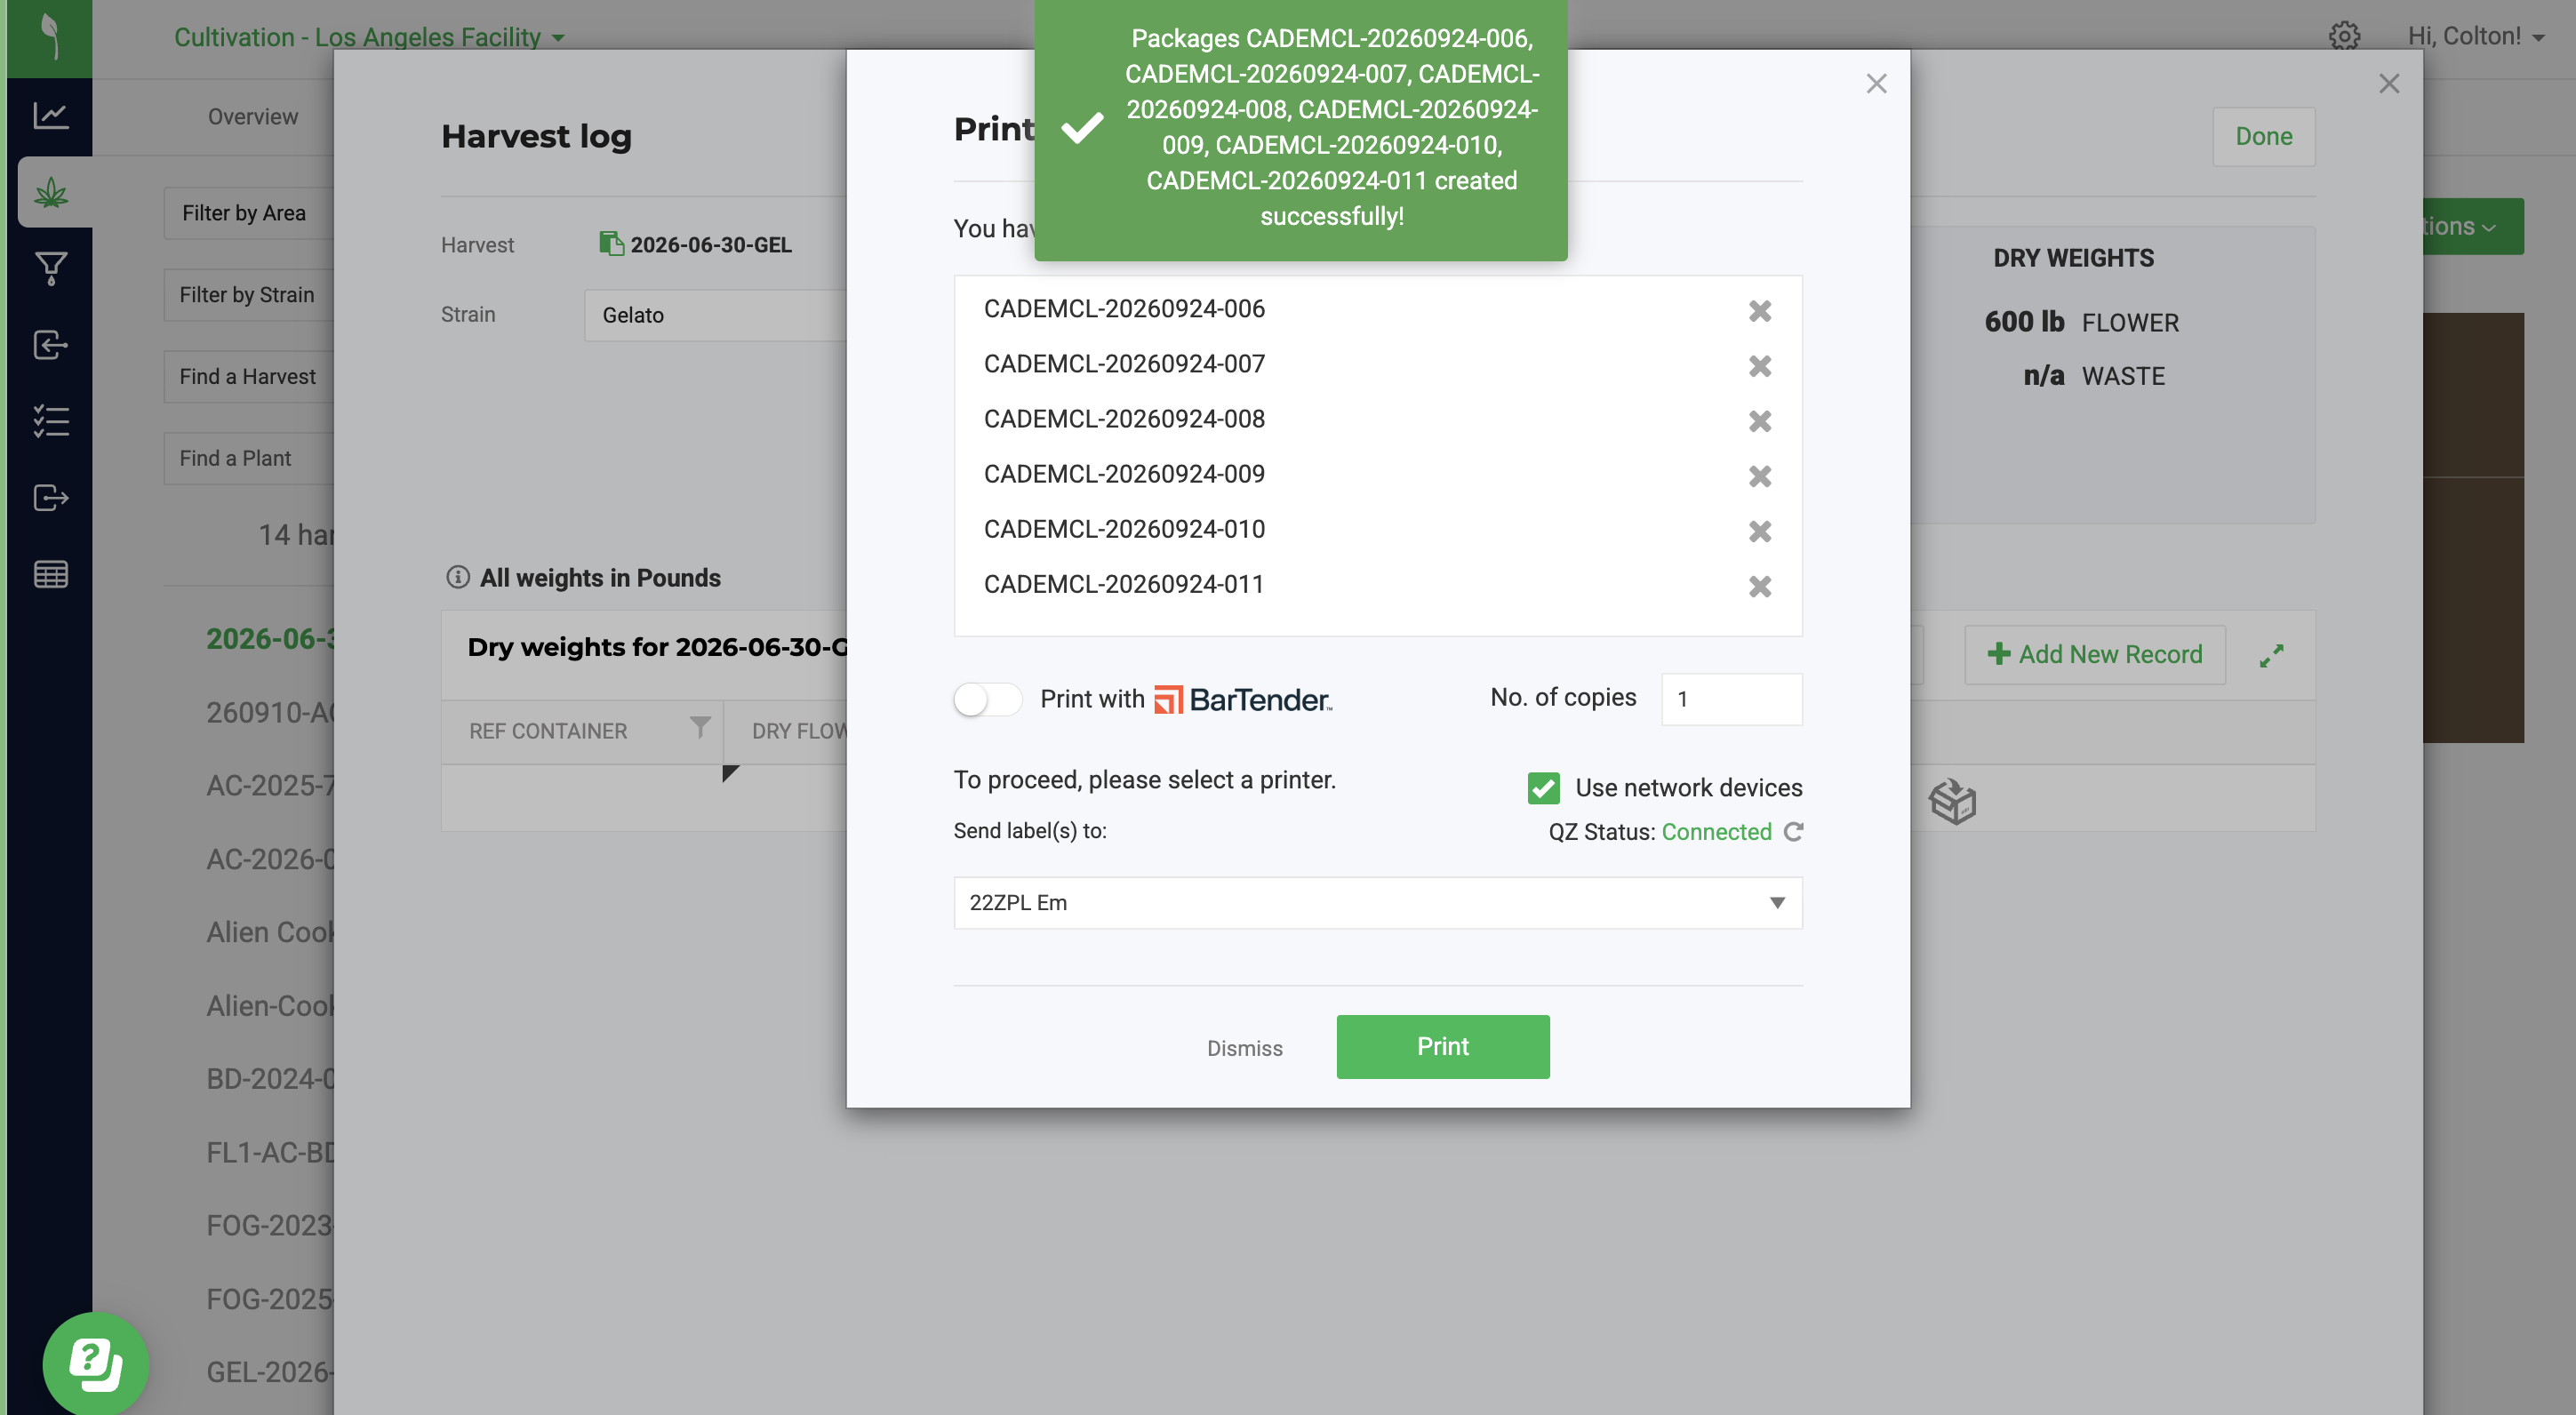
Flourish confirms the packages were created and opens the print dialog so you can print labels right away. In non-compliance facilities, Flourish generates each package ID automatically.
What Happens to the Harvest
- Harvest stage and Draw down from harvest: each package's weight is deducted from the weight recorded in the harvest log. You can't package more than is available.
- Declare & add up: each package's weight is added to the harvest's dry weight for that weight bucket. You can package from the same harvest over several sessions, and the totals keep adding up.
- Metrc facilities: each package is created in Metrc from the harvest with its assigned tag. Harvest dry weights stay in Flourish and are not reported to Metrc.
Package into a Different Strain
Sometimes the strain recorded on the harvest isn't the strain the finished package should carry. Common reasons:
- Breeding and crossing: you grew a cross or pheno hunt under a working name, such as "Gelato x OG #4" or "Mixed Seeds." Once you select a keeper, you package it under the commercial strain name it will be sold as.
- Correcting an error found after harvest: the harvest was recorded under the wrong strain, and you only caught it once the plants were cut down.
In these cases, you can package straight into an item with the correct strain, instead of creating the package first and changing its item later.
- Under Package Source, select the harvest and the harvest strain to package from, as usual.
- Under Item, uncheck Same Strain. The Item list now shows items at the facility regardless of strain.
- Select the item with the strain the package should carry, and continue with the steps above.
Weight is always drawn from, or added to, the harvest strain you selected under Package Source. The new package carries the item's strain. If the item has no strain, the package carries the harvest strain.
Turn Off Packaging into a Different Strain
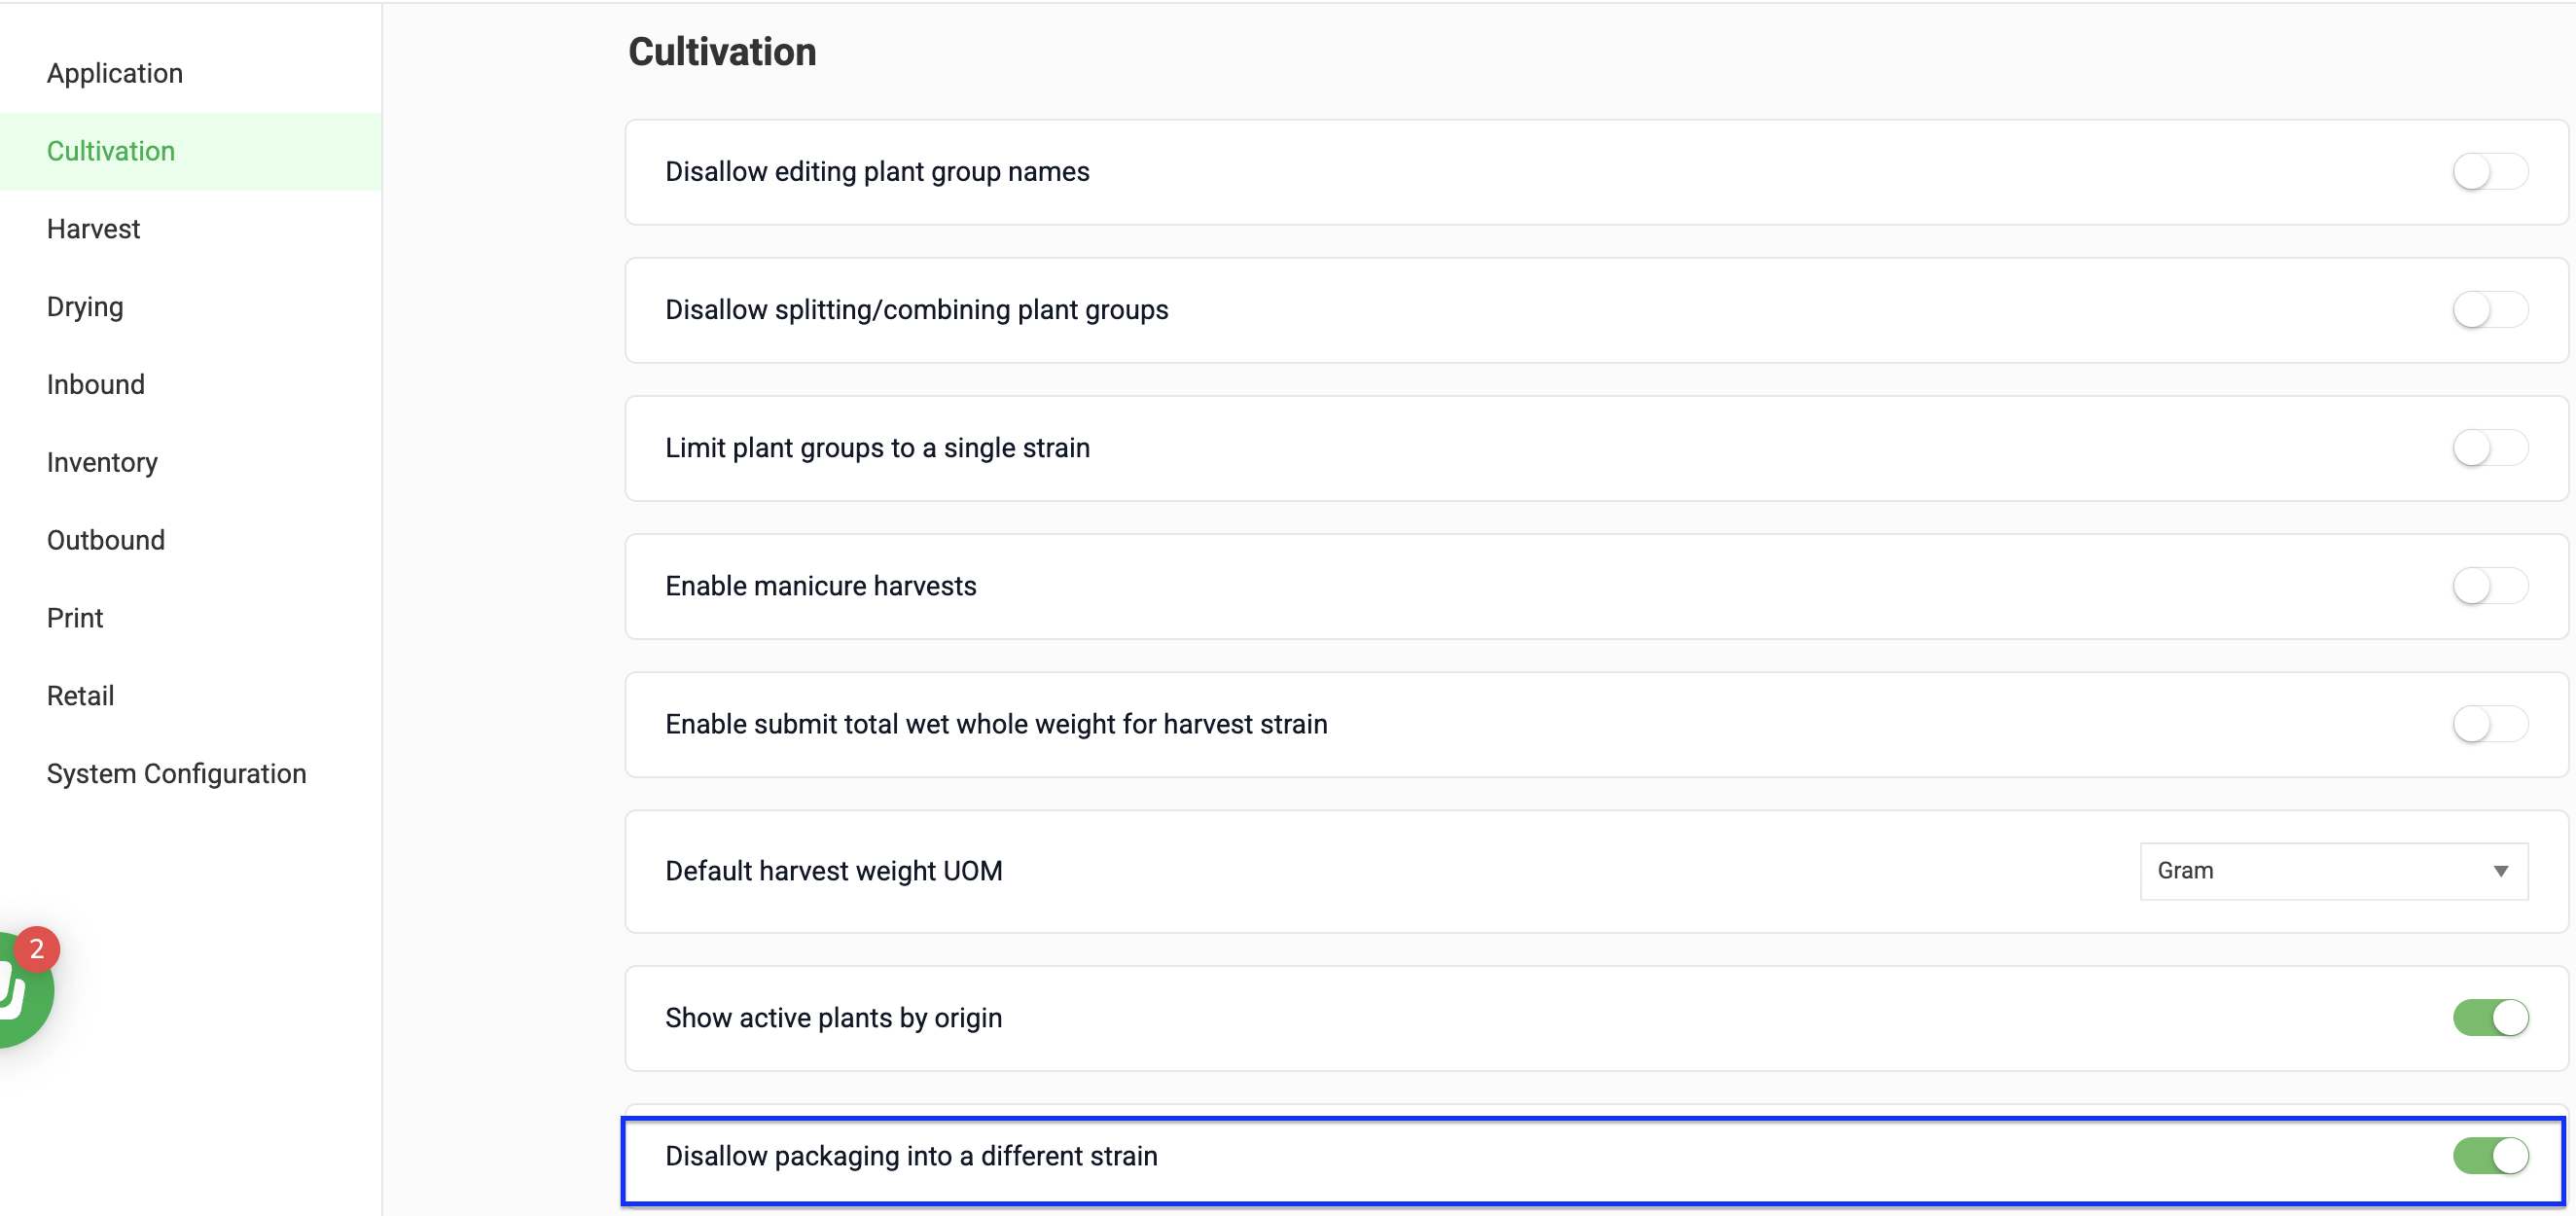
Packaging into a different strain is available by default. To keep every facility user locked to the harvest strain, turn on Disallow packaging into a different strain. The Same Strain checkbox then no longer appears, and the Item list only shows items for the harvest strain plus items with no strain.
- Click the Settings gear icon.
- Select Configurations, then select the facility.
- Click Cultivation in the left menu.
- Turn Disallow packaging into a different strain on or off. Changes save automatically.
Complete the Harvest
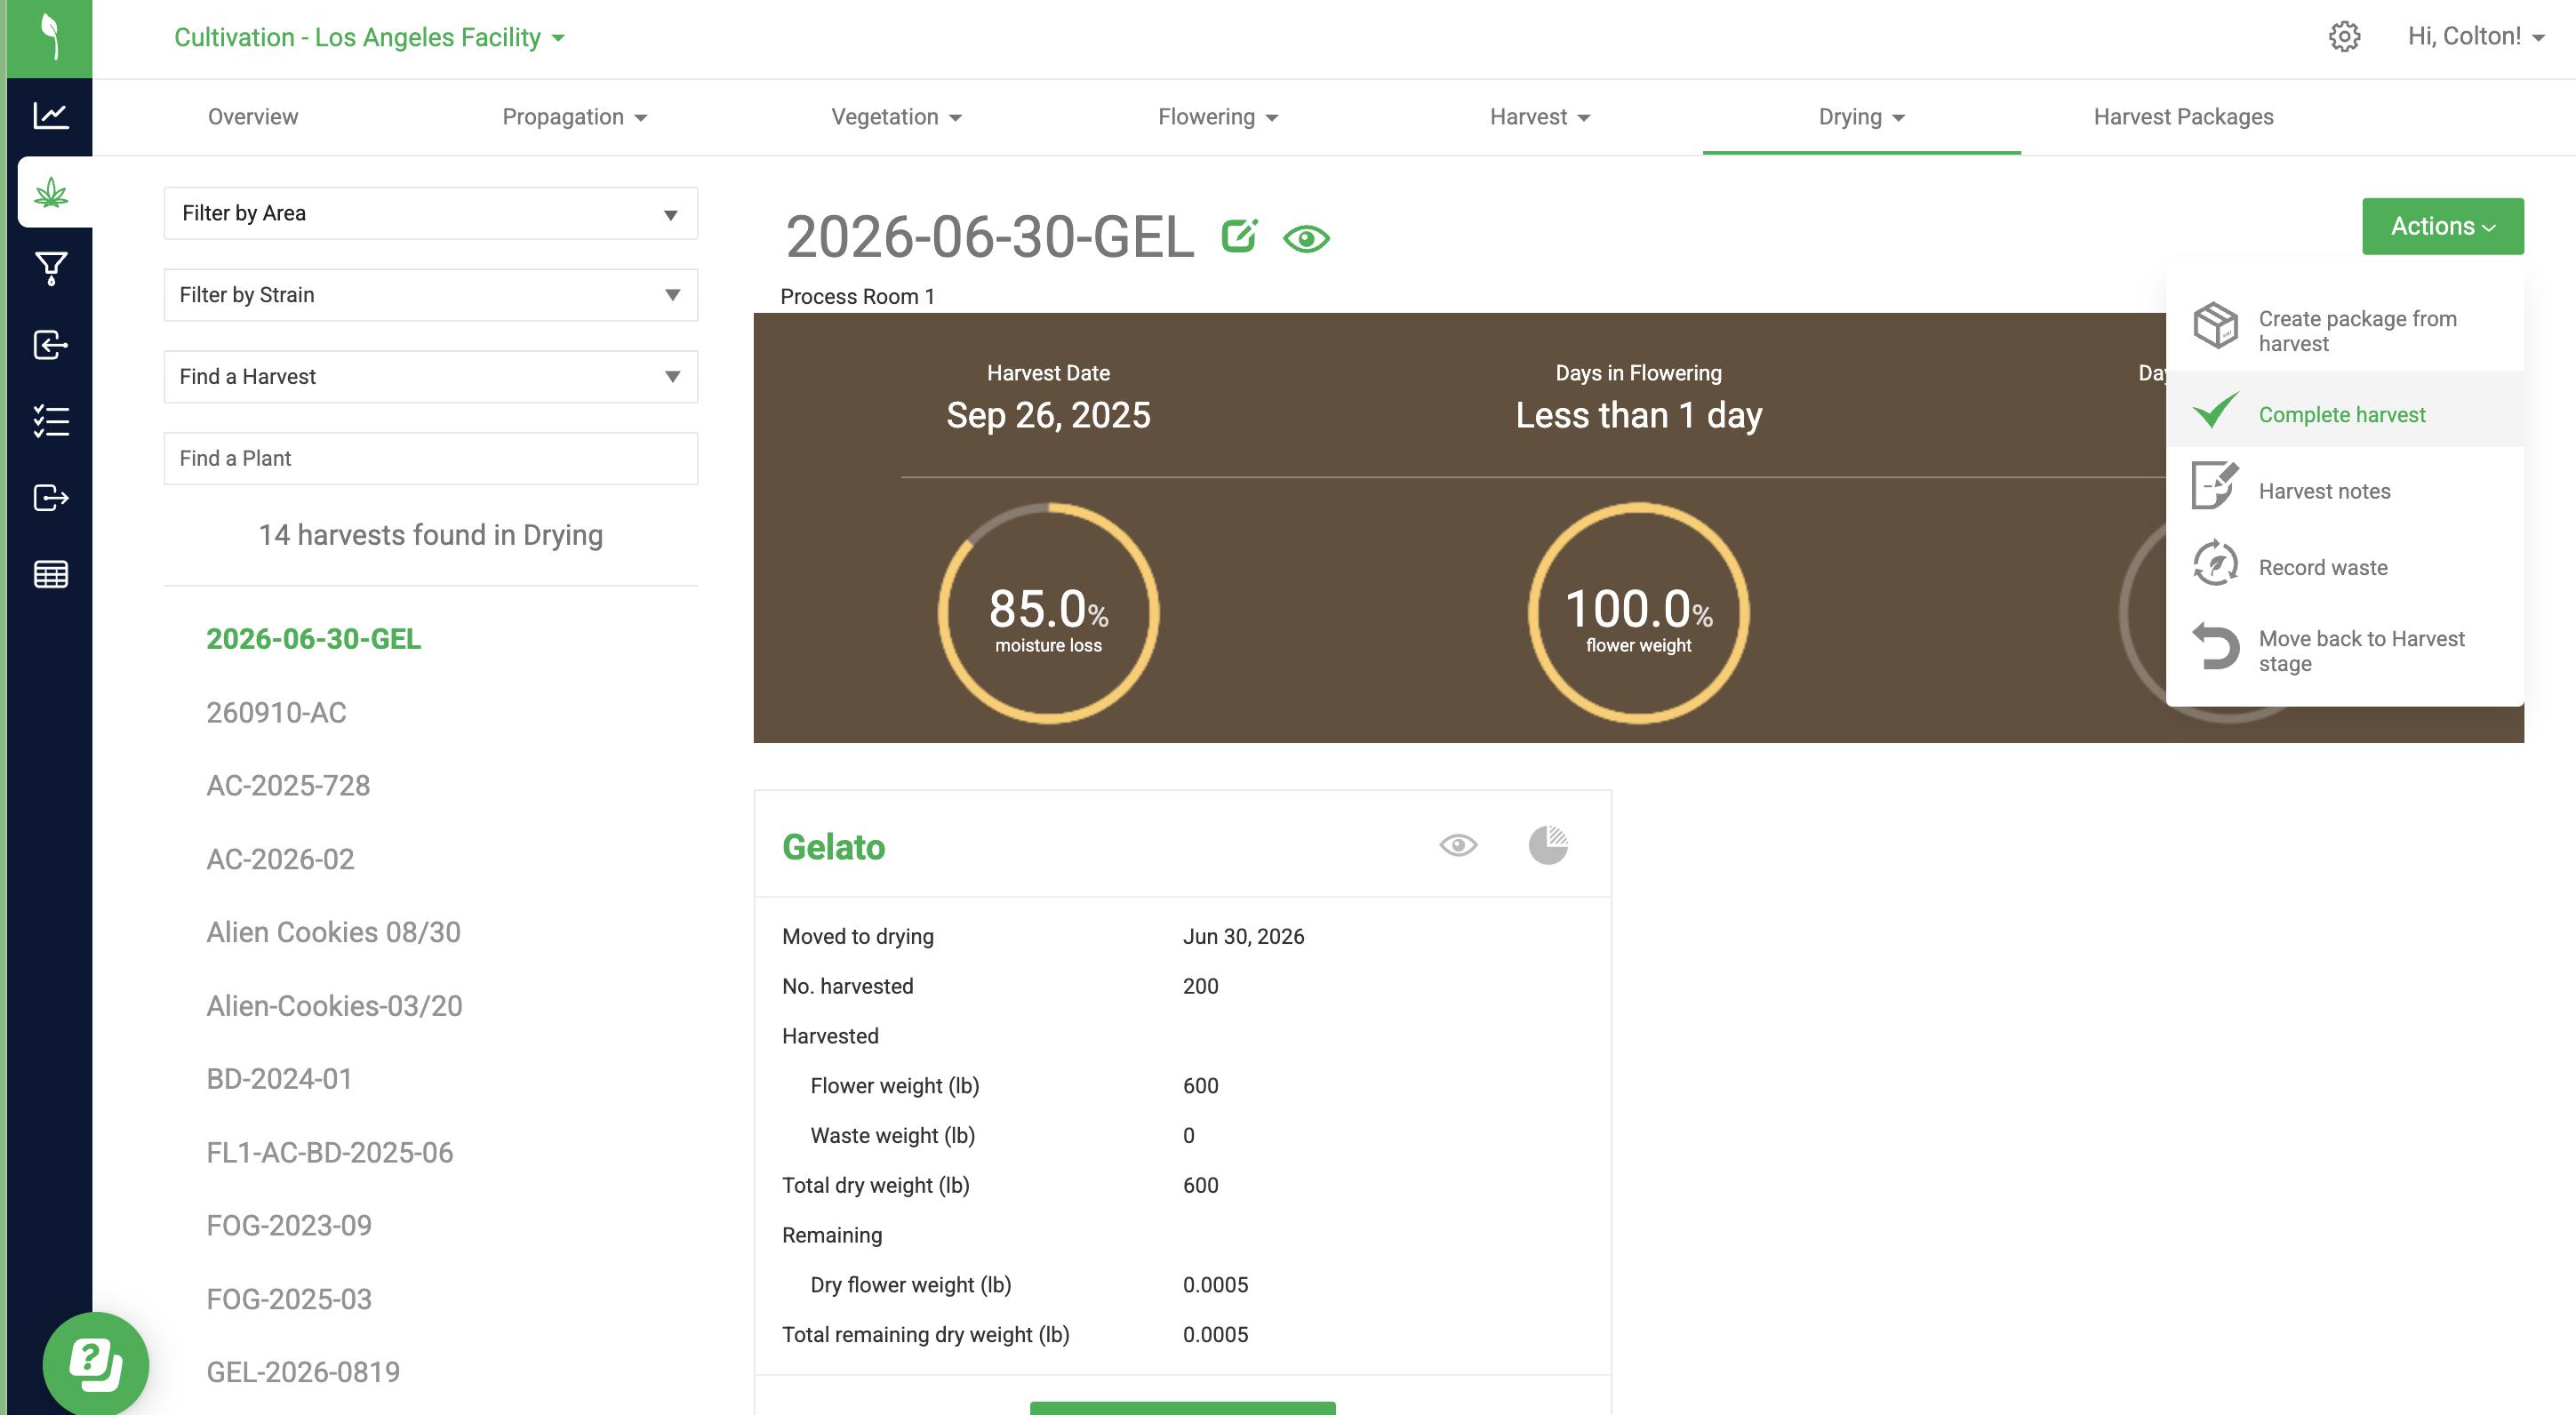
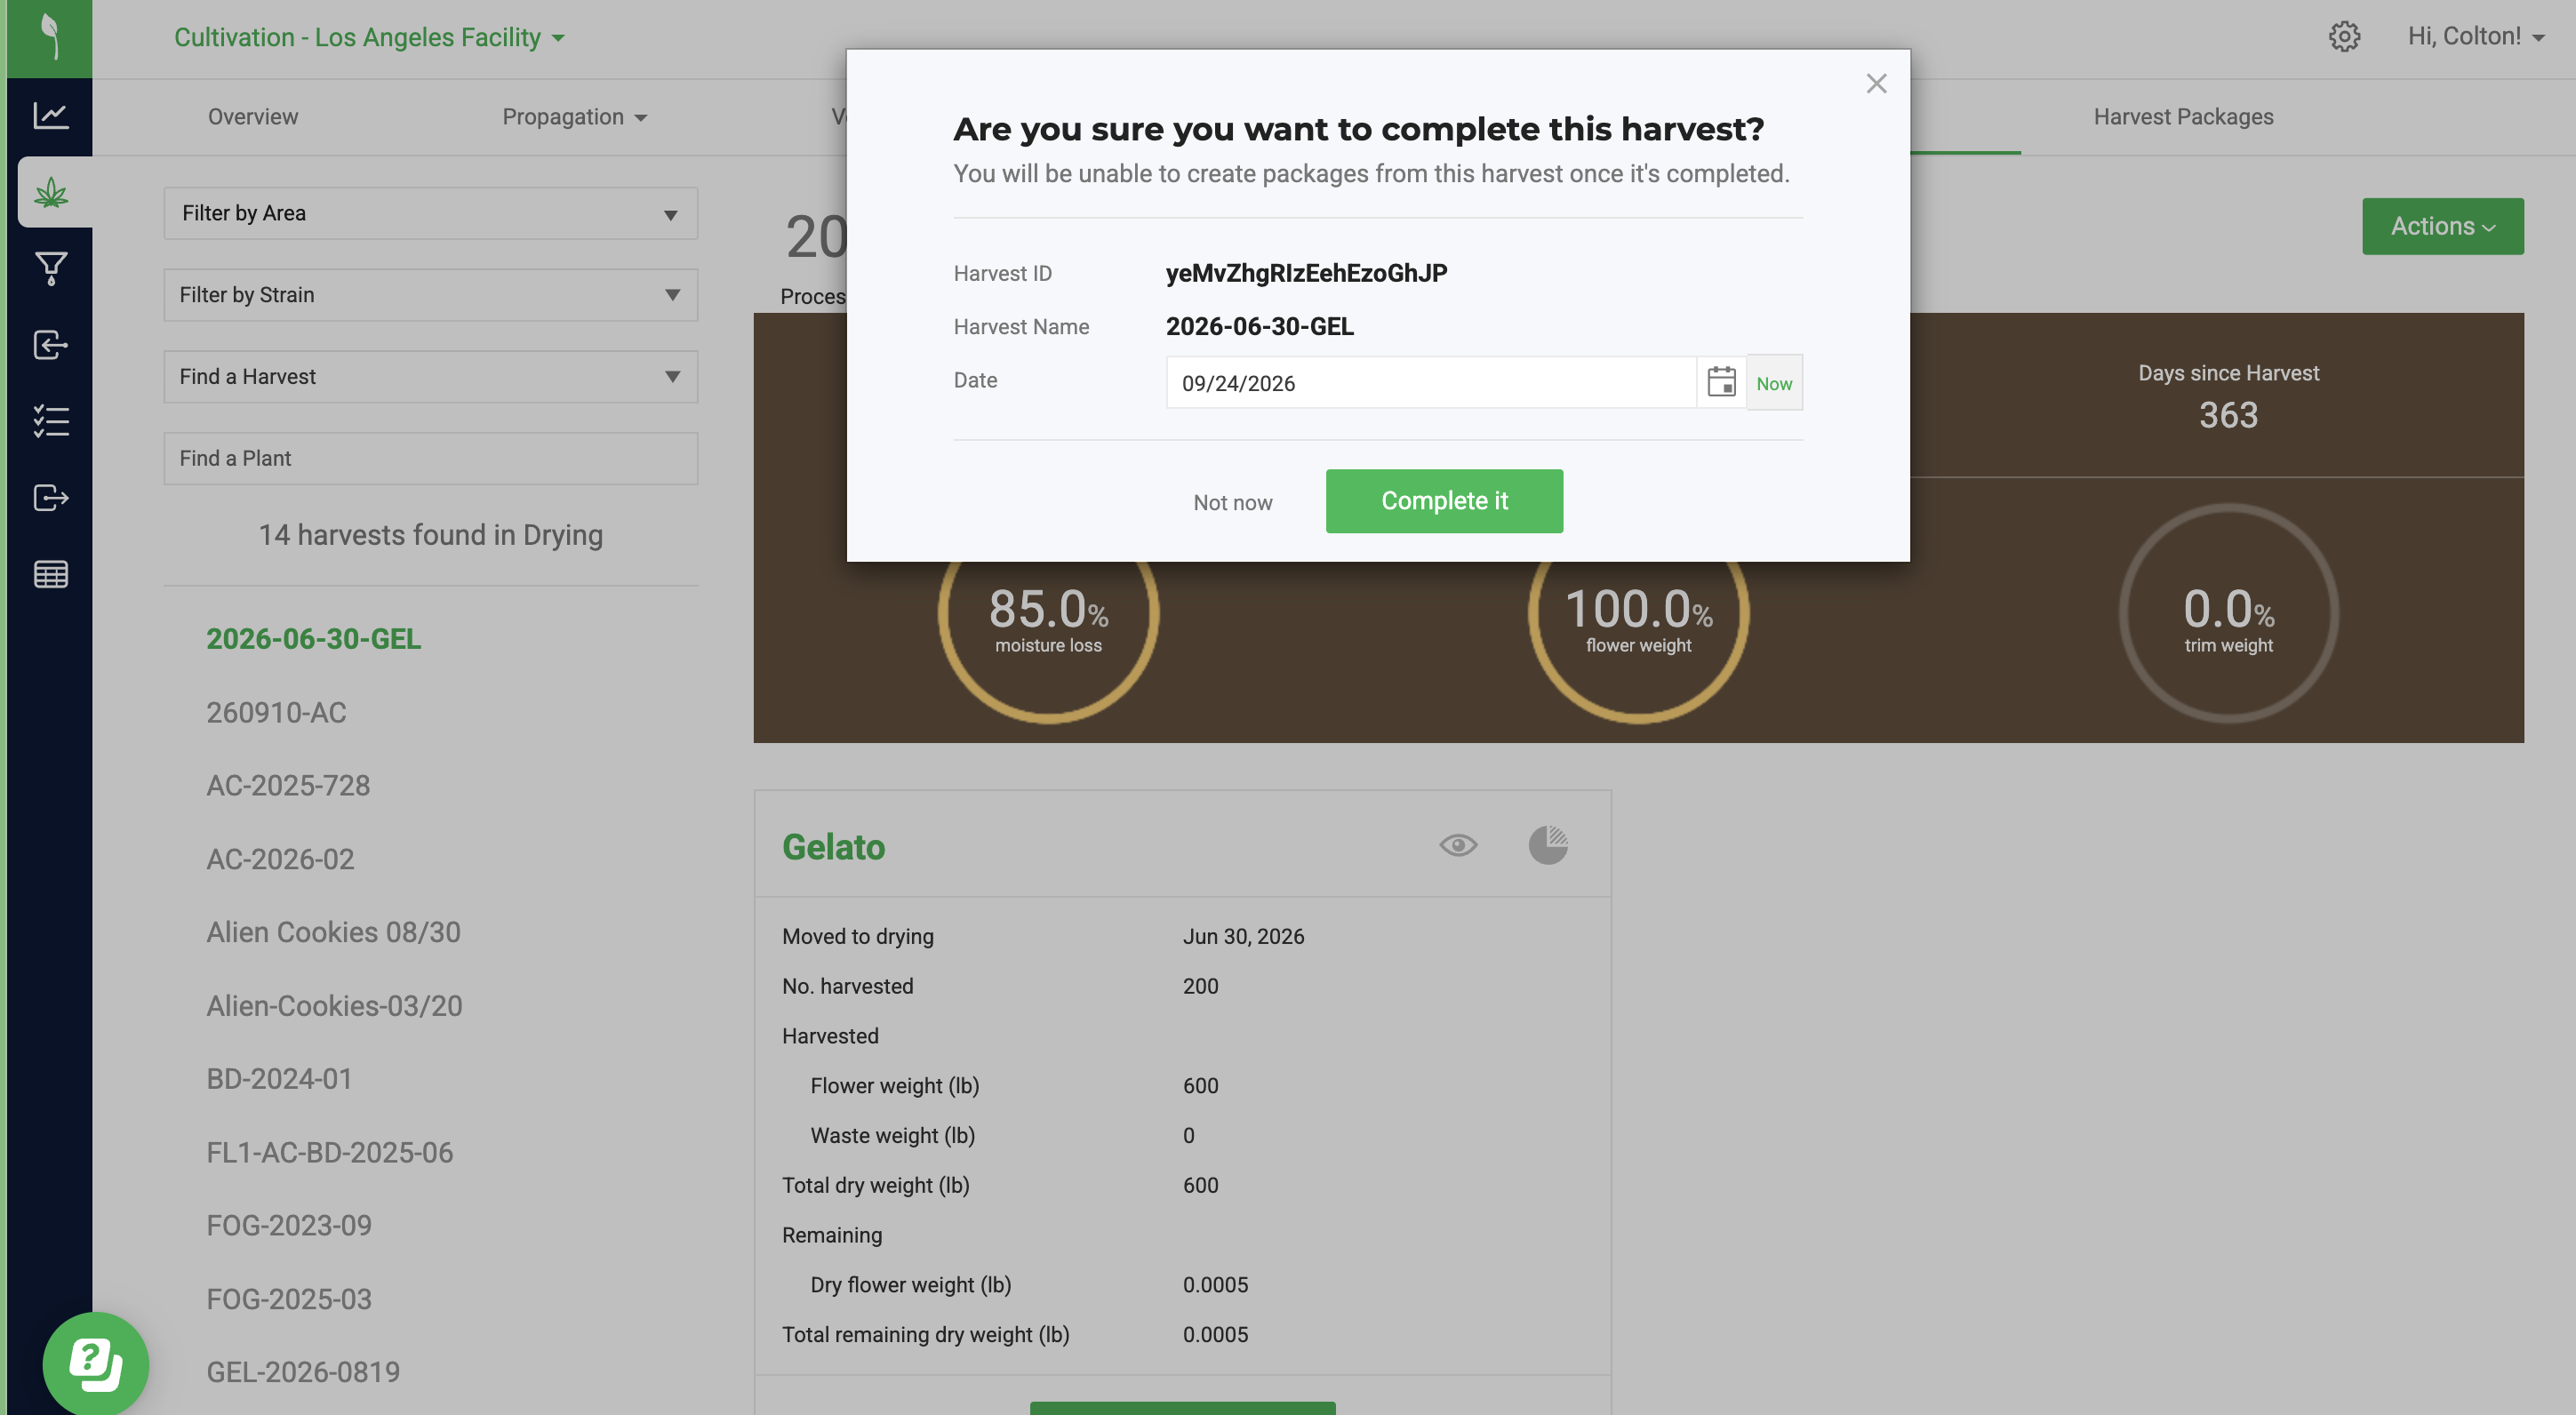
When you have finished packaging, click Actions and select Complete harvest. Confirm the date and click Complete it.
View the New Packages
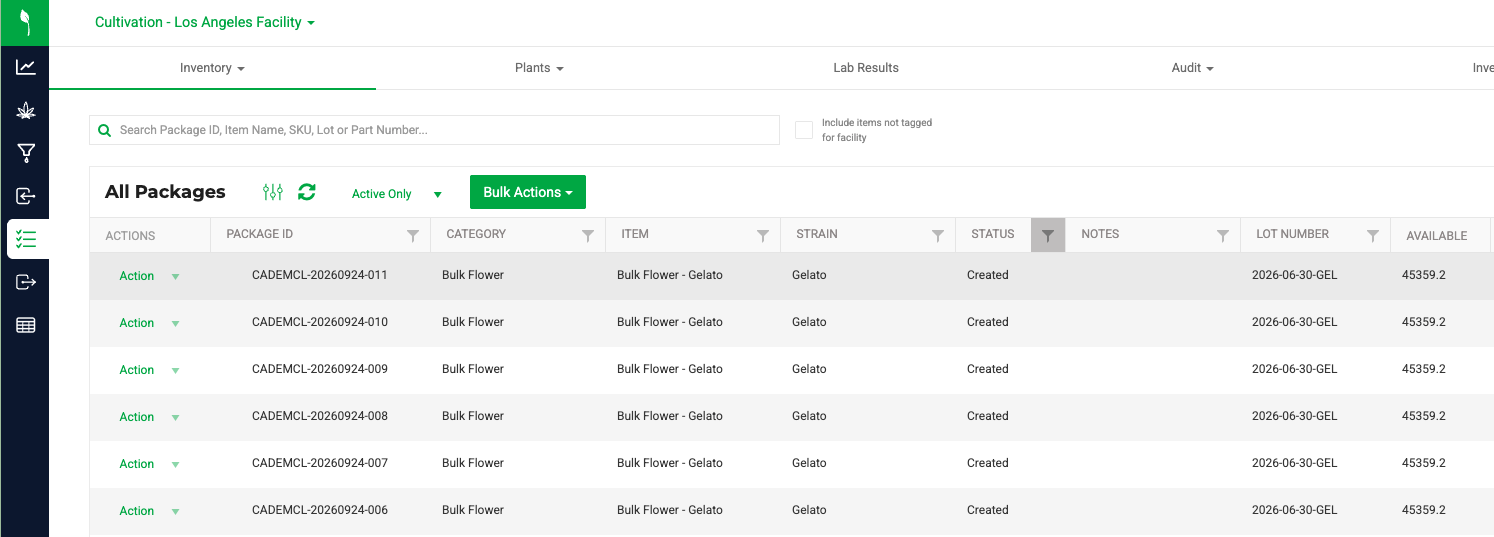
Select Inventory from the left navigation to view the packages you created.
How did we do?
Record Dry Weights
Move a Harvest Back from Drying to Harvest (Non-Metrc)
