Table of Contents
Creating Outbound Shipments and METRC Transfers
Learn how to create outbound shipments in Flourish, generate METRC transfers, and sync them back to keep your inventory compliant with cannabis tracking requirements.
After creating your outbound order, you'll need to add it to a shipment in Flourish, generate a transfer in METRC, then ship your shipment in Flourish. This is similar to the non-METRC workflow, but there are critical differences in the timing of each action to ensure that everything remains in sync with METRC.
Overview
Here are the general steps you take to create a shipment in Flourish, a MERC transfer based on shipment data, and send them both out. We will walk you through every step in detail below.
- Create the shipment in Flourish.
- Use the Transfer Template to create a transfer in METRC.
- Ship the transfer in METRC.
- Ship the shipment in Flourish.
- Sync transfers to Flourish from METRC.
State Requirements
Some states have specific requirements surrounding what can and cannot be added to a transfer. We've listed some of the essential requirements below, but always check your state's requirements to remain compliant.
Requirements by State (click to expand)
• CA does not support multi-stop transfers. You can only add one stop to your shipments.
Florida (FL)
• FL requires two drivers on your shipments.
Massachusetts (MA)
• MA requires two drivers on your shipments.
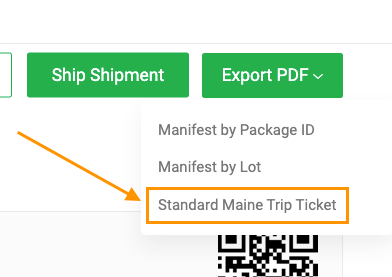
Maine (ME)
• ME requires to export the state-mandated "Standard Maine Trip Ticket" PDF.
Creating a Shipment
Before you can create your transfer in METRC, you'll need to add your orders to a shipment in Flourish.
- In Flourish, navigate to the Outbound module.
- Click Shipments, then click Create A Shipment.
- Select the following where applicable:
- Driver (click New Driver to create a new driver)
- Second Driver (FL and MA require a second driver
- Vehicle (click New Vehicle to create a new vehicle)
- Distributor
- Time of Departure
- Click the Start Shipment & Add Orders button.
- Click the Save Shipment button and return to it later or Add Orders/Stops.
Finding and Editing Your Shipments
Flourish makes it easy to locate a shipment if you've navigated away and need to edit or return to it.
- In Flourish, navigate to the Outbound module.
- Click Shipments > All Shipments.
- Use the filters and search bar to locate the shipment.
- Click the Shipment ID to edit the shipment.
Adding Orders/Stops
After you've created your shipment, you will need to add an order to it.
- Click the Add an Order/Stop button.
- Under Order #, select the sales order number from the dropdown.
- Select your Est. Arrival Time.
- Click the Save Shipment button and return to it later or Add Orders/Stops.
Printing Documents
After you've added your order to a shipment, you can print a manifest. When you print your shipment manifests, your shipment's status will update to Manifest Printed.
- Click Export PDF to print the shipping manifest.
- Select the kind of manifest you want to print.
- Manifest by Package ID
- Manifest by Lot
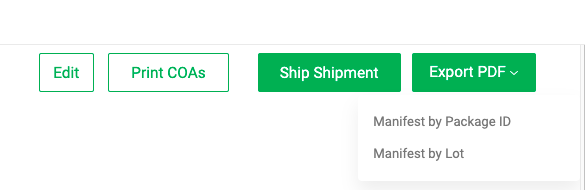
- Click Print COAs to print all of the COA PDFs uploaded to the packages on your order.
State Specific Documents
Maine
For Maine Clients, the state-mandated "Standard Maine Trip Ticket" is an option when exporting to PDF.
Creating a Transfer
Create a Transfer Template in METRC
After you've printed your documents, you can create your transfer in METRC.
Use the METRC Transfer Template feature first to create the transfer in METRC.
- In Flourish, locate and open your shipment.
- Click the Create Transfer button.
Create a Transfer From The Transfer Template in METRC
- In METRC, click Transfers and select Templates from the dropdown.
- Click Use to convert the template to a transfer.
- Verify all the details are correct, then click Register.
Shipping a Shipment
After you've created your transfer in METRC, you can ship your shipment in Flourish. When you ship a shipment, the packages will transition from Allocated to Shipped status and be removed from your active inventory.
- In Flourish, locate and open your shipment.
- Look over the details. If everything looks correct, click the Ship Shipment button.
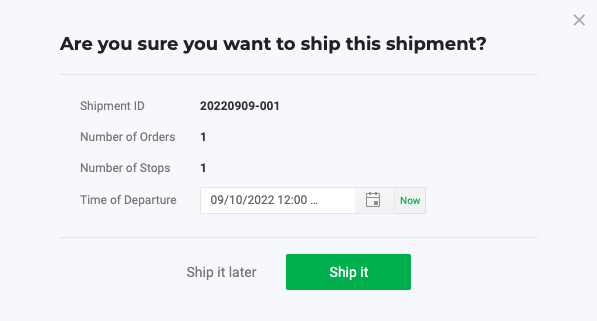
- Click Ship it to confirm.
- If you're not ready yet, click Ship it Later.
Syncing Transfers from METRC
The final step is to sync your transfer from METRC. This will bring all of the transfer information from METRC into Flourish.

- In Flourish, navigate to Outbound > Transfers.
- Click the
 button (it will turn green when you hover over it).
How did we do?
Metrc - Create a Transfer Template