Table of Contents
- Flourish WooCommerce Wholesale Portal Overview
- Prerequisites
- How it works
- Activating your Flourish Wholesale Portal
Flourish WooCommerce Wholesale Configuration Guide
Admin guide to setting up Flourish's WooCommerce integration for wholesale clients
- Flourish WooCommerce Wholesale Portal Overview
- Prerequisites
- How it works
- Activating your Flourish Wholesale Portal
Flourish WooCommerce Wholesale Portal Overview
The Flourish Wholesale Portal uses our Flourish WooCommerce Plugin to provide cultivators, brands, and manufacturing operators with a personalized, supply-chain integrated B2B e-commerce experience. Easily hosted by Flourish, yourself, or through a partner Agency, WooCommerce + WordPress allows operators to own their data, experience, and workflows to support your B2B channel with a low cost of ownership.
Key benefits include:
- The Flourish Wholesale Portal expands your B2B selling, branding, and customer experience.
- Real-time sales menu always updated with accurate information
- Offer a seamless, personalized sales experience for your customers
- Simple, efficient, and straightforward fulfillment process
Prerequisites
- WordPress site is created and WooCommerce is installed. Key plugins are installed. Follow instructions on setting up your site here.
- Flourish instance is created, and data is ready to sync.
How it works
The basics
The platforms connect on several data points. Here are the defined data objects and terms:
Flourish | WooCommerce Term |
Items | Products |
Inventory | If this is enabled on the plugin, inventory levels for products update in WooCommerce in real time. |
Destinations | Customers |
Orders | Orders created in WooCommerce sync to Flourish. Flourish updates WooCommerce during fulfillment. |
Data Flow
Flourish Data Sent to WooCommerce.
Flourish | Direction | WooCommerce |
Create or update an item in Flourish. When you toggle 'ON" the "e-commerce active" flag for an active item with a brand, price, and cost defined, it sends it to WooCommerce. |  | Creates/updates the product in WooCommerce |
Item's sellable quantity changes. |  | Updates the available quantity in WooCommerce. |
Order Status update to Shipped or Cancelled status. |  | Updates the order's status in WooCommerce |
WooCommerce Data Sent to Flourish
WooCommerce | Direction | Flourish |
A new order is created in WooCommerce. |  | The order is created in Flourish. |
Activating your Flourish Wholesale Portal
Here are the steps to set up and activate your Flourish WooCommerce Integration, enabling direct order fulfillment from your website within Flourish.
Flourish WooCommerce Plugin Setup
The site uses Flourish's API to exchange data. Generate a API username and key and add them to the plugin to establish this connection. It's recommended to set up a service account for this purpose (a user just for the purpose of generating a key).
Generate and Apply your Flourish Username and External API Key
- Generate your Username and External API Key from Flourish by following these instructions: Generate or Create New External API key.
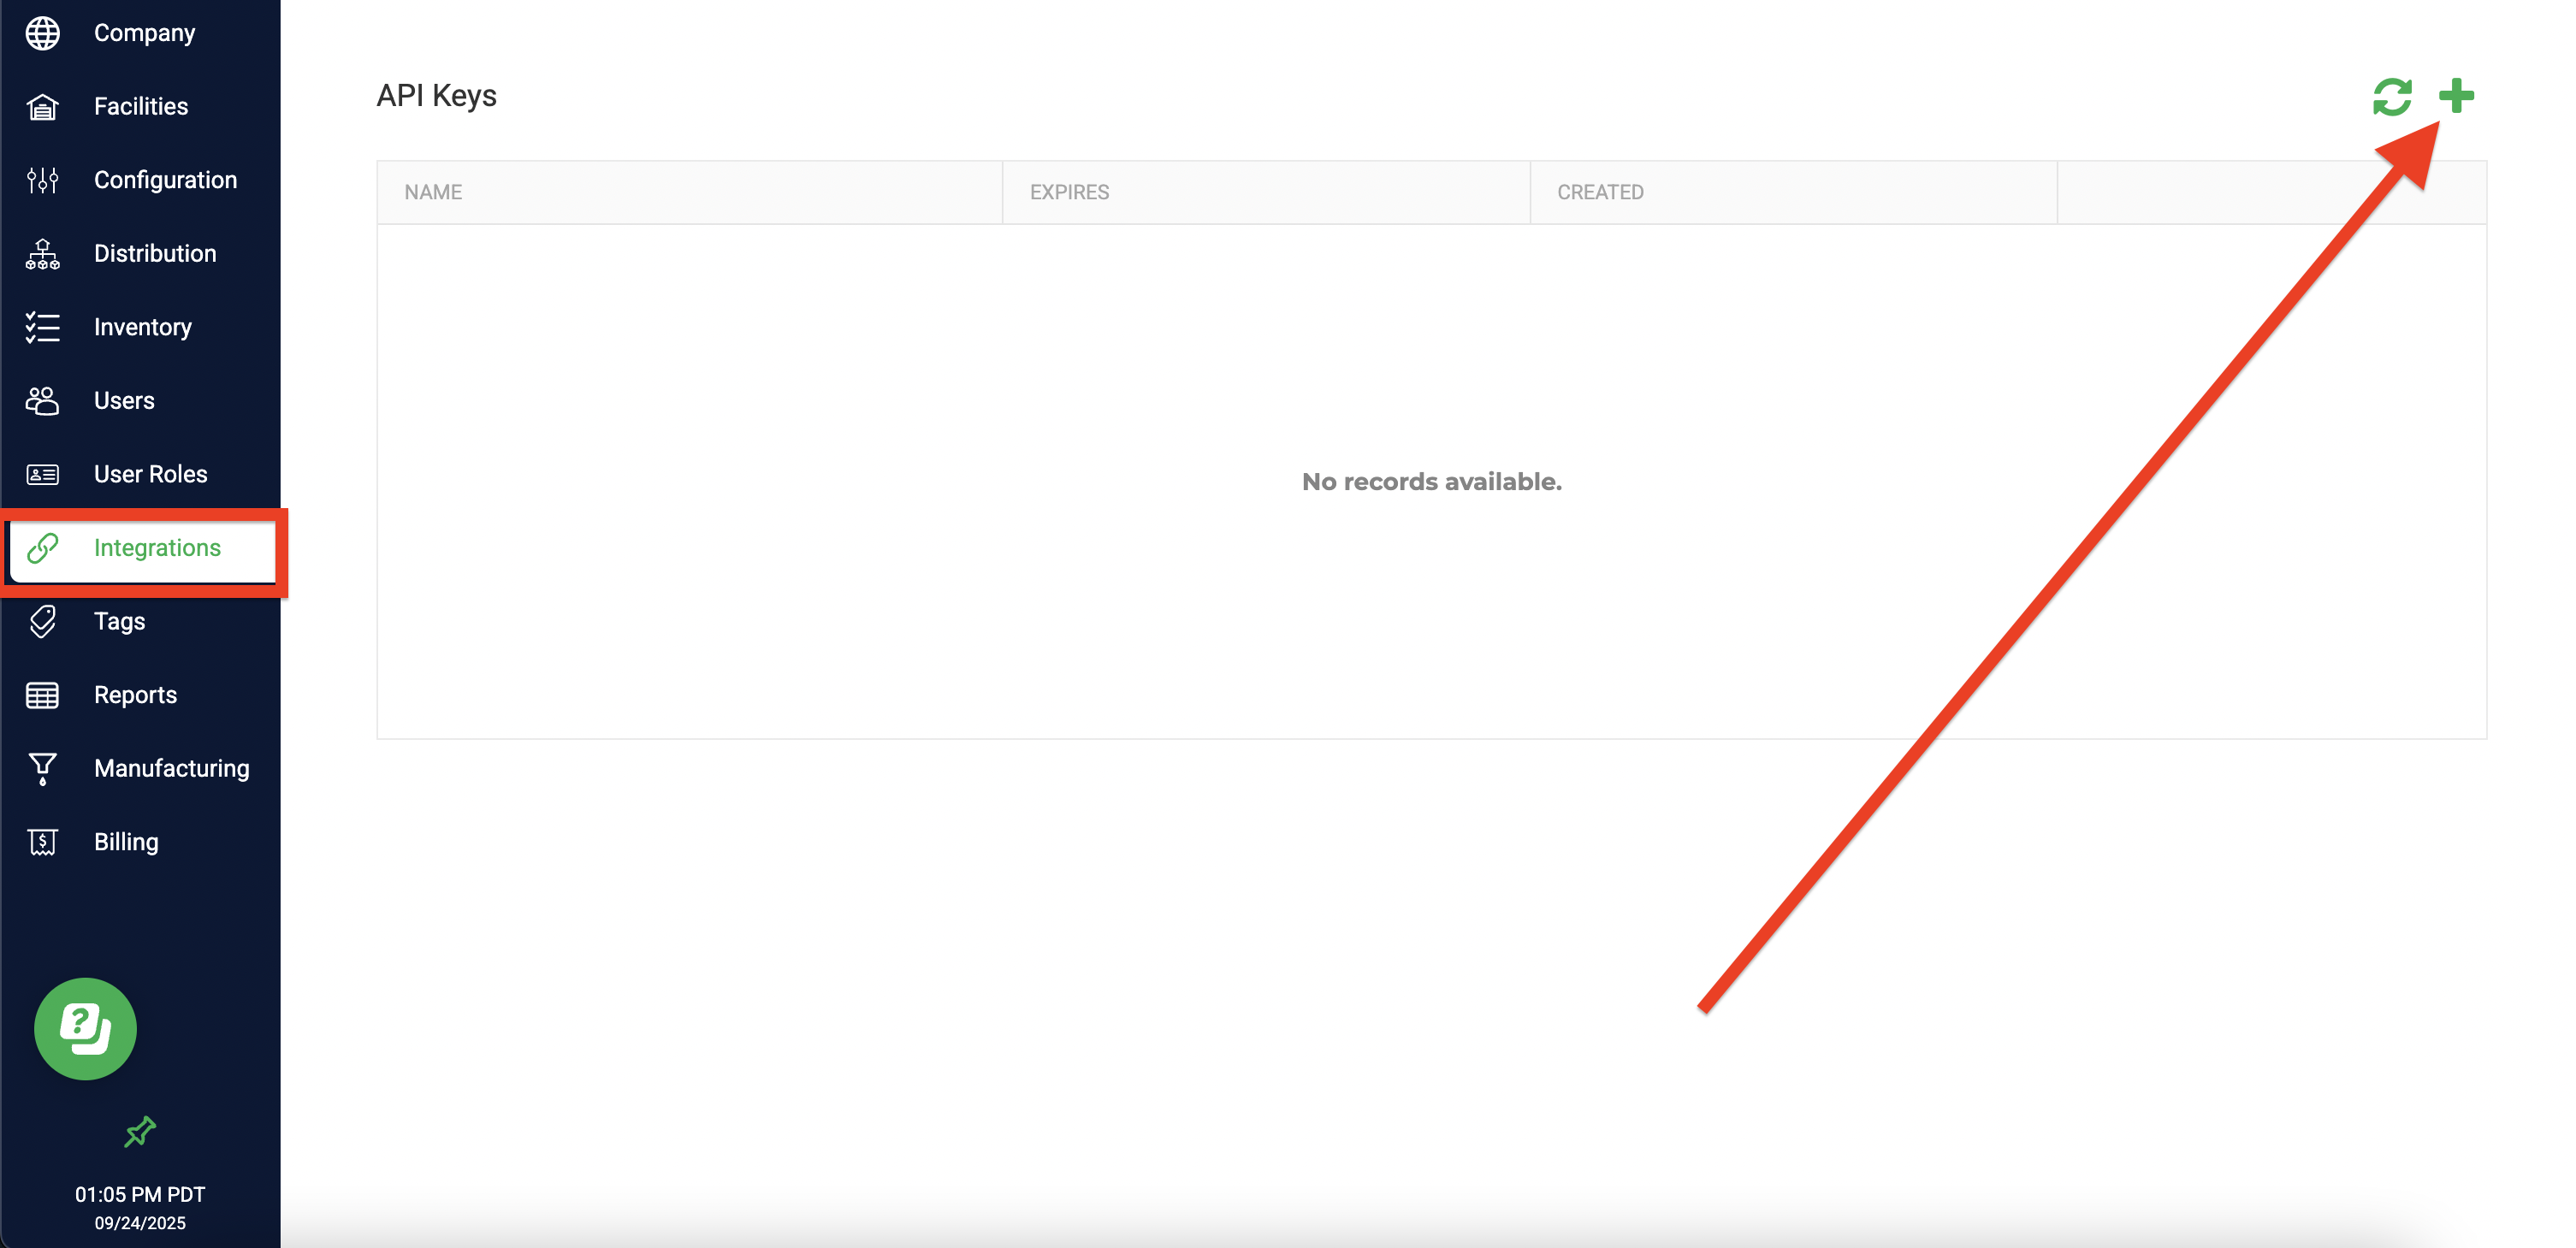
- Name the Key and Allow full permissions

- Go back to the Flourish Plugin settings and Copy and Paste the Username and External API Key you just generated.
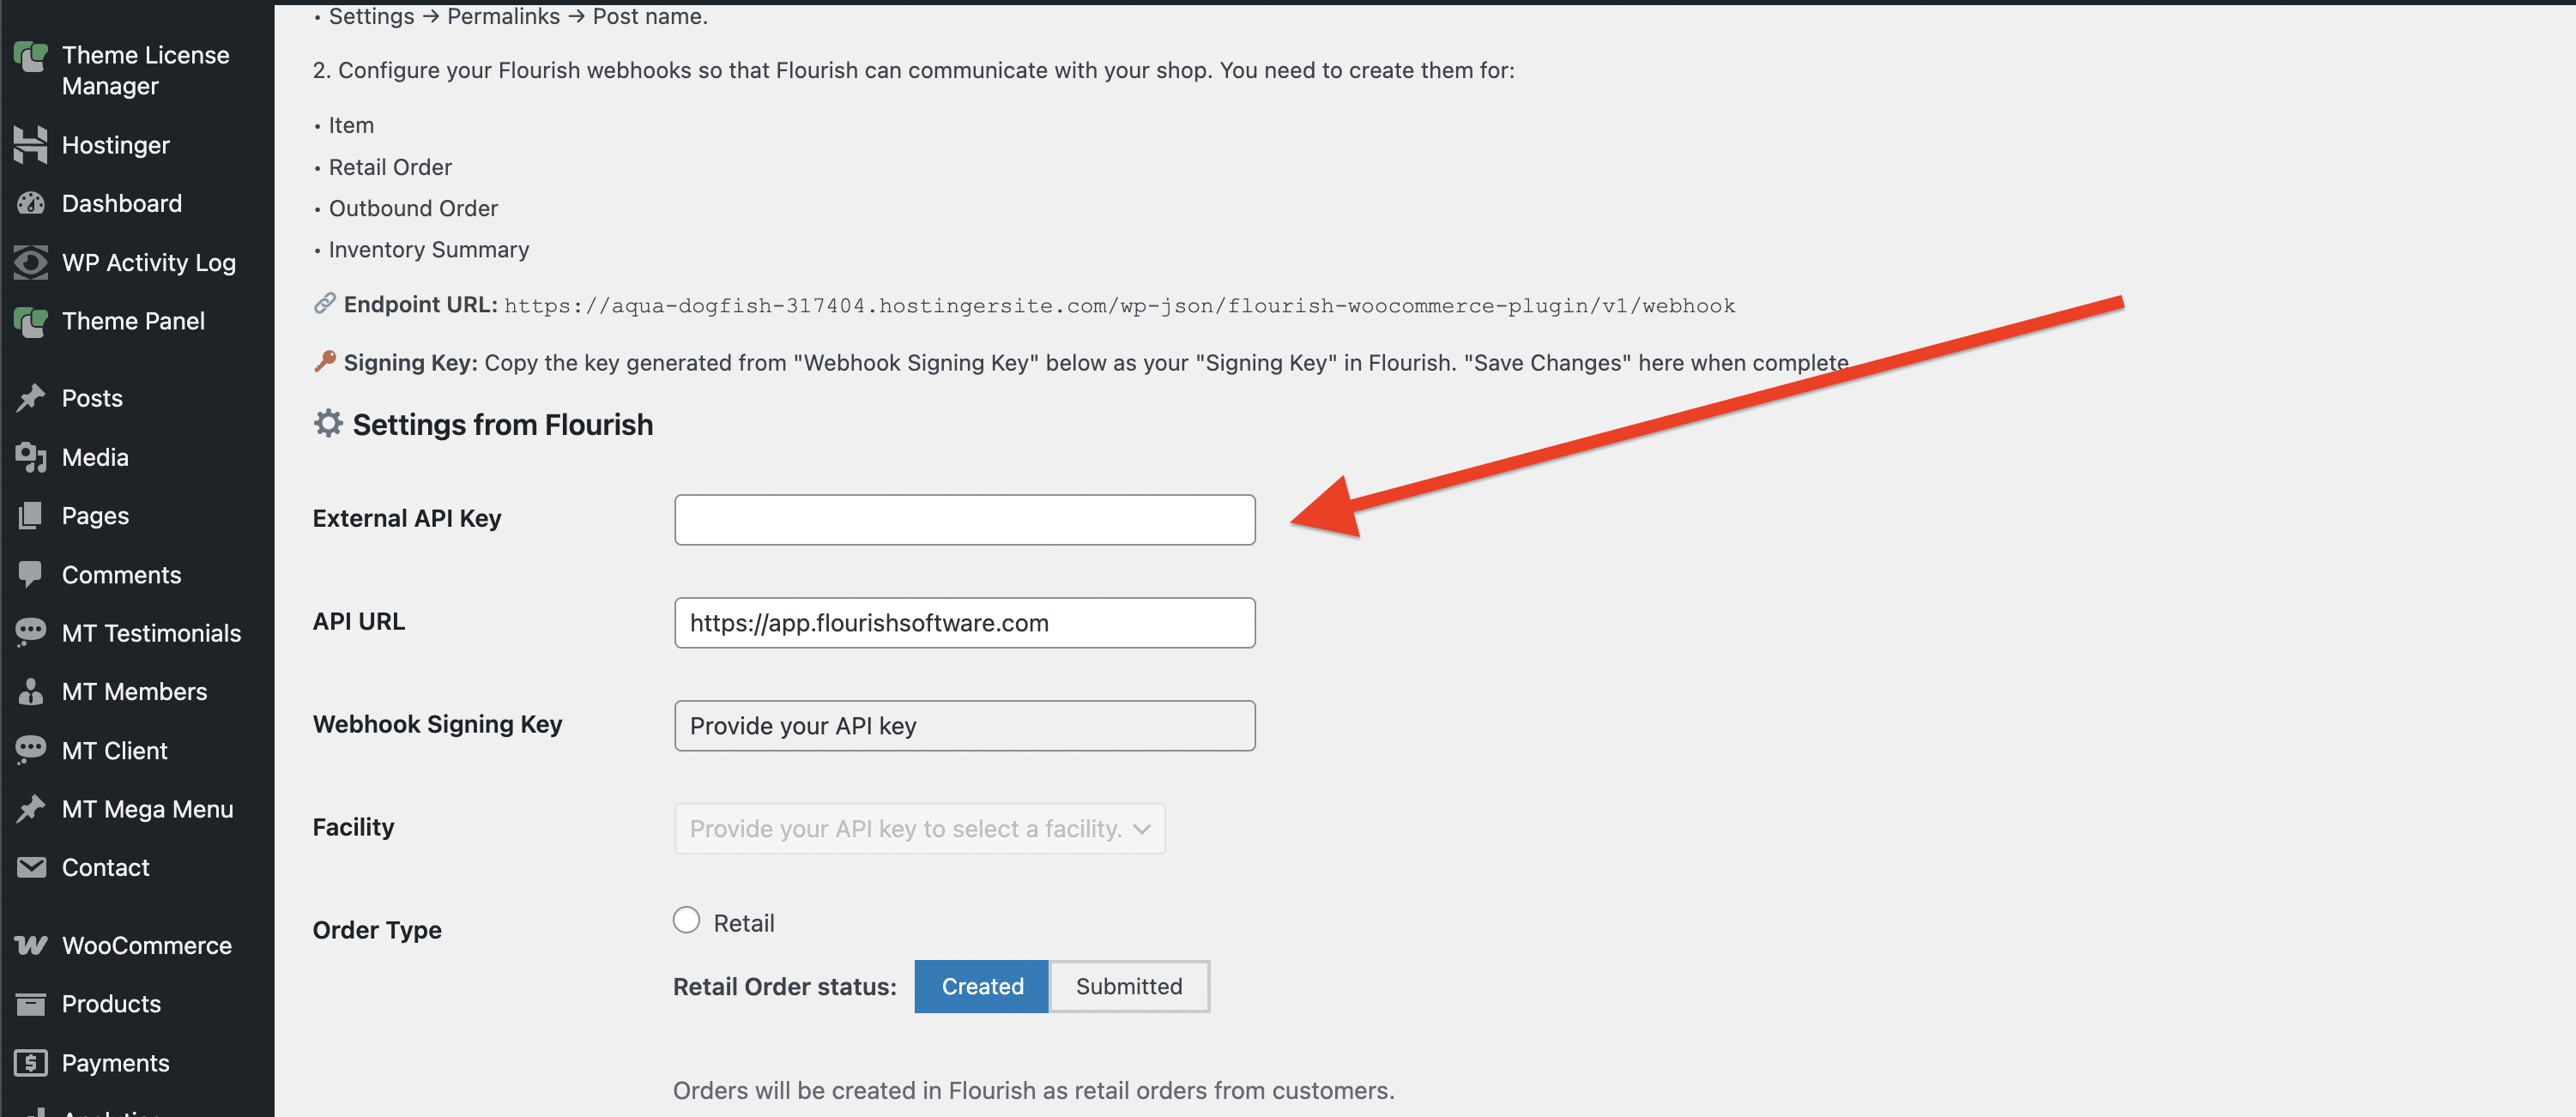
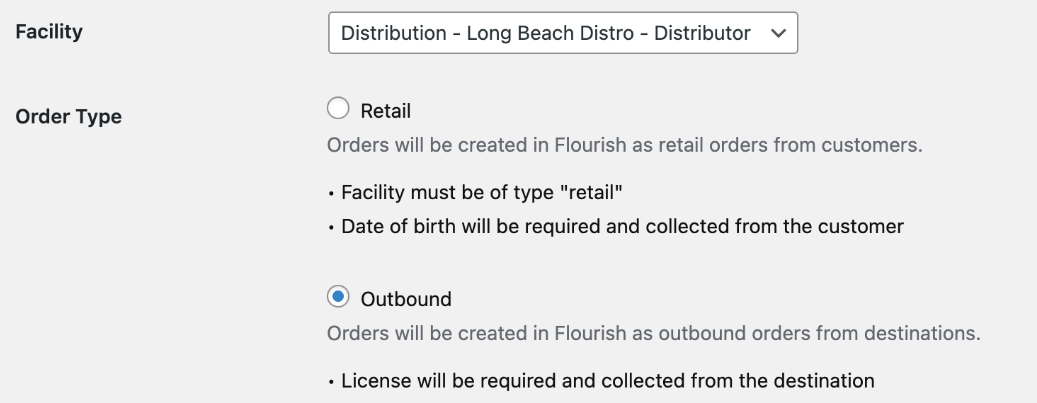
- Select the Facility you want all incoming orders populated into and by which Order Type
- Select the Order Type “Outbound” for wholesale/B2B customers.
- Select the Order Type " Retail" for retail customers.
Configure and Enable Webhooks for both WordPress and Flourish
Webhooks are automated messages sent when an action/trigger happens. They have a message and are sent to a unique URL. Outlined below is how you will configure Webhooks in both WordPress and Flourish.
Configure the Webhooks in WordPress
Go into your WordPress ADMIN so that your Webhook endpoints are available by using "Post name" permalinks.
- Go to Settings
- Click Permalinks
- Select Post name
- Click Save
Enable the Webhooks in Flourish
- Enable Webhooks from Flourish by following these instructions: How to enable Webhooks in Flourish.
- You need to create them for:
- Item
- Retail Order
- Outbound Order
- Inventory Summary
- You need to create them for:
- Paste the key generated "Signing Key" that you save when configuring the Webhooks in WordPress
- Click Save
Security for Webhooks (click to expand)
Match the Data Points & Configuration
Items in Flourish map to Products in WooCommerce by the SKU.
- Customers in WooCommerce map to Destinations in Flourish by the License Number. Flourish allows Destinations to have the same name but different license numbers when syncing incoming Orders from WooCommerce.
- Brands match between the two systems by name.
Items/Products
Flourish is the point of truth for all item and inventory information. That means items and inventory created in Flourish sync to WooCommerce automatically. You can choose to sync item info, inventory levels, or both.
- Items are created in Flourish first. WooCommerce will "listen" to Flourish's Item webhook for new items to list on the website.
- The integration will use the SKU field (Flourish's unique identifier) for synchronization.
The following data elements for items flow from Flourish to WooCommerce, so ensure all are accurate in Flourish. To learn more about creating/updating items in Flourish, click here.
- Category
- Item Name
- SKU (Required)
- Price
- Description
- Brand (Required if a brand filter is used)
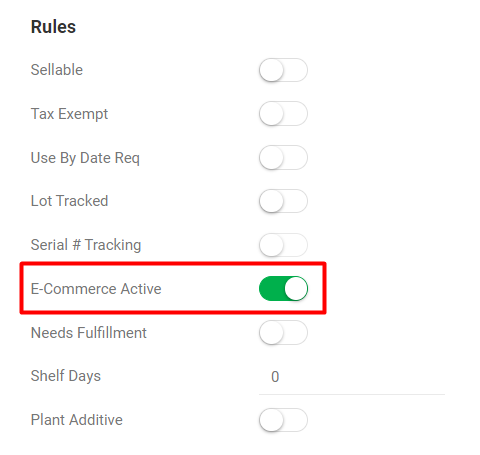
Only "E-Commerce Active" items will sync to WooCommerce. To enable to the item to sync to WooCommerce when the integration is turned on, go into Flourish Software and find the item to enable "E-commerce Active"
- Go to Settings > Inventory.
- Find the item and click Edit.
- Toggle ON the E-Commerce Active rule.
For Existing WooCommerce Users
Skip this section if you aren't already using WooCommerce to display your inventory.
To avoid Flourish creating duplicates in WooCommerce, the SKU between the two systems needs to match. Update the SKU in WooCommerce by following the instructions below:
- Go to Inventory.
- Find and click the item you want to update the SKU for, then click Edit.
- Add the SKU for the parent item and click Save.
Enable Item Attribute Mapping and Filtering
In the Flourish plugin setup is to choose the item attributes that will flow from Flourish to WooCommerce and also filter the brands you want to sync between the two systems.
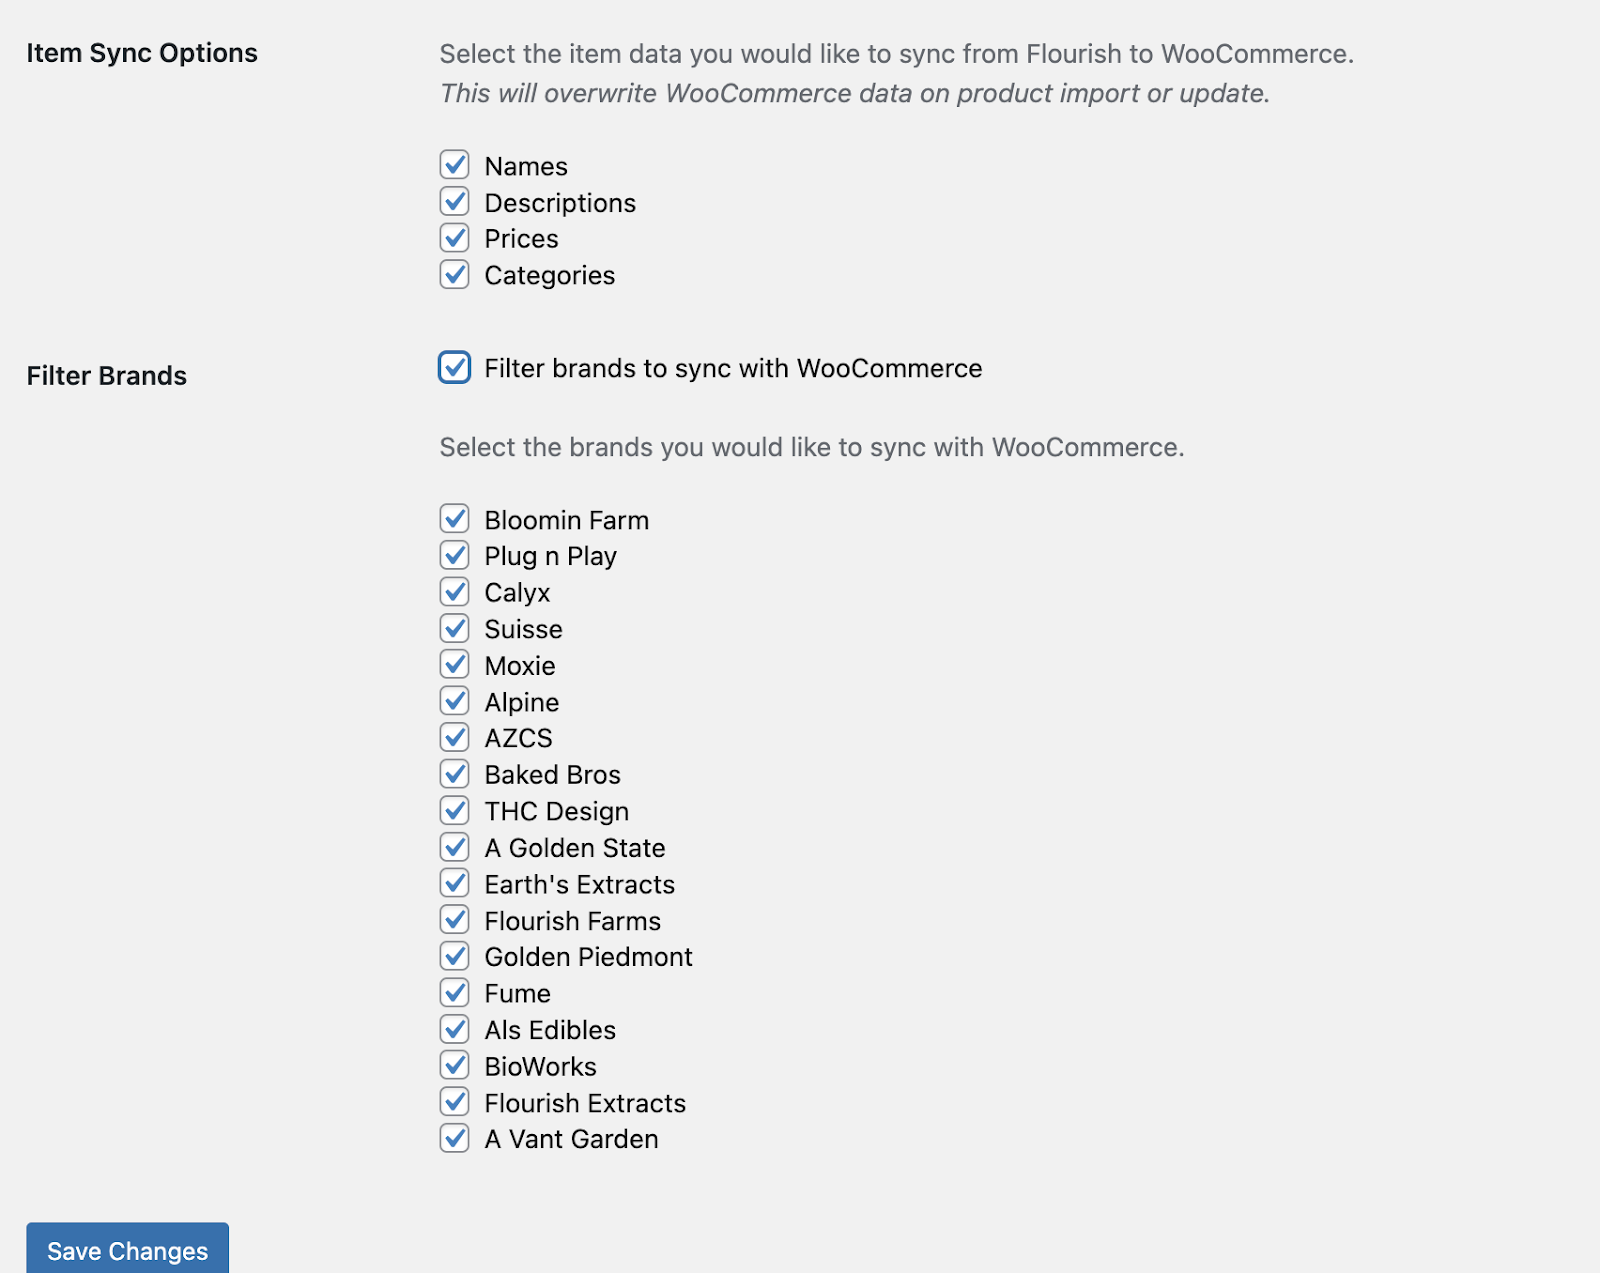
Once you are done, make sure to click Save Changes
Categories Import Automatically
The Flourish plugin creates categories automatically from the Item Category field in Flourish.
In the Admin Panel, navigate to WooCommerce > Categories to manage these:
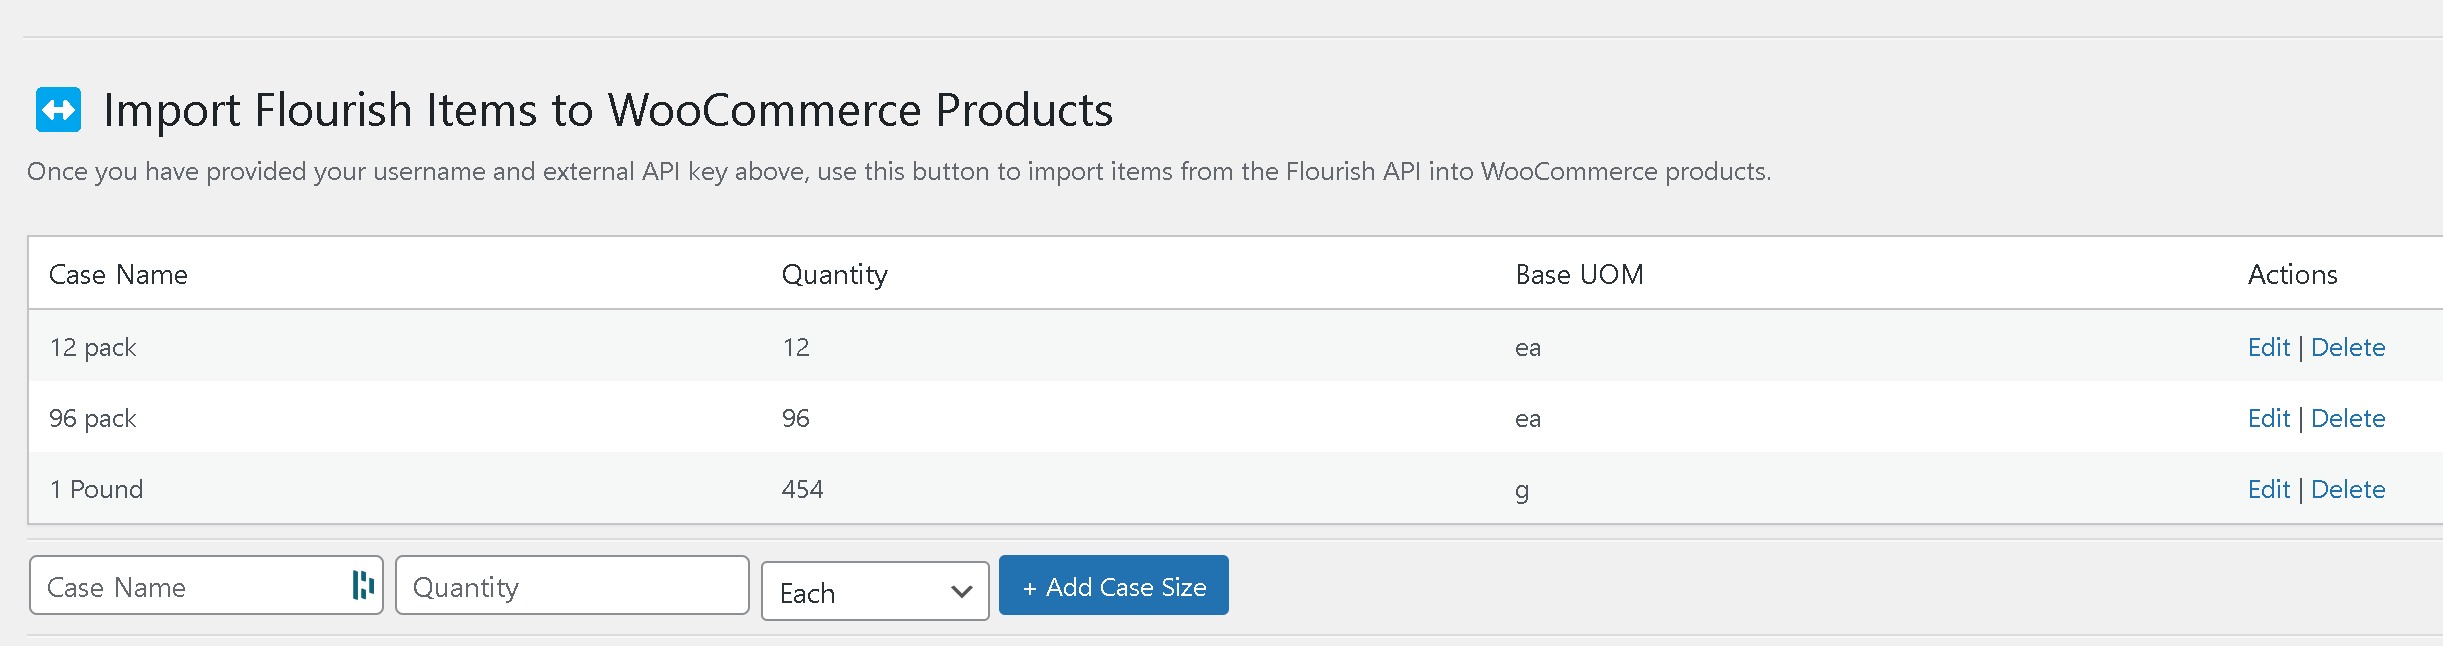
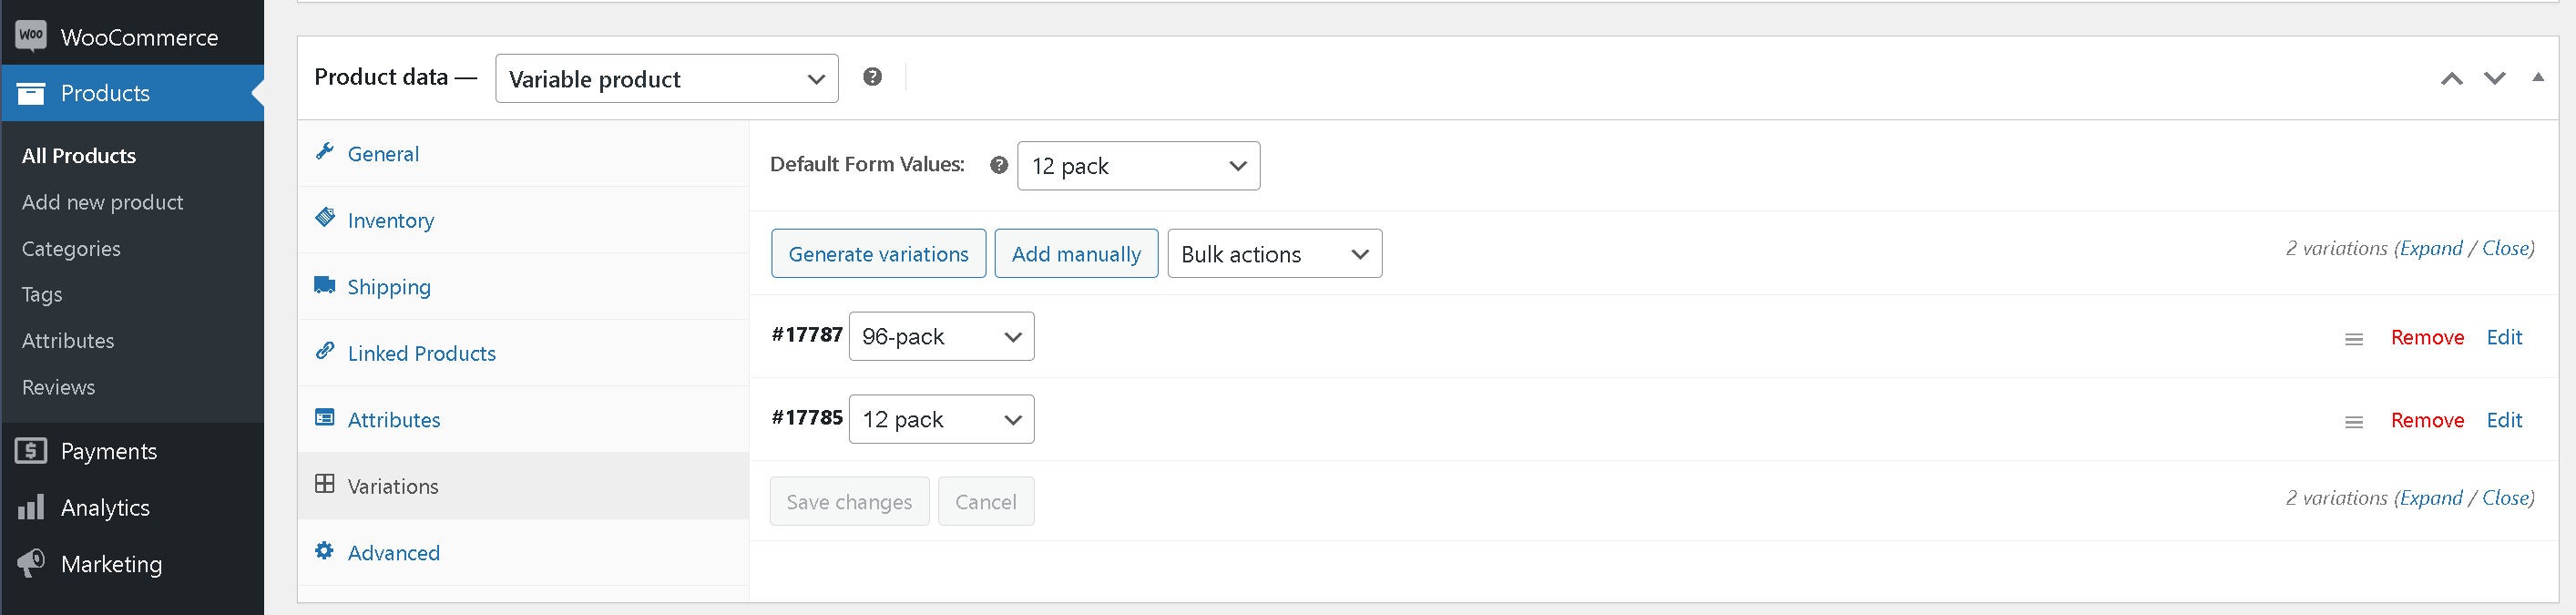
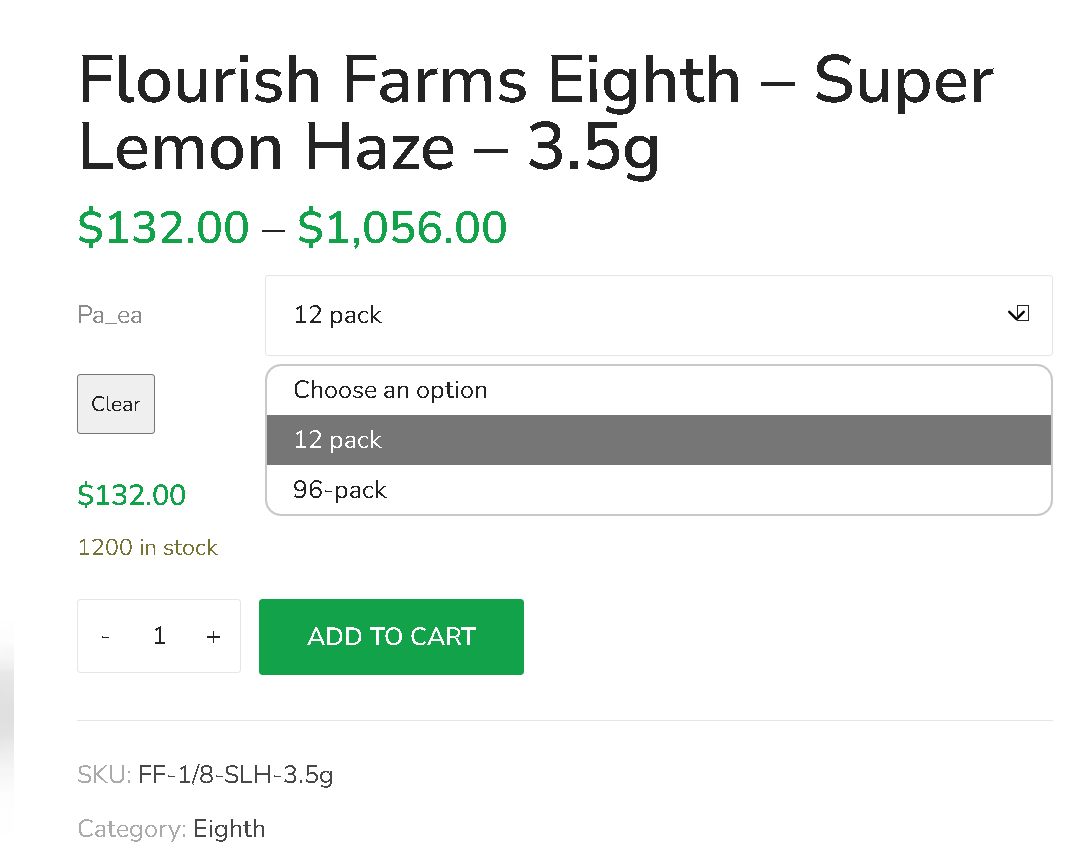
Case Size
Navigate to the Flourish Plugin to configure case sizes. Once set, items will be default configured as a variable item with a variation per case size. Manage the case sizes on an item by item basis within the item configuration screen.
- We push the order quantity to Flourish in the unit of measure defined on the item multiplied by the case size. Example: 12 pack pushes 12 Eaches to the order line for an order of 1 pack of 12.
- Case sizes will be available on all items. Delete the ones that aren't needed within the item configuration
- Edit and delete as needed. Please use these with care, especially if you have a lot of items listed.
Plugin Screen:
Item Configuration:
Example on how this is displayed in the store:
WooCommerce Product Listing State
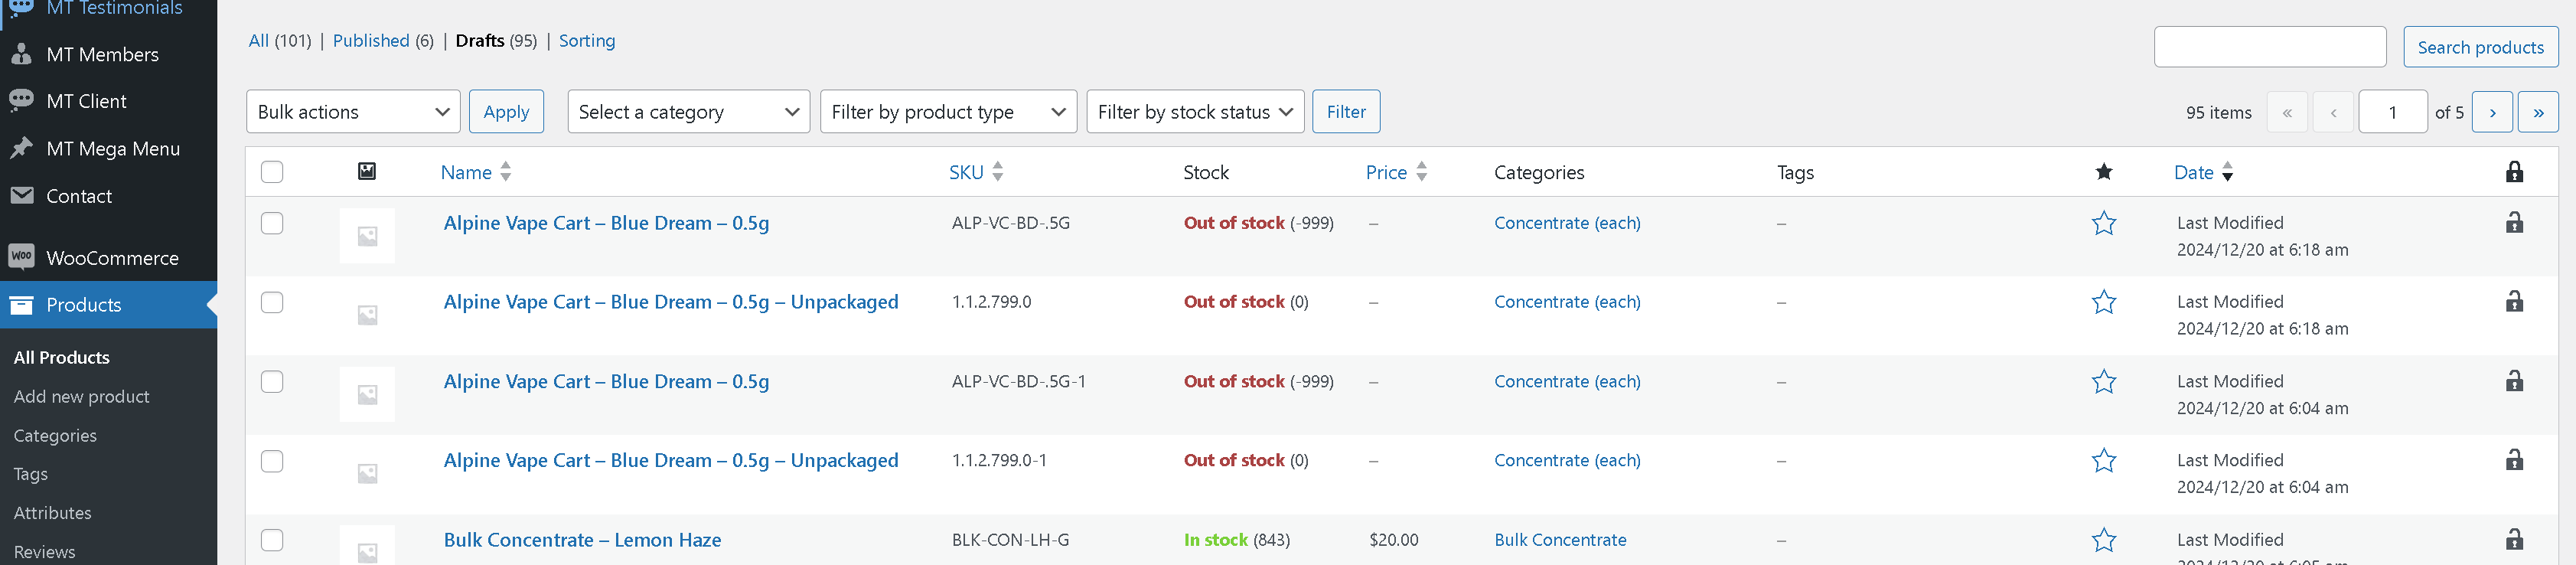
Items created in Flourish and synced to WooCommerce are created in WooCommerce with the "Draft" listing state. This allows you to update images, descriptions, review prices, etc. prior to listing inventory for sale.
Navigate to WooCommerce > Products > Drafts to see the unlisted items.
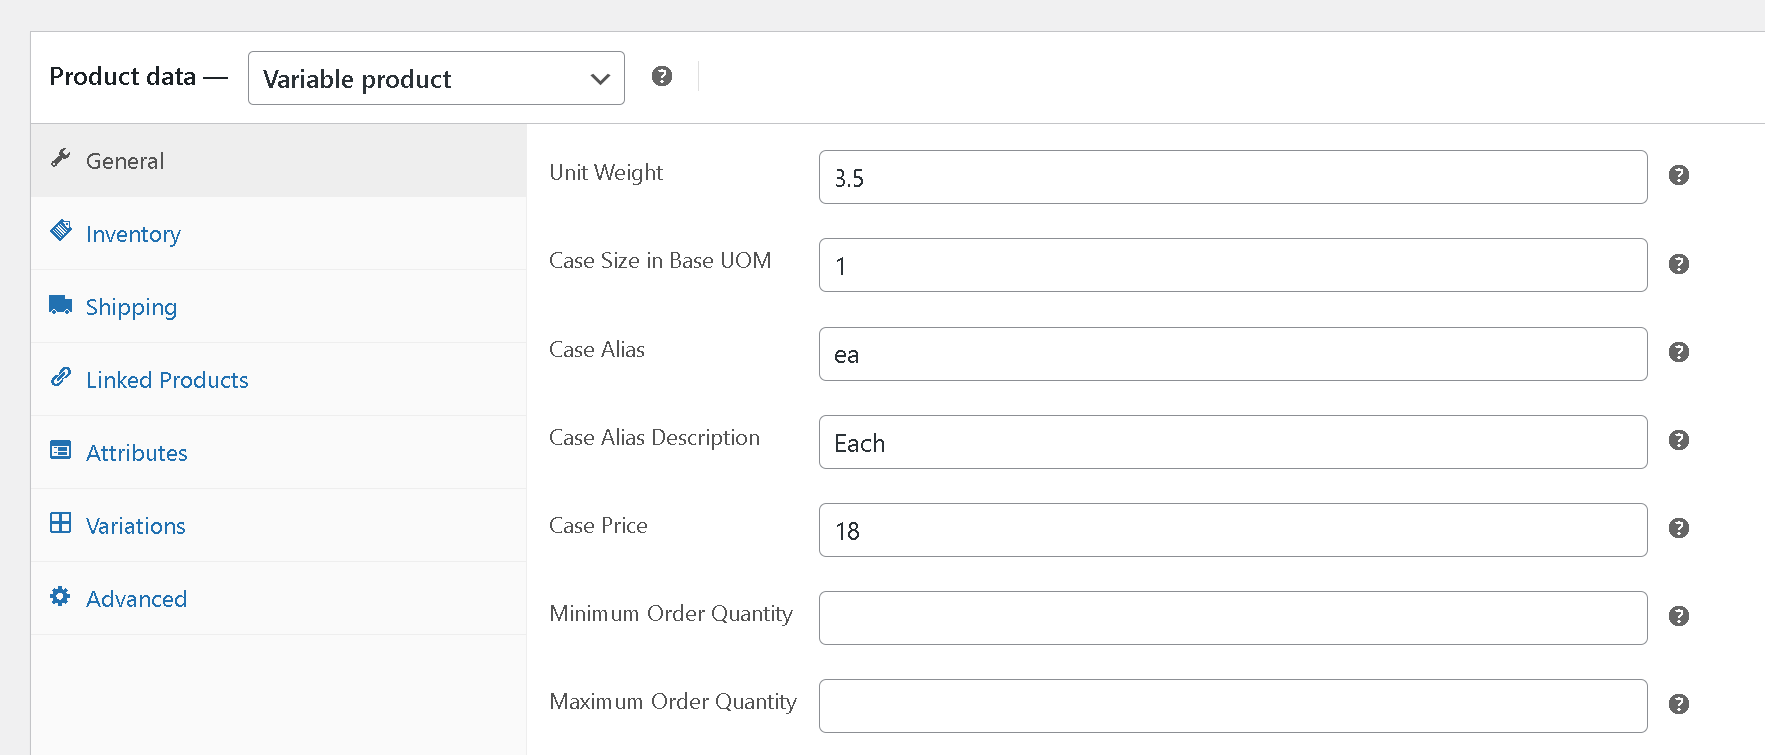
Min/Max Order Quantities
Navigate to the item screen to set minimum and maximum order values. If configured by case, these are the case counts. If left blank, there is no minimum or max.
Navigate to WooCommerce > Products > Select an item and click Edit to set the configuration.
- Leave blank to set no min or max
- The quantity is number of cases, if case sizes are defined. Otherwise, it is number of units.
Item Import
Navigate to the Flourish Plugin and click "Import Products" to import items into WooCommerce. Please stay on the page until this process completes. You can manually run this import again at any time.

To confirm if all items have been synced. Follow these steps:
- Go to Products
- Click All Products
You will also see the “In Stock” number against each item. This will always match the “Sellable” number in Flourish.
Add any additional attributes that you want for items like pictures, notes, etc., directly in WooCommerce.
Inventory
The WooCommerce Plugin listens to Flourish's webhooks. The sellable field in Flourish maps to WooCommerce. WooCommerce accounts for what's on order for orders in Draft status and in carts to help prevent overselling.

Destinations & Buyers
- B2B Customers in WooCommerce map to Destinations in Flourish. Set up Destinations in Flourish to make them available to the WooCommerce site.
- Navigate to the Users settings
- Add a New User
- Select Customer from the options
- Fill in the required information and save
Associate a Destination for a Customer
Add one or more Destinations to the buyer's profile. These correspond to the configured Flourish destinations. If the customer can buy on behalf of all destinations (e.g. an internal sales rep), select "All Destinations Assigned." The cutstomer/buyer will select a destination at check-out. This setting controls what is available to pick from.

Configure Cart Time Outs
Use this setting to set carts to expire after a certain amount of time. This ensures inventory frees back up to be ordered by other buyers.
Navigate to WooCommerce > Settings > Products > Inventory
Hold Stock (minutes): Sets the time to expire an order if not approved. You'll likely leave this blank or set this for 25, 48, 0r 72 hours to give time to approve orders. Leave blank for unlimited.
Stock Reservation Time in the cart (minutes): This setting expires carts if a buyer doesn't complete the order within the specified minutes. Leave blank for unlimited.

Order Workflow
Both platforms update each other through the lifecycle of an order.
Flourish does not update WooCommerce with newly added or updated order line information. Unless otherwise noted, Flourish only updates the Status of orders in WooCommerce. If you want to add or change an order line to your order, make the changes in WooCommerce, and when you save the order within WooCommerce, the changes will sync to Flourish as long as the order isn't partially allocated, allocated, shipped, or cancelled.
WooCommerce updates Flourish
WooCommerce Order Status | Trigger | Flourish Order Status |
Draft Orders are created in Draft status for review prior to sending them to Flourish. |  | N/A |
Processing: Update the order in WooCommerce to Processing to submit the order to Flourish. | | Created |
Canceled: If you cancel the order in WooCommerce, it will cancel the order in Flourish. | | Canceled |
Flourish updates WooCommerce
Flourish Order Status | Direction | WooCommerce Order Status |
Canceled | | Canceled |
Partially Allocated | | N/A |
Allocated | | N/A |
Shipped | | Completed |
Order Payment terms
(Coming Soon)
For payment terms that are supported in WooCommerce, see below. When you set the payment term for an outbound order (linked to a WooCommerce order) in Flourish and save, Flourish updates the WooCommerce order with the payment term.
|
|
|
Some more payment terms are internal to WooCommerce and are not supported.
Explanation on Preventing Overselling
Here's the general flow:
- Real-time Stock Updates
- Flourish sends the 'Sellable' quantity to WooCommerce via webhooks
- This quantity automatically becomes your WooCommerce stock level
- When Flourish detects any change (sales, allocations, etc.), it sends an updated quantity
In Flourish, the 'Sellable' quantity represents inventory that is:
- Physically available in your facility
- Not already allocated to existing orders
- Not reserved for other purposes
- May include locked packages IF they're configured to 'Allow allocation to outbound order' (not standard)
- WooCommerce Logic
- When a customer adds items to their cart, WooCommerce temporarily holds that quantity
- We've configured cart expiration to release held stock if the purchase isn't completed
- This prevents "ghost" holds from blocking actual sales
- Your cart expiration time is set to whatever time you desire in minutes
- For example: If you have 10 items in stock and a customer puts 4 in their cart:
- Available stock temporarily shows as 6
- If they don't complete checkout within the cart expiration time
- The 4 items are released back to available stock (back to 10)
- For example: If you have 10 items in stock and a customer puts 4 in their cart:
- Order Processing
- When an order is placed in WooCommerce, that quantity is immediately unavailable to other customers
- WooCommerce handles stock reduction at the database level with proper locking. This prevents a scenario where two orders could both successfully check out with more stock than available.
- Overselling Prevention
- WooCommerce won't allow purchases beyond the current stock level
- If stock reaches zero, the product automatically shows as 'Out of Stock'
- The frequent webhook updates from Flourish ensure your WooCommerce stock levels stay accurate if something changes outside of the normal ordering process
Hide from Search Engines
To hide the wholesale menu and site from search engines follow these steps.
- First, in the WordPress Settings:
- Go to Settings → Reading
- Check the box that says "Discourage search engines from indexing this site"
- Next, create or edit your robots.txt file in the site's root directory. You may need to create this file using FTP access, the File Manager in your hosting control panel, or SSH if you have command line access.
User-agent: *
Disallow: /
- Finally, add a meta robots tag to the functions.php file
- Go to WordPress admin
- Navigate to Appearance → Theme File Editor
- Look for functions.php in the right sidebar
- Add this code at the bottom:
function add_noindex_tags_subdomain() {
    echo '<meta name="robots" content="noindex,nofollow">';
}
add_action('wp_head', 'add_noindex_tags_subdomain');
Managing Multi-Accounts and Sub-Accounts in WooCommerce
Please watch this video:
Admin Guide to Site Branding
Refer to our WooCommerce Wholesale Store Branding and Client Experience Guide
Shopper's Guide to Using the Site
How did we do?
WordPress and WooCommerce Setup Guide for Cannabis Retail
Manage WooCommerce Wholesale Store Branding with Flourish